Hello! Welcome to the next lesson in our journey to build your autonomous content creation agent.
In our last two lessons, we successfully built publishers for LinkedIn and X (Twitter). You've mastered two very different authentication flows and now have agentic nodes capable of posting professional articles and concise tweets.
Today, we confront our most complex integration yet: Instagram. Our learning outcome is to authenticate and post content via the Instagram Graph API. Instagram's visual-first nature and its API's unique architecture present a new set of challenges and requirements. Unlike the relatively straightforward "post" calls to X, Instagram uses a multi-step process that demands a more robust implementation.
Let's dive in.
1. The Instagram Graph API Model: Containers and Public URLs
The most significant difference you'll encounter with the Instagram Graph API is that you don't just "post" an image. The process involves two distinct stages:
- Containerization: You first upload your media (image or video) to a temporary holding area called a media container. This is an asynchronous process where Instagram's servers fetch and validate your media. In response, the API gives you a
container_id. - Publishing: Once the container is ready, you make a second API call to publish it using the
container_id. This is the step that makes the content live on your Instagram profile.
This two-step model has a critical implication: your media must be hosted on a publicly accessible server. Instagram's servers use cURL to fetch the image or video from a URL you provide. You cannot upload a local file directly. Given your background in designing scalable systems, you'll recognize this as a common pattern for handling large file uploads and background processing.
Automate Every Instagram Post Type (Reels, Stories, Carousels) with n8n + Official API
The video 'Automate Every Instagram Post Type' provides an excellent, concise explanation of this two-step process. Although the demonstration uses the n8n automation tool, the underlying API concepts are identical to what we'll implement in code.
Watch the short segment from 08:14 to 08:49. The narrator clearly explains the containerization and publishing flow, which is the foundational concept for this entire lesson.
Before we start, it's also important to be aware of some key limitations of the API:
- Formats: JPEG is the only supported image format. PNGs are not accepted.
- Rate Limits: You are generally limited to 100 API-published posts per 24-hour period.
- Account Type: The API works only with Instagram Business or Creator accounts, not personal accounts.
2. The Authentication Gauntlet: Setting Up Your App and Tokens
This is the most involved setup process of all the platforms. It requires configuration across your Instagram account, a Facebook Page, and the Meta Developer Portal. Follow these steps carefully.
Prerequisites:
- Ensure your Instagram account is a Business Account. (You can switch this in your Instagram app settings: Settings and privacy > Account type and tools > Switch to professional account).
- You must have a Facebook Page that you can link to your Instagram Business Account.
- Go to your Facebook Page's settings, find the "Linked Accounts" section, and ensure your Instagram account is connected.
The video below gives a complete, visual walkthrough of the entire process on the Meta Developer Portal. While the video uses the n8n tool at the end, the initial 8 minutes are a perfect guide for getting the credentials we need.
Automate Every Instagram Post Type (Reels, Stories, Carousels) with n8n + Official API
We will now walk through the process of creating a Meta Developer App, configuring permissions, and generating the necessary long-lived access token. The 'Automate Every Instagram Post Type' video provides a step-by-step demonstration.
Follow the video from 00:43 to 08:14. I've broken down the key actions below. Pause the video as needed to complete each step on your own screen. Create a Meta Developer App (01:13): Go to developers.facebook.com, create a new app of type 'Business'. Add the Instagram Graph API Product (02:00): From your app's dashboard, add the 'Instagram Graph API' product. This is the crucial step to enable Instagram functionalities. Add an Instagram Tester (03:20): Navigate to Roles > Roles and add your own Instagram username as an 'Instagram Tester'. Accept the Tester Invite (04:13): Log in to your Instagram account on a web browser, go to Settings > Apps and websites > Tester invites, and accept the invitation from your new app. Generate a Long-Lived Access Token (05:25): This is the most critical part. The video demonstrates the 'Facebook Login' method, which is the reliable one. Go to the Graph API Explorer tool in the developer portal. Select your app. Under 'Permissions', add all instagram_* and pages_* related permissions. The video shows all 10 needed at 06:17. Click 'Generate Access Token' and log in with Facebook, making sure to grant access to the Facebook Page linked to your Instagram account. You now have a short-lived (1-hour) token. Go to the Access Token Debugger tool, paste your token, and click 'Extend Access Token'. This will generate a long-lived (2-month) token. This is the token you must save securely.
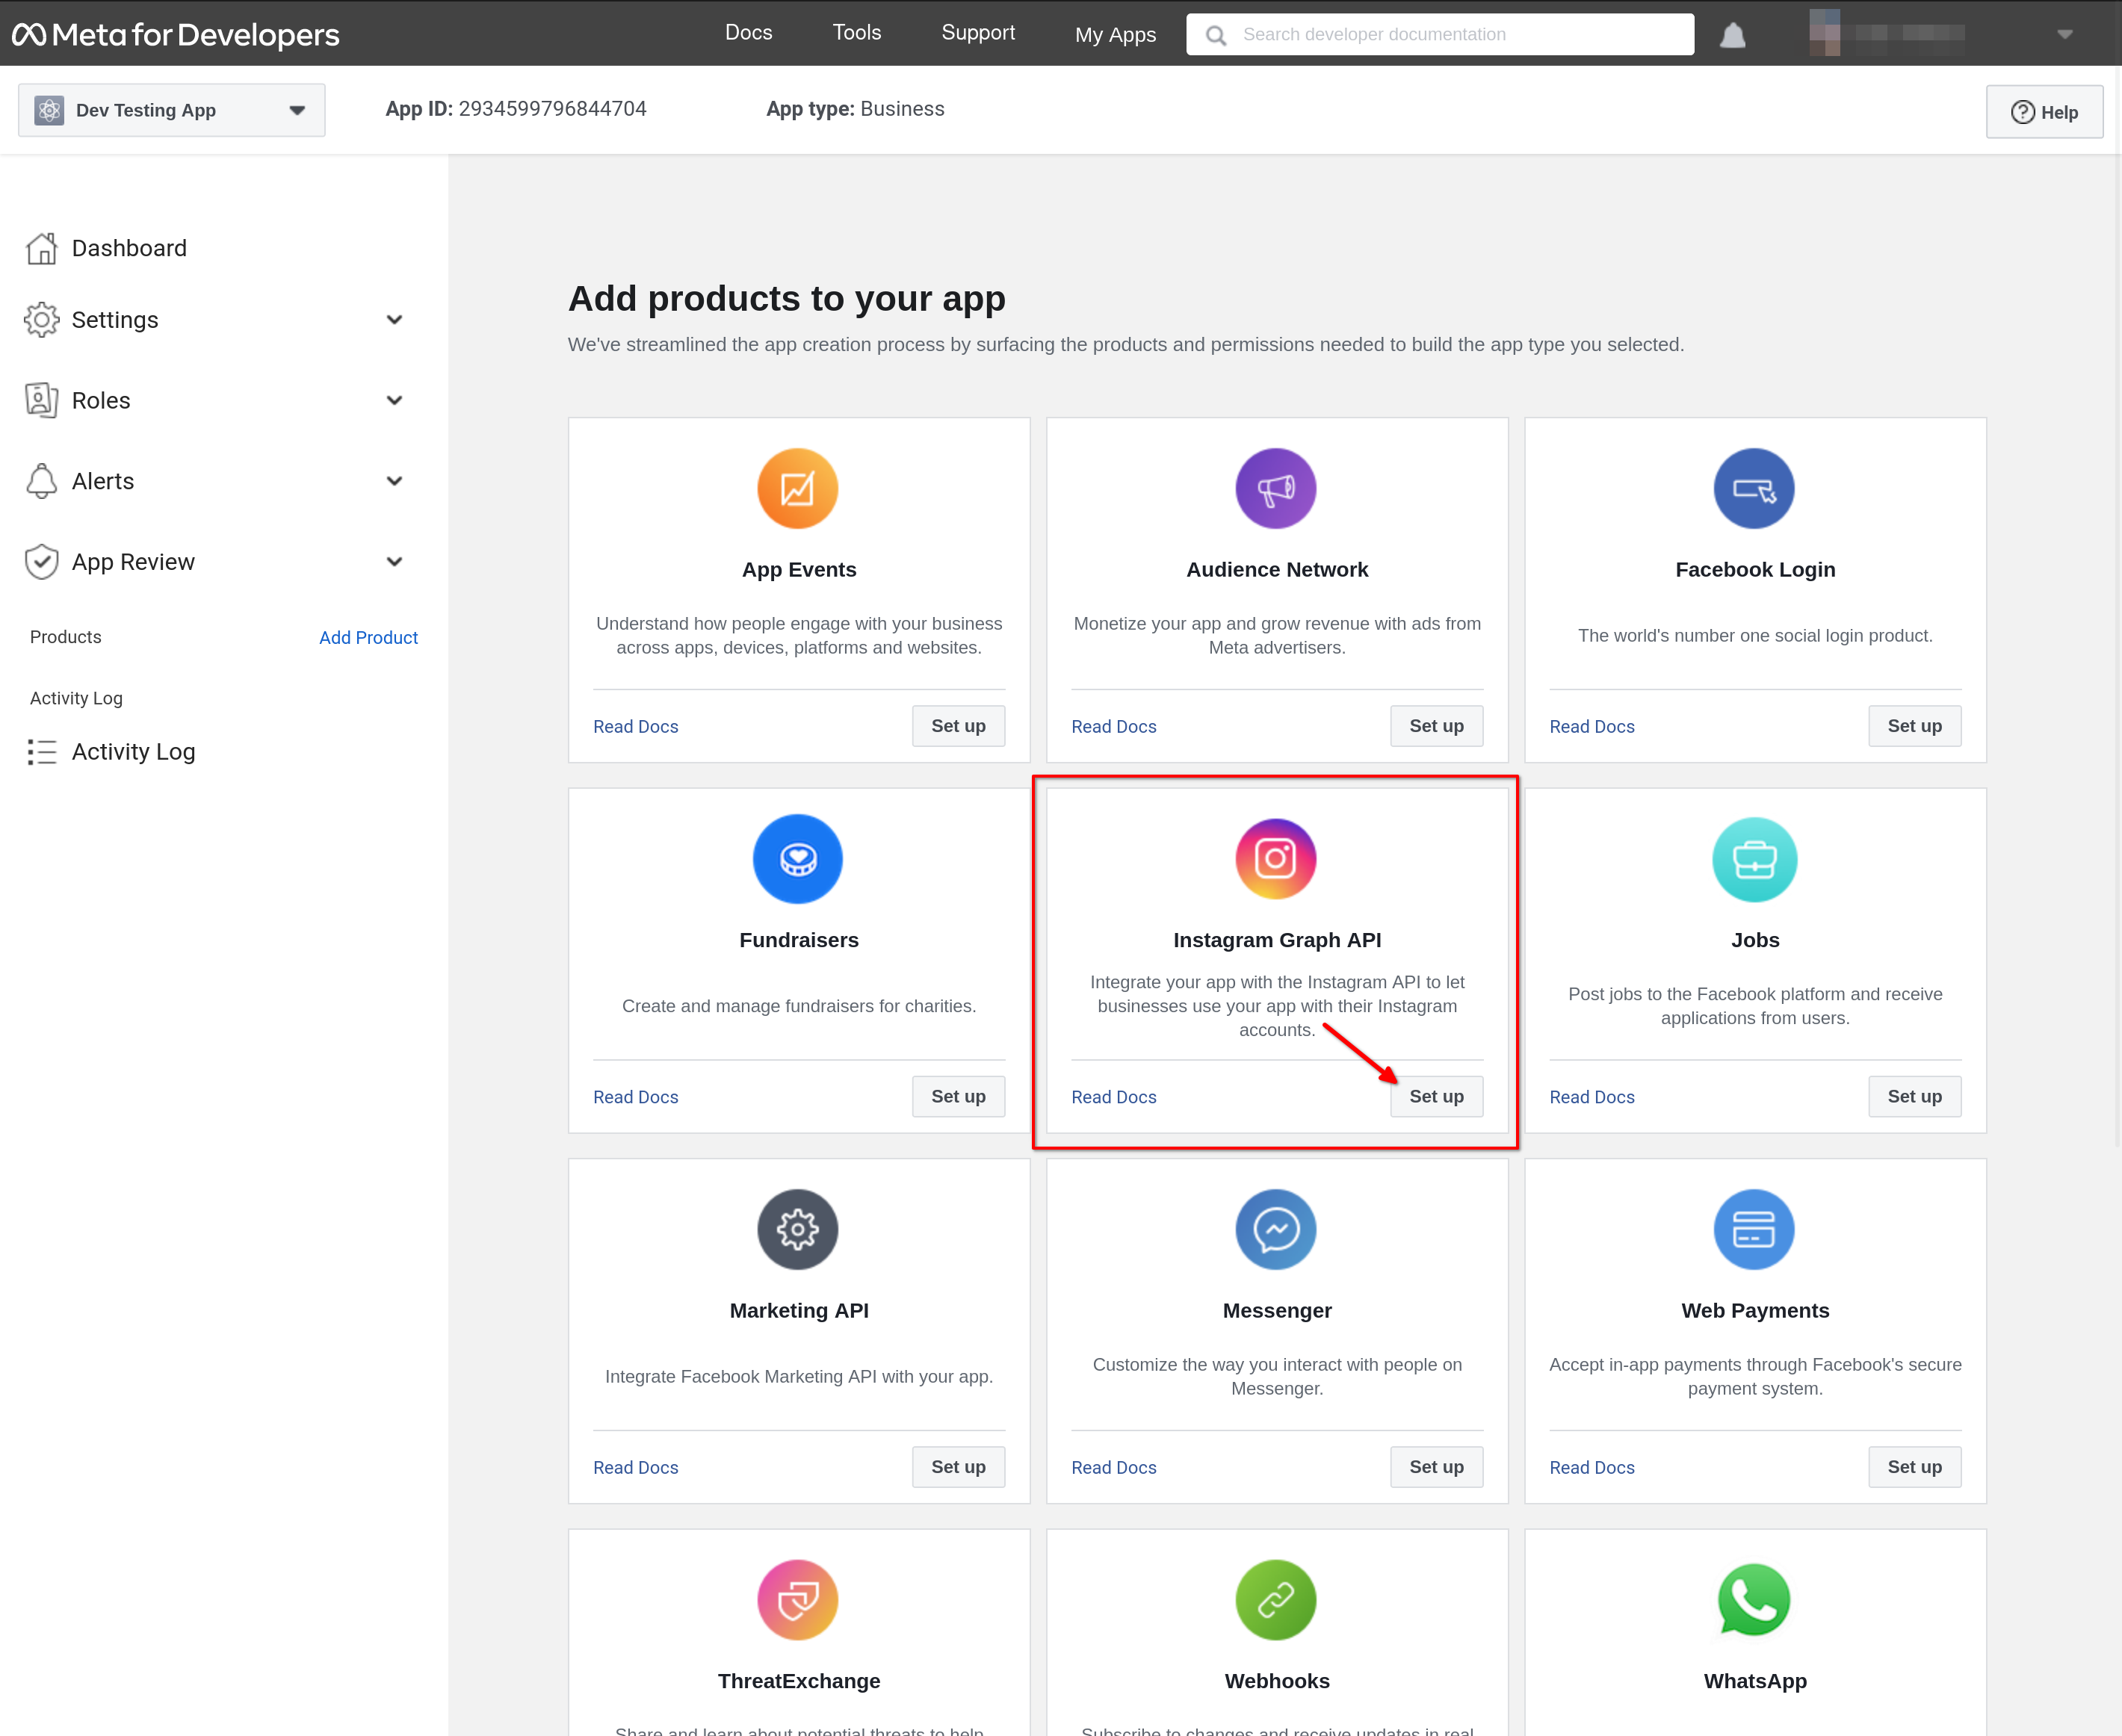
In this process, you will also need your Instagram Account ID. The video shows how to find this at 09:12 in the Instagram API Setup page within your developer app dashboard. Securely store both your Long-Lived Access Token and your Instagram Account ID.
3. Implementing the Instagram Publisher in TypeScript
Unlike the twitter-api-v2 library, there isn't a single, dominant helper library for the Instagram Graph API in the TypeScript ecosystem. We will use axios to make direct HTTP requests, which gives us full control and transparency.
First, add your new credentials to your .env file.
# .env
# ... other keys ...
INSTAGRAM_ACCESS_TOKEN="your_long_lived_token_here"
INSTAGRAM_ACCOUNT_ID="your_instagram_account_id_here"
And install axios:npm install axios
Now, let's create a new publisher file at src/publishers/instagram.ts. We'll build this in three logical functions that mirror the API's workflow. The official Meta documentation and a helpful Python-based tutorial can guide our implementation.
Publish Content - Instagram Platform - Meta for Developers
The official Meta documentation outlines the endpoints and parameters for content publishing. We'll use this as our primary reference for building the requests.
Review the sections on 'Create a container' and 'Publish the container'. Notice the different endpoints (/media and /media_publish) and the key parameters like image_url, caption, and creation_id. This is the blueprint for our code.
The process of testing these raw API calls is demonstrated well in the following video using Postman, a common developer workflow you might find familiar.
Automate Instagram Posts with Python and Instagram Graph API
To see these API calls in action before we code them, watch this segment from the 'Automate Instagram Posts with Python' video. It shows how to use Postman to make the two required POST requests.
Watch from 30:58 to 42:35. Pay attention to how the ig_user_id is used in the URL, how the image_url and caption are passed, and how the creation_id from the first response is used in the second request. Note the crucial point made at 36:50: the official documentation examples often omit the access_token, but it is required.
Here is the complete TypeScript implementation.
// src/publishers/instagram.ts

import axios from 'axios';

const { INSTAGRAM_ACCESS_TOKEN, INSTAGRAM_ACCOUNT_ID } = process.env;
const API_VERSION = 'v20.0'; // Use a recent, valid API version
const BASE_URL = `https://graph.facebook.com/${API_VERSION}`;

interface MediaContainerResponse {
  id: string;
}

interface PublishResponse {
  id: string;
}

interface ContainerStatusResponse {
  status_code: 'IN_PROGRESS' | 'FINISHED' | 'ERROR' | 'EXPIRED' | 'PUBLISHED';
}

/**
 * Step 1: Create a media container for the image.
 * @param imageUrl - Publicly accessible URL of the JPEG image.
 * @param caption - The text to be posted with the image.
 * @returns The ID of the created media container.
 */
async function createMediaContainer(imageUrl: string, caption: string): Promise<string> {
  const url = `${BASE_URL}/${INSTAGRAM_ACCOUNT_ID}/media`;

  try {
    const response = await axios.post<MediaContainerResponse>(url, {
      image_url: imageUrl,
      caption: caption,
      access_token: INSTAGRAM_ACCESS_TOKEN,
    });
    console.log('Successfully created media container:', response.data.id);
    return response.data.id;
  } catch (error) {
    console.error('Error creating media container:', error.response?.data);
    throw new Error('Failed to create Instagram media container.');
  }
}

/**
 * Step 2: Poll the container's status until it is 'FINISHED'.
 * @param containerId - The ID of the media container to check.
 */
async function pollContainerStatus(containerId: string): Promise<void> {
  const url = `https://graph.facebook.com/${containerId}`;
  let status: ContainerStatusResponse['status_code'] = 'IN_PROGRESS';
  let attempts = 0;

  console.log('Polling for container status...');
  while (status === 'IN_PROGRESS' && attempts < 10) {
    try {
      const response = await axios.get<ContainerStatusResponse>(url, {
        params: {
          fields: 'status_code',
          access_token: INSTAGRAM_ACCESS_TOKEN,
        },
      });
      status = response.data.status_code;
      console.log(`Container status: ${status}`);

      if (status === 'FINISHED') {
        return;
      }

      if (status === 'ERROR' || status === 'EXPIRED') {
        throw new Error(`Container failed with status: ${status}`);
      }

      // Wait for a few seconds before polling again
      await new Promise(resolve => setTimeout(resolve, 3000));
      attempts++;
    } catch (error) {
      console.error('Error polling container status:', error.response?.data);
      throw new Error('Failed to poll Instagram container status.');
    }
  }

  if (status !== 'FINISHED') {
    throw new Error('Container did not finish processing in time.');
  }
}

/**
 * Step 3: Publish the media container to Instagram.
 * @param containerId - The ID of the 'FINISHED' media container.
 * @returns The ID of the published media post.
 */
async function publishMedia(containerId: string): Promise<string> {
  const url = `${BASE_URL}/${INSTAGRAM_ACCOUNT_ID}/media_publish`;

  try {
    const response = await axios.post<PublishResponse>(url, {
      creation_id: containerId,
      access_token: INSTAGRAM_ACCESS_TOKEN,
    });
    console.log('Successfully published media:', response.data.id);
    return response.data.id;
  } catch (error) {
    console.error('Error publishing media:', error.response?.data);
    throw new Error('Failed to publish Instagram media.');
  }
}

/**
 * Main function to post a single image to Instagram.
 * @param imageUrl - Publicly accessible URL of the JPEG image.
 * @param caption - The text for the post.
 * @returns The ID of the final Instagram post.
 */
export async function shareOnInstagram(imageUrl: string, caption: string): Promise<string> {
  if (!imageUrl || !caption) {
    throw new Error('Image URL and caption are required for Instagram posts.');
  }

  // Step 1: Create the container
  const containerId = await createMediaContainer(imageUrl, caption);

  // Step 2: Wait for the container to be ready
  await pollContainerStatus(containerId);

  // Step 3: Publish the container
  const postId = await publishMedia(containerId);

  return postId;
}
4. Extending to Carousels
Posting carousels (multiple images) follows a similar, but slightly more complex, logic:
- For each image in the carousel, you create a media container using the
/mediaendpoint, but with an additional parameter:is_carousel_item=true. - You collect all the container IDs from step 1.
- You make one final call to the
/mediaendpoint withmedia_type=CAROUSELand achildrenparameter containing a comma-separated list of the container IDs. This creates a "parent" carousel container. - You then poll and publish this parent container ID just as you would for a single image.
Automate Every Instagram Post Type (Reels, Stories, Carousels) with n8n + Official API
The video 'Automate Every Instagram Post Type' provides a quick and clear demonstration of the carousel workflow.
Watch the section from 22:31 to 24:23. The logic explained here maps directly to the multi-step API process described above.
Conclusion
Fantastic work. Integrating with the Instagram Graph API is a significant engineering task, and you've now built a robust, multi-step publisher in TypeScript. This moves your agent far beyond text-only platforms and into the world of visual content.
Key Takeaways:
- Two-Step Process: Instagram publishing is a
containerize-then-publishmodel, which is an asynchronous pattern. - Public URLs are Mandatory: All media must be hosted on a public server before you can post it.
- Authentication is Complex: Obtaining a long-lived access token requires a multi-stage process involving a Meta App, a Facebook Page, and an Instagram Business account.
- Direct API Calls: Using a library like
axiosto make direct, typed HTTP requests is a powerful and transparent way to interact with the API.
Preview of the next lesson:
You have now created publisher nodes for LinkedIn, X, and Instagram! Your agent can generate content and has the technical means to post it across three distinct platforms. In our next and final lesson of this module, we will address a key piece of automation: "Implement scheduling logic to post at optimal engagement times per platform." This will allow your agent to not just post, but post intelligently.