Hello! It's great to continue our work on your automated content creation system.
In our last session, we built the creative engine of our workflow. We implemented parallel agents to generate text for LinkedIn and X, and visual content for Instagram, using a "fan-out, fan-in" pattern. All generated content is now collected by a placeholder joiner node.
Today, we'll implement a crucial quality control layer. The learning outcome for this lesson is to integrate a human-in-the-loop approval step before the final output node. We will replace our passive joiner with an interactive approval node. This will pause the workflow, allowing you to review, edit, or approve the AI-generated content before it's cleared for publishing, ensuring it perfectly aligns with your standards.
The Importance of Human Oversight
Before we dive into the code, let's consider why a human-in-the-loop (HITL) step is so critical in a content automation pipeline:
- Quality & Brand Alignment: An LLM might occasionally produce content that is factually incorrect, off-brand, or simply lacks the nuance you're aiming for. An approval step is your final defense.
- Editing & Enhancement: You might see an opportunity to add a timely reference, tweak a sentence for better impact, or adjust a hashtag. HITL allows for this final polish.
- Safety & Control: It prevents the system from autonomously publishing something inappropriate or nonsensical, giving you complete control over the final output.
We will build a simple approval gate that looks like this:
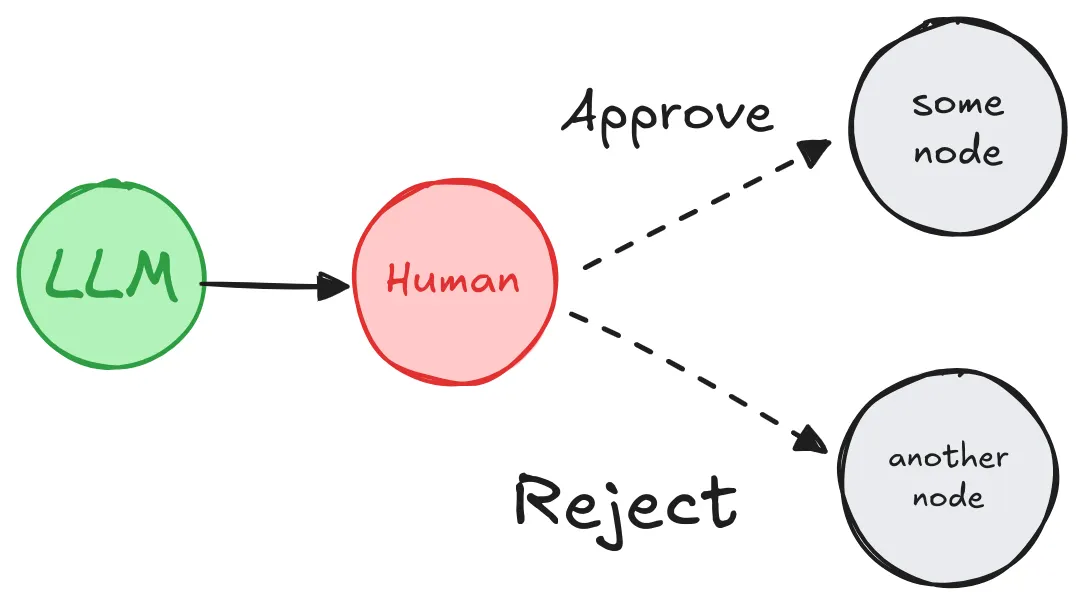
The Core Mechanism: Interrupts and Checkpointing
To build our approval node, we'll use a key feature in LangGraph called interrupts. An interrupt allows you to pause the graph's execution at a specific point inside a node and wait for external input before continuing.
For interrupts to work, LangGraph needs two things:
- A Checkpointer: A mechanism to save the graph's entire state when it's paused. This is like creating a bookmark. We'll use a simple in-memory checkpointer for now, but in production, this could be backed by a database like Postgres, which fits well with your experience.
- A Thread ID: A unique identifier for each run of the graph. This tells the checkpointer which "saved game" to load when you want to resume.
The official LangChain documentation provides the best overview of this mechanism.
Interrupts - Docs by LangChain
Let's start with the 'Interrupts' documentation from LangChain. It clearly explains the concept and its requirements.
Please read the introduction and the 'Pause using interrupt' sections. Focus on the definition of an interrupt, the role of the checkpointer and thread ID, and the sequence of events that happen when the interrupt() function is called inside a node.
To summarize the flow:
- Our
approvalNodewill callinterrupt(). - The graph pauses, saves its state using the checkpointer, and returns a message to our main script.
- Our script prompts you for input (e.g., "approve" or feedback).
- You provide input.
- Our script resumes the graph by calling
app.stream()orapp.invoke()again, passing your input inside aCommandobject. - Execution continues from where it left off inside the
approvalNode.
Implementing the Approval Node
Now, let's apply this to our project. We'll replace the joinerNode from the last lesson with a more intelligent approvalNode and update our main script to handle the interaction.
1. Update the State and Graph Definition
First, let's update our ContentPipelineState to track the approval status. We also need to import the necessary functions and add a checkpointer when compiling the graph.
// Add these imports at the top of your file
import { MemorySaver } from "@langchain/langgraph/checkpoint/memory";
import { interrupt, type Command } from "@langchain/langgraph/types";
import * as readline from 'node:readline/promises';
import { stdin as input, stdout as output } from 'node:process';

// Update the state interface
interface ContentPipelineState {
  topic: string;
  articles: Article[];
  analysis?: TrendAnalysis;
  linkedInPost?: LinkedInPost;
  xThread?: XThread;
  instagramCarousel?: InstagramCarousel;
  // New fields for the approval process
  isApproved?: boolean;
  feedback?: string;
}

// Update the channels in your StateGraph definition
const workflow = new StateGraph<ContentPipelineState>({
  channels: {
    // ... all previous channels
    isApproved: { value: null, default: () => undefined },
    feedback: { value: null, default: () => undefined },
  },
});
2. Create the approvalNode
This node replaces the old joinerNode. It displays the content and calls interrupt() to pause for your decision.
// Node for human approval
async function approvalNode(state: ContentPipelineState): Promise<Partial<ContentPipelineState>> {
  console.log("\n--- Content Generated, Awaiting Human Approval ---");
  // In a real app, you'd present this in a UI. For now, we'll log it.
  console.log("LinkedIn Post:", JSON.stringify(state.linkedInPost, null, 2));
  console.log("X Thread:", JSON.stringify(state.xThread, null, 2));

  // This is where the graph pauses and waits for external input.
  const decision = await interrupt({
    message: "Review the generated content. Type 'approve' to continue, or provide feedback to reject.",
  });

  // This code only runs AFTER the graph is resumed.
  // The 'decision' variable holds the value passed from Command(resume=...).
  console.log(`--- Resuming with decision: "${decision}" ---`);

  if (typeof decision === 'string' && decision.toLowerCase() === 'approve') {
    return { isApproved: true }; // Set approval flag in the state
  } else {
    return { isApproved: false, feedback: String(decision) }; // Flag as not approved and store feedback
  }
}
3. Update the Graph Structure
We now add the approvalNode and a rejectionNode to the graph. Crucially, we use addConditionalEdges to route the workflow based on the isApproved flag in our state. This is a powerful pattern for creating dynamic agentic systems.
// Add the new nodes to the graph
workflow.addNode("approval_agent", approvalNode);

async function rejectionNode(state: ContentPipelineState): Promise<null> {
    console.log("\n--- Content Rejected ---");
    console.log("Feedback received:", state.feedback);
    console.log("In a real system, this could trigger a refinement loop or alert a user.");
    return null;
}
workflow.addNode("handle_rejection", rejectionNode);


// --- Update Graph Edges ---
// Previous edges remain the same up to the fan-out
workflow.setEntryPoint("data_collection_agent");
workflow.addEdge("data_collection_agent", "trend_analysis_agent");
workflow.addEdge("trend_analysis_agent", "generate_text_content_agent");
workflow.addEdge("trend_analysis_agent", "generate_visual_content_agent");

// The two generation branches now feed into the approval agent
workflow.addEdge("generate_text_content_agent", "approval_agent");
workflow.addEdge("generate_visual_content_agent", "approval_agent");

// Add a conditional edge from the approval agent
workflow.addConditionalEdges(
  "approval_agent",
  (state) => (state.isApproved ? END : "handle_rejection"),
);

// The rejection node also goes to the end for this simple case
workflow.addEdge("handle_rejection", END);
4. Update the Execution Logic
Finally, we modify our main runGraph function to be interactive. It needs to listen for the __interrupt__ event, get your input, and resume the graph.
// CRITICAL: Compile the graph with a checkpointer
const checkpointer = new MemorySaver();
const app = workflow.compile({ checkpointer });

// Update the runGraph function to be interactive
async function runGraph() {
  const rl = readline.createInterface({ input, output });

  // Each run needs a unique thread_id for the checkpointer to work
  const config = { configurable: { thread_id: `thread-${Date.now()}` } };
  const initialState = {
    topic: "The rise of AI in modern frontend development",
  };

  let finalState;
  // We use .stream() to get all events, including interrupts
  const stream = app.stream(initialState, config);

  for await (const event of stream) {
    const [eventName] = Object.entries(event)[0];

    if (eventName === "__interrupt__") {
      console.log("\n--- Graph Paused: Awaiting Input ---");
      const userInput = await rl.question("Your input (e.g., 'approve' or feedback): ");

      // Resume the graph by streaming again with the user's input
      const resumeStream = app.stream(userInput as any, config); // Pass input directly
      for await (const resumeEvent of resumeStream) {
        const [resumeEventName, resumeEventValue] = Object.entries(resumeEvent)[0];
        if (resumeEventName === END) {
            finalState = resumeEventValue;
        }
      }
    } else if (eventName === END) {
        finalState = event[END];
    }
  }

  rl.close();
  console.log("\n--- Graph Finished ---");
  console.log("Final output:", finalState);
}

runGraph();
When you run this code, the workflow will execute as before, but after generating the content, it will print --- Graph Paused: Awaiting Input --- and wait. If you type approve, it will proceed to the end. If you type anything else, it will route to the rejectionNode and then end.
Advanced Pattern: Iterative Refinement
Our current setup is a binary approve/reject. A more powerful pattern is an iterative loop where you can provide feedback multiple times to refine the content. This is especially useful for creative tasks.
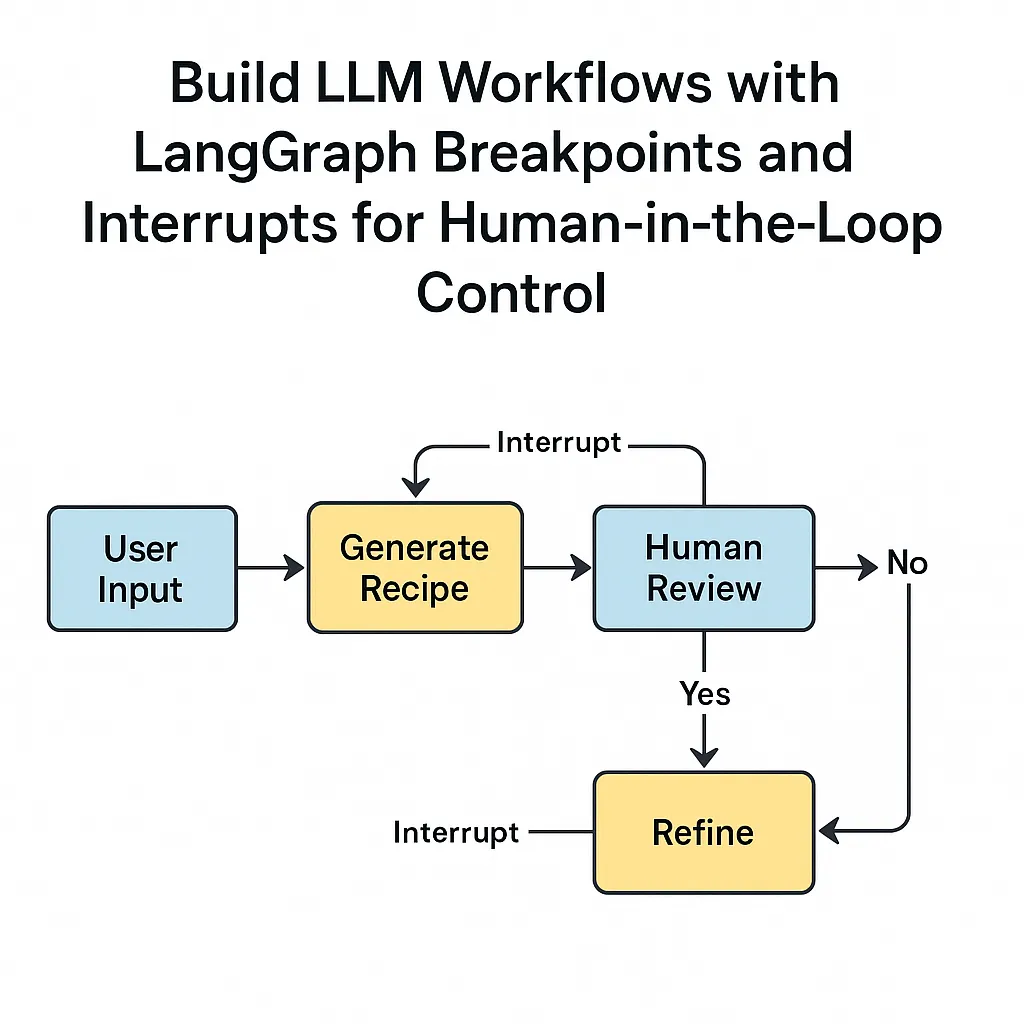
The following video provides an excellent walkthrough of building this exact pattern, where the graph loops back on itself until the user is satisfied.
LangGraph Crash Course #33 - Human In The Loop - Multi-turn Conversations
To see how to build a more advanced iterative refinement loop, watch this crash course video. It demonstrates a multi-turn conversation where the user can repeatedly provide feedback to an agent.
Watch the entire video (it's short!). Pay close attention to how the state tracks a list of human feedback and how the graph is designed to loop back to the model generation node if feedback is provided. The presenter's while loop in the main execution code is the key to managing this multi-turn interaction.
To implement this, you would modify your conditional edge to loop back to the content generation nodes if the content is not approved, passing along your feedback in the state. This allows the agents to use your feedback to create a new, improved version for your review.
Conclusion
Excellent work today! You have successfully integrated a critical human-in-the-loop approval step into your content automation pipeline. This adds an essential layer of control and quality assurance, transforming your system from a simple generator into a true collaborative assistant.
Key Takeaways:
- Human-in-the-Loop: You've implemented a HITL process using LangGraph's
interruptfeature. - Stateful Pausing: You learned that
checkpointersandthread_idare essential for pausing and resuming stateful graph executions. - Interactive Execution: You modified the main application logic to handle interrupts, gather user input, and resume the workflow using a
Command. - Conditional Routing: You used
addConditionalEdgesto dynamically route the graph based on the human's approval decision, a fundamental pattern for building complex agentic systems.
Preview of the next lesson:
Our graph now has a complex, multi-step flow. In the next lesson, "Manage data persistence and traceability across agent calls within the graph's state," we will explore how to make our checkpoints durable (e.g., saving to a database) and how to effectively log the journey of our data through the graph. This is crucial for debugging, auditing, and understanding how your agent is making decisions.