Hello! It's great to reconnect and continue building your automated content creation system.
In our last lesson, we implemented a human-in-the-loop approval step, which was a significant move towards ensuring content quality. We used an in-memory checkpointer (MemorySaver) to pause and resume the graph. While effective, this approach is transient; if our application were to restart, the saved state would be lost.
Today, we will address that limitation. The learning outcome for this lesson is to manage data persistence and traceability across agent calls within the graph's state. We'll upgrade from our temporary in-memory saver to a durable, database-backed solution. Given your background with Postgres, we will integrate a PostgresSaver to make our agent's state resilient, auditable, and traceable.
This step is essential for building a production-ready system, enabling capabilities like:
- Fault Tolerance: Recovering a long-running workflow from the last successful step if an error occurs.
- Asynchronous Execution: Allowing a workflow to be paused (like at our approval step) for hours or days and then resumed seamlessly.
- Traceability & Debugging: Querying the history of a workflow's state to understand and debug the agent's behavior.
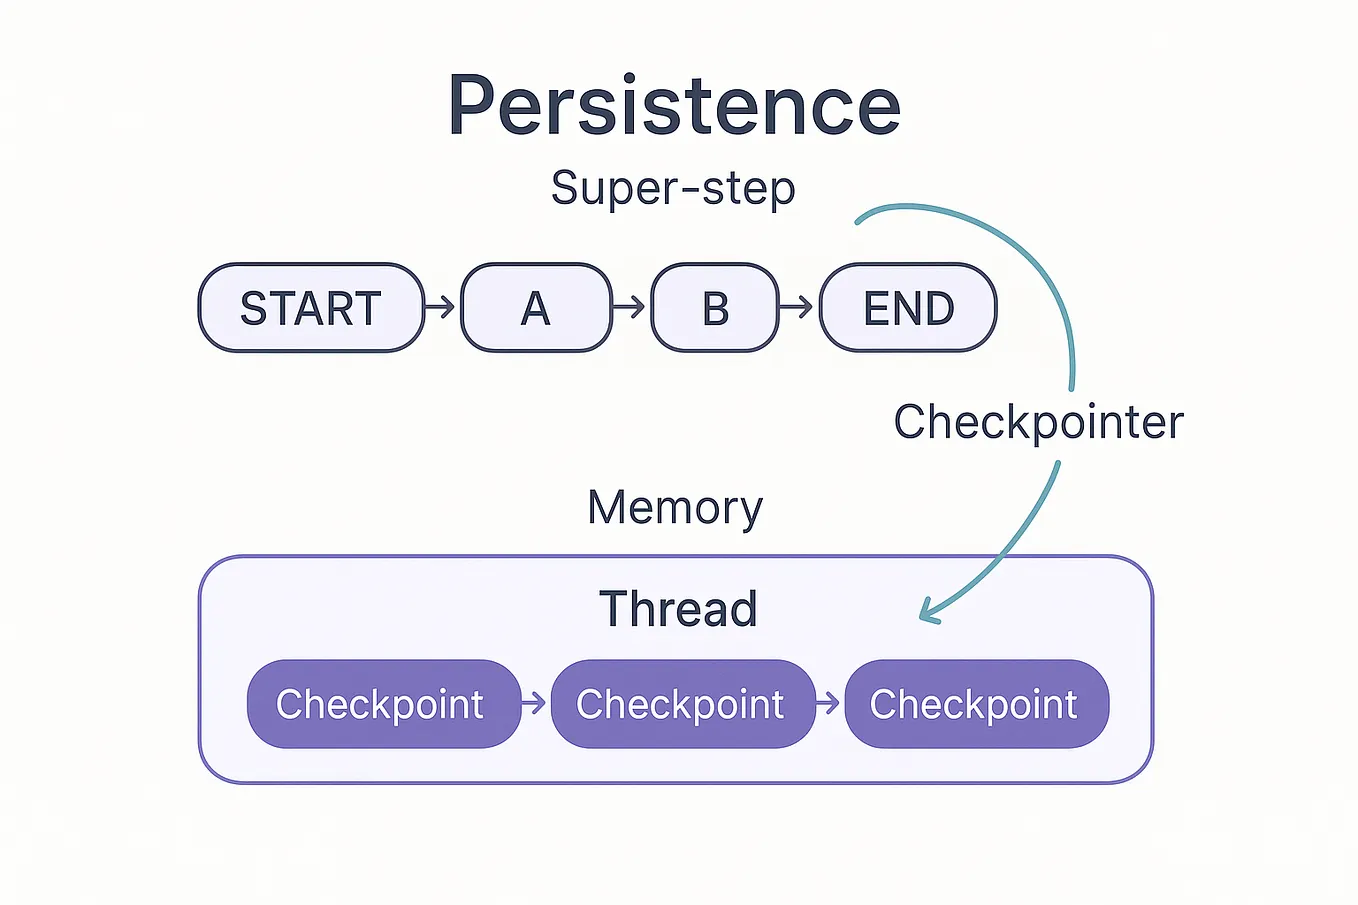
The LangGraph Persistence Model: Threads and Checkpoints
Before we write the code, let's solidify our understanding of the two fundamental concepts that enable persistence in LangGraph: threads and checkpoints.
Persistence - Docs by LangChain
The official LangChain documentation provides the clearest explanation of these concepts. This will be our foundation.
Please read the introduction and the sections 'Threads' and 'Checkpoints'. Focus on the relationship between them: a thread is a sequence of checkpoints, and a checkpoint is a snapshot of the graph's state at a point in time.
To summarize the key ideas from that reading:
- Thread: A
threadis a unique identifier for a single, continuous execution or conversation. In our last lesson, we created one withthread_id: \thread-${Date.now()}``. It acts as the primary key for a sequence of state snapshots. - Checkpoint: A
checkpointis a snapshot of the graph's entire state at a specific moment, saved within a thread. LangGraph automatically creates a checkpoint after each node (or "super-step") completes. configurable: This object, which we've been passing to.stream()and.invoke(), is how we tell LangGraph which thread to work on.
This persistent history is the key to traceability. We can inspect the state of our workflow at any point in its execution.
From In-Memory to Durable Postgres Checkpointing
LangGraph offers several checkpointer implementations. Since you have a strong background in Postgres, we'll use the AsyncPostgresSaver. This is a production-grade checkpointer that stores the state directly in a Postgres database.
For this, you'll need a running Postgres instance. A Docker container is a great way to manage this for local development.
# Example Docker command to run a Postgres container
docker run --name langgraph-db -e POSTGRES_PASSWORD=mysecretpassword -p 5432:5432 -d postgres
1. Under the Hood: The Checkpointer Schema
When we use AsyncPostgresSaver, it creates several tables in the database to manage the state. Understanding this schema is vital for traceability, as it allows you to query the workflow's history directly using SQL.
A fellow engineer wrote an excellent blog post that dissects the AsyncPostgresSaver schema and discusses the practical implications.
Internals of Langgraph Postgres Checkpointer (AsyncPostgresSaver)
Let's read the 'Internals of Langgraph Postgres Checkpointer' blog post. This provides a fantastic, practical look at what the checkpointer is actually doing in your database.
Read the sections 'The Database Schema: A Tour of the Tables' and 'The Challenge of Pickled Blobs'. Pay close attention to the roles of the checkpoints and checkpoint_blobs tables. The discussion on pickled blobs is a key real-world insight into the trade-offs of this persistence strategy.
As the article highlights, the checkpointer serializes complex parts of the state (like our message history or generated content objects) into a binary format (BYTEA) in the checkpoint_blobs table. This makes direct SQL queries on the content of those objects impossible, but it provides a robust way to save and load the complete state back into your TypeScript application. The main checkpoints table stores metadata and references, which are fully queryable.
For a deeper dive into how a checkpointer class is structured, the following video builds a custom PostgresSaver from scratch in Python. While we'll be using the pre-built TypeScript version, the video offers valuable conceptual insight into the methods like put, get_tuple, and list that interact with the database tables we just learned about.
LangGraph Advanced Persistance - Custom Checkpointers
To see the logic of a checkpointer in action, this video demonstrates building one. It's in Python, but the database interactions and class structure are conceptually identical to what the TypeScript AsyncPostgresSaver does.
Watch the section from 02:06 to 07:21 where the presenter implements the PostgresSaver class. Focus on how the setup, get_tuple, list, and put methods translate into SQL commands that interact with the checkpoints table. This will give you a strong mental model of what our checkpointer is doing.
Implementing AsyncPostgresSaver in Your Project
Now let's modify our code to use the durable Postgres checkpointer. The changes are surprisingly minimal, which speaks to the modular design of LangGraph.
1. Install Dependencies and Update Imports
First, add the Postgres checkpointer package to your project.
npm install @langgraph/checkpoint-postgres pg
Note: The pg package is the underlying Node.js driver for PostgreSQL.
Next, update your imports in your main TypeScript file.
// REMOVE the in-memory saver
// import { MemorySaver } from "@langchain/langgraph/checkpoint/memory";

// ADD the postgres saver
import { AsyncPostgresSaver } from "@langgraph/checkpoint-postgres";

// We'll also need this for the connection
import { Pool } from "pg";
2. Instantiate and Compile with AsyncPostgresSaver
Replace the MemorySaver with AsyncPostgresSaver. We'll instantiate it and then call its setup() method to ensure the necessary tables exist in our database.
// ... (your state definition, nodes, and graph definition remain the same) ...

async function runGraph() {
  // Define your Postgres connection details
  // For production, use environment variables
  const dbConfig = {
    user: 'postgres',
    password: 'mysecretpassword',
    host: 'localhost',
    port: 5432,
    database: 'postgres', // Or your specific database name
  };

  // Instantiate the checkpointer with a connection pool
  const checkpointer = new AsyncPostgresSaver(new Pool(dbConfig));

  // Ensure the database tables are created.
  // This is an idempotent operation.
  await checkpointer.setup();

  // Compile the graph with the NEW checkpointer
  const app = workflow.compile({ checkpointer });

  // ... (the rest of the runGraph function remains the same) ...
  const rl = readline.createInterface({ input, output });
  const config = { configurable: { thread_id: `thread-${Date.now()}` } };
  const initialState = {
    topic: "The impact of server-side rendering on SEO",
  };

  let finalState;
  const stream = app.stream(initialState, config);

  // The interactive loop for handling interrupts is unchanged
  for await (const event of stream) {
    const [eventName] = Object.entries(event)[0];

    if (eventName === "__interrupt__") {
      console.log("\n--- Graph Paused: Awaiting Input ---");
      const userInput = await rl.question("Your input (e.g., 'approve' or feedback): ");

      const resumeStream = app.stream(userInput as any, config);
      for await (const resumeEvent of resumeStream) {
        const [resumeEventName, resumeEventValue] = Object.entries(resumeEvent)[0];
        if (resumeEventName === END) {
            finalState = resumeEventValue;
        }
      }
    } else if (eventName === END) {
        finalState = event[END];
    }
  }

  rl.close();
  console.log("\n--- Graph Finished ---");
  console.log("Final output:", finalState);
}

runGraph();
3. Test and Trace
Now, run your application. Let it pause at the approval step. At this point, you can connect to your Postgres database with a client like DBeaver, pgAdmin, or even the psql CLI and inspect the checkpoints table.
You should see rows corresponding to the steps your graph has taken, all linked by the same thread_id. Now, if you terminate and restart your application, you could theoretically write code to resume from that exact checkpoint_id (this is called "time travel," a topic for another day!). When you type approve in the terminal, the graph will resume, and a new checkpoint will be saved marking the completion of the approval_node.
Conclusion
Fantastic work. You have now established a durable, persistent foundation for your agentic workflow. By replacing the MemorySaver with AsyncPostgresSaver, you've made your system robust and prepared it for real-world deployment challenges.
Key Takeaways:
- Durable Persistence: You successfully implemented a
PostgresSaverto store your graph's state in a database, ensuring fault tolerance and the ability to handle long-running asynchronous tasks. - Traceability through Schema: You learned about the underlying database schema (
checkpoints,checkpoint_blobs) and can now use SQL to query the metadata of your workflow's history. - Practical Limitations: You understand the practical trade-off of using serialized blobs for complex state values, which makes the state opaque to direct database queries but ensures perfect restoration within the application.
- Modular Checkpointers: You saw how easy it is to switch out the persistence backend in LangGraph by simply changing the checkpointer object during compilation.
Preview of the next lesson:
Our workflow is now persistent, but what happens if a node fails? An API call might time out, or an LLM could return a malformed response. In our next lesson, "Incorporate error handling and retry mechanisms into critical agent nodes," we will leverage our newfound persistence to build a system that can gracefully handle and recover from such failures.