Hello! Let's continue building our autonomous content creation system.
In the last lesson, we laid the groundwork by implementing the data collection and analysis agents as the first two nodes in our LangGraph workflow. Our graph can now take a topic, find relevant articles, and produce a structured TrendAnalysis object. This object, containing the narrative, key points, and a contrarian angle, is now ready in our ContentPipelineState.
Today, we'll build the creative core of our system. Our learning outcome is to implement the content generation agents for text and visuals as distinct nodes. We will create specialized "worker" agents that take the structured analysis from the previous step and generate polished, platform-specific content. This is where your goal of automating engaging content comes to life.
We'll focus on two key tasks:
- Creating text-based content for LinkedIn and X.
- Generating visual content for an Instagram carousel.
To do this, we will introduce a more advanced graph structure that allows for parallel execution—a concept you'll recognize from designing scalable systems.
Expanding the State for Generated Content
First, we need to extend our ContentPipelineState to store the output from our new generation agents. Let's add fields for a LinkedIn post, an X (Twitter) thread, and an Instagram carousel.
// In your project file, let's update the interfaces

interface Article {
  url: string;
  title: string;
  content: string;
}

interface TrendAnalysis {
  topic: string;
  summary: string;
  narrative: string;
  contrarianAngle: string;
  keyPoints: string[];
}

// New interfaces for generated content
interface LinkedInPost {
  title: string;
  body: string;
  hashtags: string[];
}

interface XThread {
  tweets: string[]; // Each string is a tweet in the thread
}

interface InstagramCarousel {
  slides: {
    image_prompt: string;
    image_url?: string; // To be populated after generation
    caption: string;
  }[];
  main_caption: string;
  hashtags: string[];
}

// Updated ContentPipelineState
interface ContentPipelineState {
  topic: string;
  articles: Article[];
  analysis?: TrendAnalysis;

  // New fields for generated content
  linkedInPost?: LinkedInPost;
  xThread?: XThread;
  instagramCarousel?: InstagramCarousel;
}

// Update the StateGraph channels definition
const workflow = new StateGraph<ContentPipelineState>({
  channels: {
    // ... previous channels (topic, articles, analysis)
    linkedInPost: { value: null, default: () => undefined },
    xThread: { value: null, default: () => undefined },
    instagramCarousel: { value: null, default: () => undefined },
  },
});
With our state updated, we can now build the agents that will populate these new fields.
Node 3: The Text Generation Agent
Our first content creator is the generate_text_content_agent. This node will take the analysis from the state and generate both a long-form LinkedIn post and a concise X thread. This demonstrates how a single agent node can produce multiple, related outputs in one step.
The key is to use targeted prompts that instruct the LLM on the specific format, tone (from your brand voice guide), and length for each platform.
// Node 3: Text Content Generation Agent
async function generateTextContentNode(state: ContentPipelineState): Promise<Partial<ContentPipelineState>> {
  console.log("--- Executing Text Content Generation Agent ---");
  const { analysis } = state;

  if (!analysis) {
    throw new Error("Analysis object is not available.");
  }

  // --- Mock LLM calls for text generation ---
  // In a real implementation, you would use your LLM client here.

  // Prompt for LinkedIn
  const linkedInPrompt = `Based on the following trend analysis, write a professional LinkedIn post.
  Analysis: ${JSON.stringify(analysis, null, 2)}
  Structure: A strong hook, 3-4 body paragraphs expanding on the key points, and a concluding question.
  Tone: Thought-leadership, insightful, professional.
  Format: JSON object with "title", "body", and "hashtags" keys.`;

  const mockLinkedInPost: LinkedInPost = {
    title: `The Unspoken Truth About ${analysis.topic}`,
    body: `Everyone is talking about ${analysis.summary}. But the real story is ${analysis.contrarianAngle}...`,
    hashtags: ["#Tech", "#AI", "#Innovation"]
  };

  // Prompt for X (Twitter) Thread
  const xThreadPrompt = `Based on the following trend analysis, create a 3-tweet thread for X.
  Analysis: ${JSON.stringify(analysis, null, 2)}
  Tweet 1: A compelling hook about the main topic.
  Tweet 2: Elaborate on the contrarian angle.
  Tweet 3: List key takeaways and pose a question.
  Format: JSON object with a "tweets" key containing an array of strings.`;

  const mockXThread: XThread = {
    tweets: [
      `Is ${analysis.topic} overhyped? Here's the contrarian take you haven't heard. 🧵`,
      `While most focus on ${analysis.summary}, the real shift is ${analysis.contrarianAngle}. This changes everything for developers.`,
      `Key takeaways:\n1. ${analysis.keyPoints[0]}\n2. ${analysis.keyPoints[1]}\nWhat's your take?`
    ]
  };
  // --------------------------------------------------

  console.log("Generated LinkedIn post and X thread.");
  return {
    linkedInPost: mockLinkedInPost,
    xThread: mockXThread
  };
}
This approach of creating distinct functions for different content types is a common pattern. The following article provides a simple, clear example of this in Python, creating separate nodes for a blog post and a social media post.
Agents for Creating Blogs and Social Media Posts using LangGraph
The article 'Agents for Creating Blogs and Social Media Posts using LangGraph' shows a clean, practical way to structure content generation nodes.
Please review the code snippets under the headings 'Building the State Graph...', 'blog_writer.py', and 'social_media_post_creator.py'. Notice how two distinct nodes, create_blog_post and create_social_media_post, are added to the graph. Each node is a function that takes the state, calls a model, and updates the state with its specific output. This is precisely the pattern we're following.
Node 4: The Visual Generation Agent
Next, we'll build the generate_visual_content_agent. This agent's task is more complex as it involves both text and image generation for an Instagram carousel.
The process within this node has two stages:
- Narrative Generation: Use an LLM to generate the text content for each slide of the carousel, based on the
analysis. - Image Generation: Use the text prompts from step 1 to call an image generation API (like DALL-E 3) for each slide's visual.
// Node 4: Visual Content Generation Agent
async function generateVisualContentNode(state: ContentPipelineState): Promise<Partial<ContentPipelineState>> {
  console.log("--- Executing Visual Content Generation Agent ---");
  const { analysis } = state;

  if (!analysis) {
    throw new Error("Analysis object is not available.");
  }

  // --- Stage 1: Generate Carousel Narrative with a Text LLM ---
  const carouselNarrativePrompt = `Based on the following trend analysis, create the content for a 5-slide Instagram carousel.
  Analysis: ${JSON.stringify(analysis, null, 2)}
  For each slide, provide a concise caption and a descriptive prompt for an image generation model to create a matching visual.
  Format: JSON object with a "slides" array, a "main_caption", and "hashtags". Each object in the "slides" array should have "image_prompt" and "caption" keys.`;

  const mockCarouselNarrative: Omit<InstagramCarousel, 'slides'> & { slides: { image_prompt: string; caption: string }[] } = {
    slides: [
      { image_prompt: "Abstract digital art representing the concept of AI in coding.", caption: `The Rise of AI in Development` },
      { image_prompt: "A developer looking puzzled at a simple chart, while a complex, glowing neural network is in the background.", caption: `But are we missing the point? ${analysis.contrarianAngle}` },
      // ... more slides
    ],
    main_caption: `Digging deeper into ${analysis.topic}.`,
    hashtags: ["#Developer", "#Coding", "#FutureOfTech"]
  };

  // --- Stage 2: Generate Images with an Image LLM ---
  // Here, you would loop through mockCarouselNarrative.slides and call an image generation API.
  const generatedSlides = mockCarouselNarrative.slides.map((slide, index) => ({
    ...slide,
    image_url: `https://mock-image-url.com/image_${index}.png` // Placeholder for the real URL
  }));

  const finalCarousel: InstagramCarousel = {
      ...mockCarouselNarrative,
      slides: generatedSlides
  };
  // ---------------------------------------------------------

  console.log("Generated Instagram carousel content and images.");
  return { instagramCarousel: finalCarousel };
}
Integrating an image generation tool into an agent is straightforward. The article below provides an excellent hands-on guide for doing this with LangGraph and the DALL-E API.
Advanced LangGraph: Building Intelligent Agents with ReACT ...
To see how to implement the image generation part, please refer to the article 'Advanced LangGraph: Building Intelligent Agents with ReACT...'
Read sections '2. Define Tools and Parameter Schemas', '5. Invoke the Agent and Output Content', and 'Analysis of Results'. Focus on how the OpenAIDALLEImageGenerationTool is initialized and added to a list of tools for the agent. The code shows how invoking the agent with a text prompt results in a call to the DALL-E API and returns an image URL. This is the exact mechanism you would use inside our generateVisualContentNode.
Orchestrating Parallel Generation with "Fan-Out"
Now we have two powerful but independent generation agents. Since both generateTextContentNode and generateVisualContentNode depend only on the output of analyzeTrendsNode, we don't need to run them sequentially. We can run them in parallel.
This is known as a "fan-out" pattern. One node's output triggers multiple downstream nodes simultaneously. After they complete, their results can be merged back together in a "fan-in" step. This is highly efficient and a common pattern in distributed system architectures.
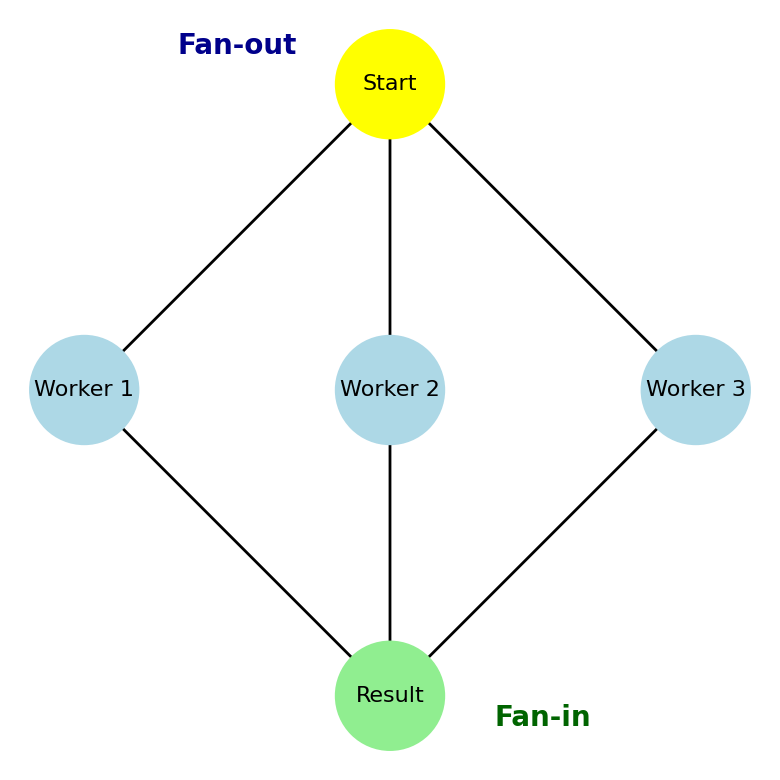
To implement this in LangGraph, we simply add edges from our analysis node to both generation nodes.
Let's update our graph definition:
// Add the new nodes to the graph
workflow.addNode("generate_text_content_agent", generateTextContentNode);
workflow.addNode("generate_visual_content_agent", generateVisualContentNode);

// Let's also add a placeholder for our next lesson's human review step
async function joinerNode(state: ContentPipelineState): Promise<null> {
  console.log("--- Joining parallel branches ---");
  console.log("All content has been generated and is ready for review.");
  return null;
}
workflow.addNode("joiner", joinerNode);

// -- Define the Graph Structure --
// 1. Entry point remains the data collection agent
workflow.setEntryPoint("data_collection_agent");

// 2. Linear sequence for data collection and analysis
workflow.addEdge("data_collection_agent", "trend_analysis_agent");

// 3. FAN-OUT: from analysis to both generation agents
workflow.addEdge("trend_analysis_agent", "generate_text_content_agent");
workflow.addEdge("trend_analysis_agent", "generate_visual_content_agent");

// 4. FAN-IN: both generation agents connect to the joiner node
workflow.addEdge("generate_text_content_agent", "joiner");
workflow.addEdge("generate_visual_content_agent", "joiner");

// 5. The joiner node is the end for now
workflow.addEdge("joiner", END);

// Compile and run the new workflow
const app = workflow.compile();

async function runGraph() {
  const initialState = {
    topic: "The rise of AI in modern frontend development",
  };

  const finalState = await app.invoke(initialState);

  console.log("\n--- Final State ---");
  console.log(JSON.stringify(finalState, null, 2));
}

runGraph();
When you run this updated code, LangGraph's engine will automatically execute the two generation nodes in parallel after the analysis node completes. The joiner node will only run after both parallel branches have finished, effectively merging the workflows. You'll see their log messages interleave in the console, and the final state will contain the outputs from all agents.
For a deeper dive into how complex multi-agent systems are structured, including writing teams, the following video is an excellent resource.
Multi Agent Systems - a complete guide with hands-on using LangGraph | Agent Design Pattern
The video 'Multi Agent Systems - a complete guide with hands-on using LangGraph' provides a comprehensive walkthrough of building a hierarchical agent system.
Watch the segment from 00:34:51 to 00:44:06. The presenter builds a 'writing team' consisting of a doc_writer_agent, note_taking_agent, and chart_generator_agent. Observe how these are wrapped into doc_writing_node and chart_generating_node and added to a supervisor graph. This is a more advanced version of what we've done today, showing how specialized agents can collaborate on content creation.
Conclusion
Fantastic work! You have now implemented the creative engine of our content automation pipeline. By adding specialized text and visual generation agents as distinct nodes, you've moved closer to a fully autonomous system.
Key Takeaways:
- Specialized Agents: We created distinct nodes for text (
generateTextContentNode) and visual (generateVisualContentNode) content generation, each with its own tailored prompts and logic. - Multi-Stage Nodes: A single node can perform multiple steps, like our visual agent which first generates a narrative and then uses it to create image prompts.
- Parallel Execution: You learned how to use a "fan-out, fan-in" pattern in LangGraph to run independent tasks in parallel, improving the efficiency of your workflow.
- State as a Canvas: The
ContentPipelineStateacts as a shared canvas where each agent adds its contribution, building up the final product step-by-step.
Preview of the next lesson:
Our graph now autonomously generates a full suite of content, but it does so without any oversight. In our next lesson, "Integrate a human-in-the-loop approval step before the final output node," we will transform our simple joiner node into an interactive checkpoint. This will allow a human to review, edit, and approve the generated content before it moves to the final publishing stage, adding a crucial layer of quality control to our system.