Hello! Welcome back to our project on building an autonomous content creation system.
In our last lesson, we designed the architectural blueprint for our entire pipeline. Using LangGraph, we mapped out a supervisor-style workflow with specialized agents for each stage of content creation. We defined the ContentPipelineState, which will act as the shared memory for our agents, and sketched out the nodes and edges of our graph.
Today, we transition from architect to builder. Our goal is to implement the first two worker agents from our design as functional nodes within the graph. This lesson directly fulfills the learning outcome: Implement the data collection and analysis agents as nodes in the graph.
We will take the logic you conceptualized in Modules 2 and 3 and integrate it into our LangGraph structure. By the end of this session, you'll have a running, albeit partial, graph that can autonomously collect data and perform trend analysis based on a given topic.
From Diagram to Code: Implementing Nodes
As we reviewed, a LangGraph is built from nodes (functions that do work) and edges (connections that direct the flow). A node's signature is simple and powerful: it accepts the current state and returns a partial state object with its updates.
Let's start by setting up the basic structure in TypeScript. We'll use the ContentPipelineState we designed previously and initialize our StateGraph.
import { StateGraph, END } from "@langchain/langgraph";

// Re-defining the State from our previous lesson's design
interface Article {
  url: string;
  title: string;
  content: string;
}

interface TrendAnalysis {
  topic: string;
  summary: string;
  narrative: string;
  contrarianAngle: string;
  keyPoints: string[];
}

interface ContentPipelineState {
  // Input to the pipeline, e.g. "AI in frontend development"
  topic: string;

  // Populated by the data collection agent
  articles: Article[];

  // Populated by the trend analysis agent
  analysis?: TrendAnalysis;

  // We'll add more fields for content generation and routing later
  // ...
}

// Initialize the state graph
const workflow = new StateGraph<ContentPipelineState>({
  channels: {
    topic: {
      value: null,
      default: () => "",
    },
    articles: {
      value: (x: Article[], y: Article[]) => x.concat(y),
      default: () => [],
    },
    analysis: {
      value: null,
      default: () => undefined,
    }
  },
});
This setup creates a graph that manages our ContentPipelineState. Notice the channels configuration. For articles, we specify a reducer function (x, y) => x.concat(y). This tells LangGraph to append new articles to the existing list rather than overwriting it, which is useful for iterative research. For other fields, the default behavior is to replace the old value.
Implementing Node 1: The Data Collection Agent
Our first worker is the data_collection_agent. Its job is to take the initial topic from the state, find relevant articles, and add them back to the state. This is a classic "Data Step," as described in the LangGraph documentation.
Let's define the function for this node. For now, we'll use mock data to keep the focus on the LangGraph integration. In a real implementation, this is where you would plug in the RSS feed parsers and API clients you developed in Module 2.
// Node 1: Data Collection Agent
async function collectDataNode(state: ContentPipelineState): Promise<Partial<ContentPipelineState>> {
  console.log("--- Executing Data Collection Agent ---");
  const { topic } = state;
  console.log(`Collecting articles for topic: "${topic}"`);

  // --- This is where your data collection logic from Module 2 would go ---
  // e.g., call functions to fetch from HackerNews, Reddit, etc.
  const foundArticles: Article[] = [
    { url: "https://example.com/ai-react", title: "AI in React Components", content: "..." },
    { url: "https://example.com/ai-css", title: "Generative AI for CSS", content: "..." },
  ];
  // -------------------------------------------------------------------------

  console.log(`Found ${foundArticles.length} articles.`);
  return { articles: foundArticles };
}
This function is a perfect example of a LangGraph node: it reads from the state (state.topic) and returns an object representing its contribution ({ articles: ... }).
For a detailed walkthrough of implementing such a data collection node in practice (using Python, but the concepts are identical), the following video is an excellent resource. It shows how to call external APIs (like a search engine) and process the results, which is exactly what our collectDataNode would do.
How to Build an Advanced AI Agent with Search (LangGraph, Python, Bright Data & More)
The video 'How to Build an Advanced AI Agent with Search' by Tech With Tim provides a practical demonstration of building data collection nodes.
Watch the segment from 00:32:27 to 00:52:36, where the presenter implements the Google and Bing search agents. Pay attention to how the node function takes the user query from the state, calls an external service (the SERP_search function), and returns the results to be updated in the graph's state. This is a direct parallel to our collectDataNode.
Now, let's add this node to our graph and set it as the starting point.
// Add the data collection node to the graph
workflow.addNode("data_collection_agent", collectDataNode);

// Set the entry point of the graph
workflow.setEntryPoint("data_collection_agent");
Implementing Node 2: The Trend Analysis Agent
Next up is the trend_analysis_agent. This node will pick up the articles from the state, perform its analysis (as developed in Module 3), and update the state with a structured TrendAnalysis object. This is an "LLM Step" that involves reasoning and generation.
A key technique here is using an LLM with structured output to ensure the analysis conforms to our TrendAnalysis interface. This makes the output reliable and easy for downstream agents to use.
import { ChatOpenAI } from "@langchain/openai";
import { HumanMessage } from "@langchain/core/messages";

// Mock LLM for demonstration purposes. In a real scenario, you'd use a real one.
const llm = new ChatOpenAI({ modelName: "gpt-4o" }); // Replace with your actual LLM setup

// Node 2: Trend Analysis Agent
async function analyzeTrendsNode(state: ContentPipelineState): Promise<Partial<ContentPipelineState>> {
  console.log("--- Executing Trend Analysis Agent ---");
  const { articles } = state;

  // --- This is where your trend analysis logic from Module 3 would go ---
  // 1. Cluster articles to find a core theme.
  // 2. Use an LLM to generate the analysis.

  // Forcing structured output is key. Here's a simplified example:
  const structuredLLM = llm.withStructuredOutput(TrendAnalysis);

  const prompt = new HumanMessage({
    content: `Analyze the following articles and generate a trend analysis report.
    Articles:
    ${articles.map(a => `- ${a.title}`).join("\n")}

    Identify the core topic, summarize it, create a compelling narrative, find a unique or contrarian angle, and list the key takeaways.`,
  });

  const analysisResult = await structuredLLM.invoke(prompt);
  // --------------------------------------------------------------------------

  console.log("Generated Trend Analysis.");
  return { analysis: analysisResult };
}
The article "LangGraph 101" provides a great explanation of this pattern, showing how to use Pydantic (the Python equivalent of libraries like Zod or TypeBox in TypeScript) to enforce a schema on an LLM's output within a node.
LangGraph 101: Let's Build A Deep Research Agent
The article 'LangGraph 101: Let's Build A Deep Research Agent' explains how to implement the core operations inside a node.
Please read the subsection '3.1 Structured output'. It shows how to use .with_structured_output() to get reliable JSON from an LLM, which is exactly the technique we're using in our analyzeTrendsNode to generate the TrendAnalysis object.
Now, let's add this analysis node to the graph and connect it to the data collection node. This creates a simple, two-step sequence.
// Add the trend analysis node
workflow.addNode("trend_analysis_agent", analyzeTrendsNode);

// Create a static edge from data collection to trend analysis
workflow.addEdge("data_collection_agent", "trend_analysis_agent");
Compiling and Running the Graph
With our two nodes and the edge connecting them in place, we have a complete, runnable (though partial) workflow. The final step is to compile the graph and invoke it.
// This node will be the final step for now
workflow.addEdge("trend_analysis_agent", END);

// Compile the workflow into a runnable app
const app = workflow.compile();

// Let's run it!
async function runGraph() {
  const initialState = {
    topic: "The rise of AI in modern frontend development",
  };

  const finalState = await app.invoke(initialState);

  console.log("\n--- Final State ---");
  console.log(JSON.stringify(finalState, null, 2));
}

runGraph();
When you execute this code, you will see the logs from each agent running in sequence. The final output will be the complete ContentPipelineState object, populated with the results from both the data collection and trend analysis nodes.
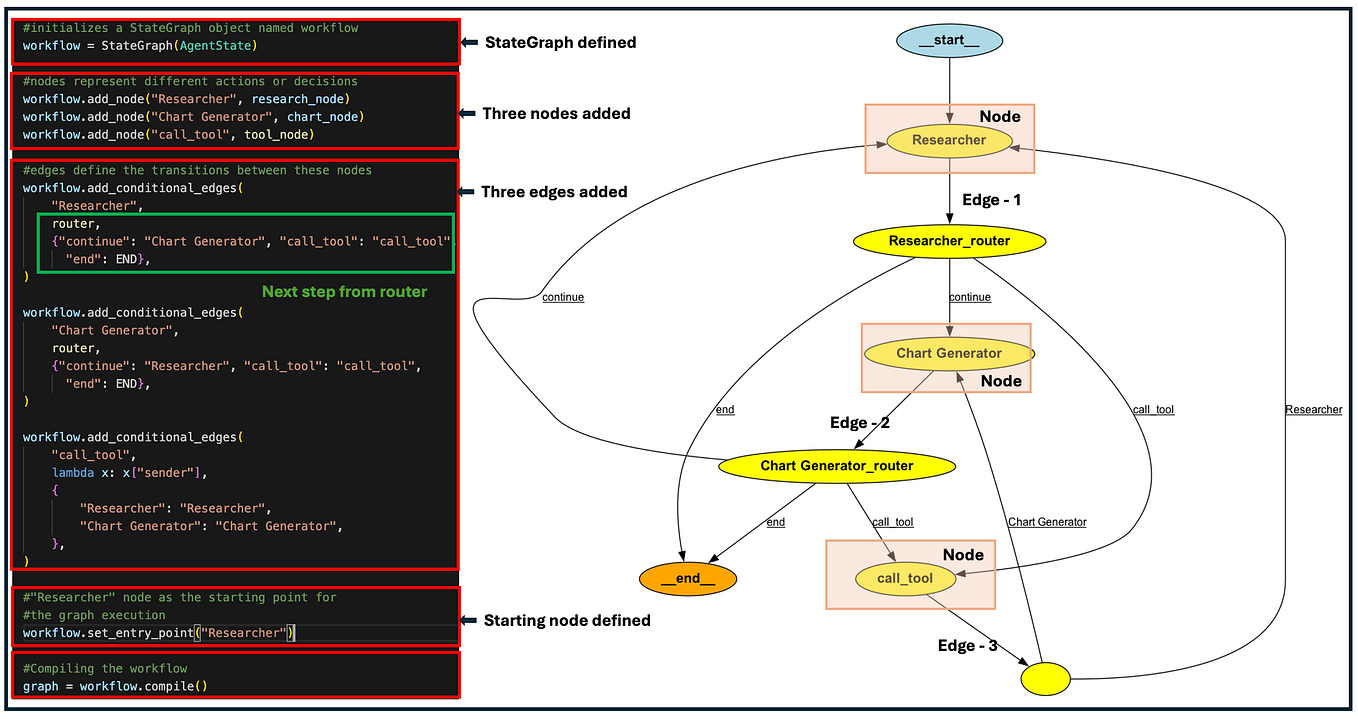
Here is a visual representation of the simple graph we've just built.
Conclusion
Congratulations! You've successfully translated the first part of our architectural design into working code. You've implemented two specialized agents as nodes in LangGraph and orchestrated their interaction through a shared state.
Key Takeaways:
- A LangGraph Node is a function that receives the current state and returns an object with the fields it wants to update.
- The
StateGraphis initialized with achannelsschema that defines the structure of your state and how updates should be merged. - You add nodes using
workflow.addNode()and connect them withworkflow.addEdge()to define a static sequence. - The
data_collection_agentacts as a "Data Step," interacting with external sources and populating the state with raw information. - The
trend_analysis_agentacts as an "LLM Step," using the information in the state to perform reasoning and generate a structured analysis.
Preview of the next lesson:
Our current graph is a simple, linear sequence. In the next lesson, "Implement the content generation agents for text and visuals as distinct nodes," we will add the supervisor router and the specialized content generation agents. This is where we'll introduce conditional edges to enable the dynamic, decision-making capabilities that are at the heart of our autonomous system.