Hello and welcome to Module 6!
In the previous modules, we've focused on building the individual, specialized tools for our content creation pipeline. You've engineered functions to gather data, analyze trends, and generate platform-specific content for LinkedIn, X, and—most recently—a complete InstagramPostPayload with visuals and a caption.
Now, it's time to transition from being a toolmaker to being an architect. This module is about assembling these individual components into a cohesive, autonomous system. Today's lesson is the blueprinting phase. We'll design the master workflow that orchestrates all the agents we've conceptualized. This directly addresses the learning outcome: Design the primary state graph for the content pipeline using LangGraph.
By the end of this lesson, you will have a complete architectural design for your agentic workflow, defining the states it will track, the agents (nodes) that will perform the work, and the logic (edges) that will guide the process from start to finish.
From Linear Chains to Dynamic Graphs
So far, you've used LangChain, likely for relatively linear sequences of operations. However, an autonomous content creation system isn't a simple, straight line. It needs to make decisions, potentially loop back to refine its work, and manage multiple parallel tasks. For example:
- What if a trend analysis is inconclusive? The agent might need to retry with new data.
- After analysis, should it create content for LinkedIn, X, or Instagram? It needs to decide.
- It should generate content for all chosen platforms, potentially in parallel.
This is where LangGraph comes in. It's a library built on top of LangChain specifically for creating stateful, multi-agent applications with cycles and complex control flow. Given your experience designing scalable, event-driven systems, you can think of LangGraph in a similar way: it orchestrates a series of workers (nodes) that communicate and pass around a persistent state object.
To understand the core difference, let's look at a video that contrasts the two frameworks.
LangChain vs LangGraph: A Tale of Two Frameworks
The video 'LangChain vs LangGraph' from IBM Technology clearly explains why the graph-based structure of LangGraph is essential for the kind of complex, stateful system we are building.
Please watch the segments on LangGraph's architecture (03:08 - 05:33) and the direct comparison (05:33 - 09:27). Focus on how LangGraph's use of nodes, edges, and a persistent state allows for loops and non-linear workflows, which are limitations in basic LangChain.
The Three Pillars of LangGraph
A LangGraph workflow is defined by three fundamental components. Understanding these is key to designing our pipeline.
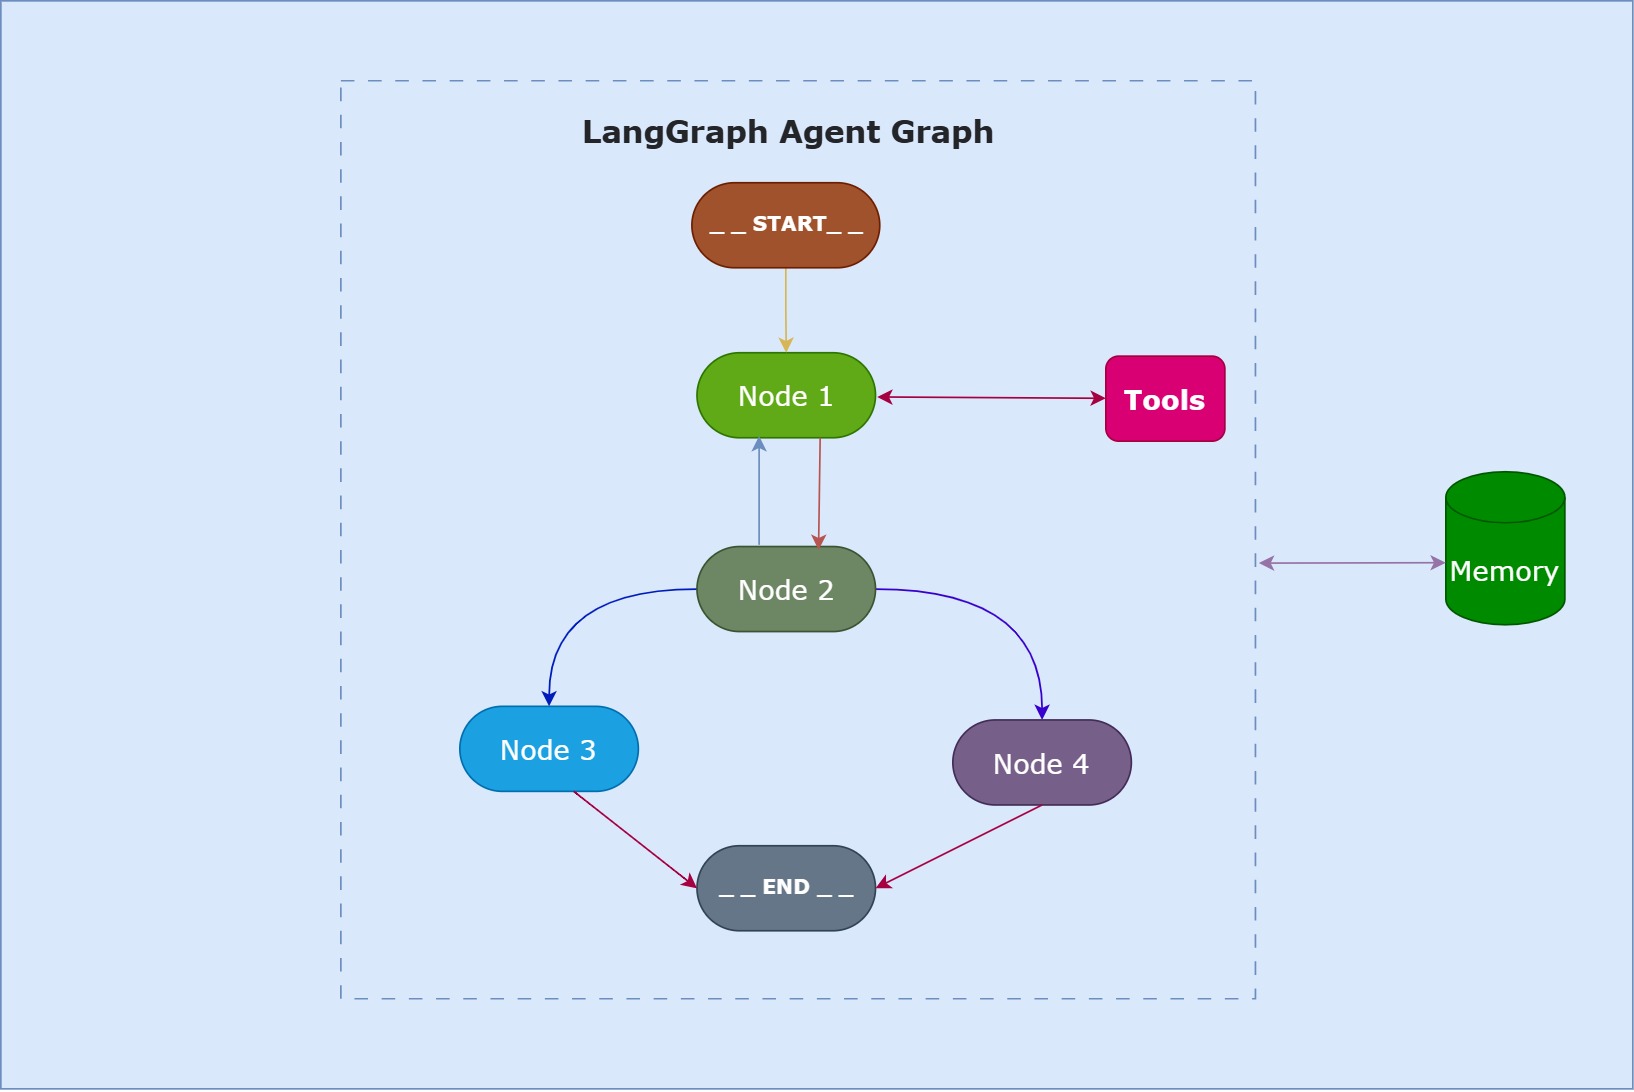
Let's explore these concepts through a detailed article.
LangGraph — Architecture and Design
The article 'LangGraph — Architecture and Design' provides an excellent breakdown of the core components. We'll use it to define the building blocks for our own graph.
Please read the section 'LangGraph Workflow Structure'. Pay close attention to the definitions and code examples for State, StateGraph, Nodes, and Edges. Although the examples are in Python, the concepts—a typed dictionary for state, functions for nodes, and conditional branching for edges—are directly transferable to TypeScript.
To summarize the key ideas from the reading:
- State: This is the shared memory of your workflow. It's a structured object (in TypeScript, we'll use an
interface) that every node can read from and write to. It holds all the data passed between steps, from raw collected articles to the final generated posts. - Nodes: These are the "workers" in your assembly line. A node is a function or a runnable (like an agent) that performs a specific task. It receives the current state, executes its logic, and returns updates to the state. All the functions you've built so far—
collectData,analyzeTrends,generateLinkedInPost—will become nodes in our graph. - Edges: These are the connections that define the control flow. An edge dictates which node runs after another. The most powerful feature here is the conditional edge, which allows the graph to dynamically route the workflow based on the current state. This is how we'll implement decision-making.
For a practical demonstration of these concepts in code, the following video is very helpful.
LangGraph Tutorial - How to Build Advanced AI Agent Systems
The 'LangGraph Tutorial' by Tech With Tim provides a hands-on walkthrough of building both a simple and a complex graph. It's a great way to see how State, Nodes, and Edges come together.
Watch the following segments. Again, focus on the concepts, not the Python-specific syntax: Graph Concepts (02:12 - 04:13): Visualizes simple vs. complex graphs with routers. Defining State (09:05 - 13:43): Shows how to create the state object. Simple Graph (13:43 - 18:15): Demonstrates adding a node and simple edges. Complex Graph Design (24:16 - 30:52): Explains how to set up a more complex state and outline different agent nodes. Conditional Edges (37:31 - 41:33): This is the most important part. See how a router node directs the flow to different agent nodes based on the state.
Activity Part 1: Designing the State for Our Content Pipeline
Before we draw the graph, let's define the data that flows through it. Our State object needs to hold all the artifacts our agents will create. Think about the entire process, from data collection to final output.
What information do we need to track? Let's design a TypeScript interface for our graph's state. It should be comprehensive enough to carry the payload between all our agents.
Here's a proposed structure. Consider it a starting point that we can refine.
interface Article {
  url: string;
  title: string;
  content: string;
}

interface TrendAnalysis {
  topic: string;
  summary: string;
  narrative: string;
  contrarianAngle: string;
  keyPoints: string[];
}

interface ContentOutputs {
  linkedInPost?: string;
  xThread?: string[];
  instagramPayload?: InstagramPostPayload; // We defined this in the last lesson
}

// The main state for our LangGraph workflow
export interface ContentPipelineState {
  // Input to the pipeline
  topic: string;

  // State after data collection
  articles: Article[];

  // State after trend analysis
  analysis?: TrendAnalysis;

  // State after content generation
  generatedContent: ContentOutputs;

  // For routing and error handling
  nextAction: string;
  error?: string;
}
This state object acts as a centralized container. The data_collection agent will populate articles. The trend_analysis agent will read articles and populate analysis. The generation agents will populate generatedContent, and the nextAction field will be used by our router to decide where to go next.
Activity Part 2: Architecting the Primary State Graph
Now for the main event: designing the graph itself. For a multi-agent system like ours, a common and effective design is the Supervisor pattern. One "supervisor" agent acts as a router, delegating tasks to a team of specialized "worker" agents.

This pattern is a perfect fit for our content pipeline. We will have a central router that, after the initial trend analysis, decides which content generation agents to call.
Let's sketch out the nodes and edges for our ContentPipelineStateGraph. The nodes correspond directly to the major steps outlined in our course modules.
Our Agent Nodes (The Workers):
data_collection_agent: (From Module 2) Gathers articles from sources like HackerNews, Reddit, etc.trend_analysis_agent: (From Module 3) Takes the articles, identifies a trend, and produces a structuredTrendAnalysisobject.linkedin_generation_agent: (From Module 4) Generates a long-form LinkedIn post from the analysis.x_generation_agent: (From Module 4) Generates an X (Twitter) thread.instagram_generation_agent: (From Module 5) Generates an Instagram carousel plan and the finalInstagramPostPayload.human_approval_node: (From Module 6) A special node that pauses the graph to wait for a human to approve the generated content.
The Supervisor (The Router):
The supervisor_router node is the brain. Its job is to look at the state and decide what to do next. It will be implemented as a conditional edge.
Here is a visual representation of our proposed graph using Mermaid syntax, which is great for sketching out graph structures.
graph TD
    A[START] --> B(data_collection_agent);
    B --> C(trend_analysis_agent);
    C --> D{supervisor_router};
    D -- Call LinkedIn Agent --> E(linkedin_generation_agent);
    D -- Call X Agent --> F(x_generation_agent);
    D -- Call Instagram Agent --> G(instagram_generation_agent);
    E --> H{aggregator_and_check_completion};
    F --> H;
    G --> H;
    H -- More content to generate --> D;
    H -- All content generated --> I(human_approval_node);
    I -- Approved --> J[END];
    I -- Rejected/Revise --> C;
Let's walk through the flow:
- The graph starts and immediately calls the
data_collection_agent. - Once data is collected, it moves to the
trend_analysis_agent. - The output of the analysis goes to the
supervisor_router. This router inspects the state to decide which content to generate. It might decide to call all three generation agents. - It calls the generation agents one by one (or in parallel, an advanced topic we'll touch on later). After each agent runs, control returns to an
aggregatornode. - The
aggregator_and_check_completionnode checks if all requested content has been generated. If not, it routes back to thesupervisor_routerto pick the next agent. - Once all content is generated, it proceeds to the
human_approval_node. - If the human approves, the graph ends, with the final content stored in the state. If rejected, it could route back to the
trend_analysis_agentfor a re-do.
This design gives us a robust, flexible, and observable workflow that forms the backbone of our autonomous system. The article below discusses this supervisor pattern with a content creation example that's very similar to ours.
LangGraph Multi-Agent Systems: Complete Tutorial & Examples
The 'LangGraph Multi-Agent Systems' tutorial provides a great overview of common architectural patterns. Let's focus on the one we're using.
First, read 'Main Architecture Patterns' to solidify your understanding of the Supervisor architecture. Then, review the 'Basic Multi-Agent Workflow Example' which describes a Research, Writing, and Editor agent team coordinated by a Supervisor—this should feel very familiar!
Conclusion
Fantastic work today. We've moved from isolated components to a complete architectural blueprint for our autonomous content creation agent. By leveraging LangGraph, we can build a system that is far more intelligent and flexible than a simple linear chain.
Key Takeaways:
- LangGraph is essential for building complex, stateful agentic workflows that require loops, branching, and persistent memory.
- A LangGraph is composed of State (the shared data), Nodes (the workers), and Edges (the control flow logic).
- The Supervisor pattern is a powerful architecture for orchestrating a team of specialized agents, using a central router to delegate tasks.
- We have designed a primary state graph for our content pipeline, defining the
ContentPipelineStateand mapping out the nodes and edges that will orchestrate the entire workflow.
Preview of the next lesson:
With our architectural blueprint in hand, we can now start the implementation. In the next lesson, "Implement the data collection and analysis agents as nodes in the graph," we will take the code from Modules 2 and 3 and wrap it into the first two nodes of our StateGraph, bringing our design to life in TypeScript.