Hello! Welcome back to the final lesson in our initial implementation module.
In our last session, we put in place a professional, Spring-native way to handle rate limit violations. Your RateLimitInterceptor now throws a custom RateLimitExceededException, which is caught by a GlobalExceptionHandler that returns a structured HTTP 429 Too Many Requests JSON response.
Manually testing this with curl or Postman is a good first step, but it's not scalable or repeatable. To build a reliable system, we need to automate this verification process.
Your learning outcome for this lesson:
By the end of this lesson, you will be able to write an integration test using @SpringBootTest to verify the rate-limited endpoint. This test will confirm that your entire rate-limiting mechanism—from the interceptor to the exception handler—works together as a cohesive unit.
1. The Spring Boot Testing Landscape
Before we write code, it's important to understand the different types of tests you can write for a Spring Boot application and why we're choosing a specific approach.
At a high level, Spring provides two primary annotations for testing web endpoints:
@WebMvcTest: This is a more focused test that loads only the web layer (controllers, interceptors, filters,ControllerAdvice, etc.) without loading the full application context. It's faster and is ideal for testing the logic within a controller in isolation from other services.@SpringBootTest: This is a full-blown integration test. It bootstraps your entire application, loading the complete Spring application context, including all beans, services, and configurations. It's slower but essential for verifying the end-to-end behavior of a feature.
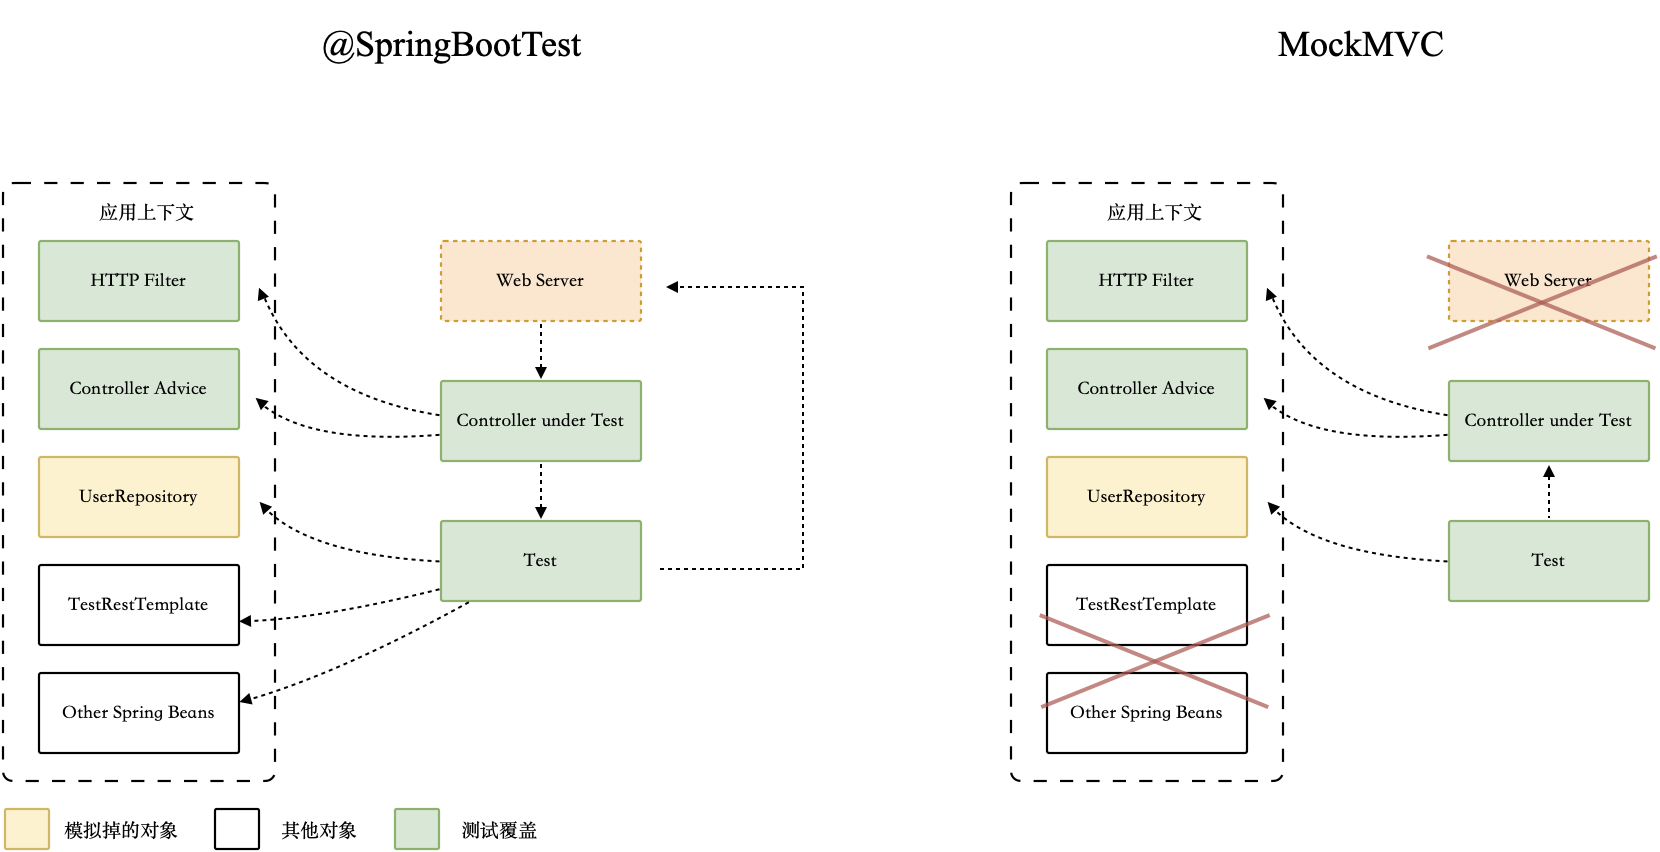
For our purpose, we need to verify that the RateLimitInterceptor, the RateLimiter bean it depends on, and the GlobalExceptionHandler all work together correctly. This requires the full application context, making @SpringBootTest the right tool for the job.
To get a clearer picture of these testing strategies, the following video provides a great practical demonstration.
Spring Boot Testing a REST Controller with Unit, Integration & Acceptance Tests
The video 'Spring Boot Testing a REST Controller' by Kris Foster demonstrates the practical differences between a unit test, an integration test using @WebMvcTest, and an acceptance test using @SpringBootTest. It will help solidify your understanding of which tool to use and when.
Watch the sections on integration testing (10:44-20:58) and acceptance testing (20:58-24:56). Pay close attention to the annotations used (@WebMvcTest vs. @SpringBootTest) and how the scope of what's being tested changes.
2. Setting Up the Integration Test
Let's create our test class. In your src/test/java directory, create a new class, for instance, RateLimiterIntegrationTest.java.
This test will use MockMvc, a powerful utility from the Spring Test framework that allows us to simulate HTTP requests to our controllers without needing to run a real web server.
Here is the basic structure of the test class:
src/test/java/com/example/ratelimiter/RateLimiterIntegrationTest.java:
package com.example.ratelimiter;

import org.junit.jupiter.api.Test;
import org.springframework.beans.factory.annotation.Autowired;
import org.springframework.boot.test.autoconfigure.web.servlet.AutoConfigureMockMvc;
import org.springframework.boot.test.context.SpringBootTest;
import org.springframework.test.web.servlet.MockMvc;

@SpringBootTest
@AutoConfigureMockMvc
public class RateLimiterIntegrationTest {

    @Autowired
    private MockMvc mockMvc;

    @Test
    void aTestToStartWith() {
        // We will implement our test logic here
    }
}
Let's break down the annotations:
@SpringBootTest: Tells Spring Boot to look for a main configuration class (e.g.,@SpringBootApplication) and use it to start a Spring application context for the test.@AutoConfigureMockMvc: Automatically configures aMockMvcinstance that is connected to your application context.@Autowired private MockMvc mockMvc;: Injects the configuredMockMvcinstance so we can use it to perform requests.
The following resource provides a complete example of a test class that verifies a rate limiter, which will serve as an excellent guide for our implementation.
The article 'Rate Limiter in Distributed Systems' contains a file, RateLimiterTest.java, that provides a perfect template for the tests we need to write. We will adapt its structure for our project.
Review the code in the RateLimiterTest.java section. Notice the three distinct test methods: one for requests within the limit, one for requests exceeding the limit, and one for verifying the limit reset. We will implement these three scenarios.
3. Implementing the Test Scenarios
Now, let's implement the core logic for our tests based on the structure from the RateLimiterTest.java example. We'll write three tests to cover the essential behaviors of our fixed window rate limiter. For this example, let's assume your fixed window is configured to allow 5 requests per minute.
3.1. Test 1: Allowing Requests Within the Limit
This test ensures that a client can make requests as long as they stay within the configured limit.
import static org.springframework.test.web.servlet.request.MockMvcRequestBuilders.get;
import static org.springframework.test.web.servlet.result.MockMvcResultMatchers.status;

// ... inside RateLimiterIntegrationTest class

@Test
void shouldAllowRequestsWithinLimit() throws Exception {
    int limit = 5; // Assuming your limit is 5
    String endpoint = "/api/resource"; // Use your protected endpoint

    for (int i = 0; i < limit; i++) {
        mockMvc.perform(get(endpoint))
               .andExpect(status().isOk());
    }
}
Here, we loop limit times, performing a GET request to our protected endpoint in each iteration. For each of these requests, we expect an HTTP 200 OK status.
3.2. Test 2: Blocking Requests That Exceed the Limit
This test verifies that once the limit is reached, the very next request is blocked with the correct status code.
import static org.springframework.test.web.servlet.result.MockMvcResultMatchers.jsonPath;

// ... inside RateLimiterIntegrationTest class

@Test
void shouldBlockRequestsExceedingLimit() throws Exception {
    int limit = 5;
    String endpoint = "/api/resource";

    // 1. Exhaust the limit
    for (int i = 0; i < limit; i++) {
        mockMvc.perform(get(endpoint))
               .andExpect(status().isOk());
    }

    // 2. The next request should be blocked
    mockMvc.perform(get(endpoint))
           .andExpect(status().isTooManyRequests())
           .andExpect(jsonPath("$.error").value("Too Many Requests"))
           .andExpect(jsonPath("$.message").value("You have exceeded your request rate limit."));
}
Notice the additional assertions. We're not only checking for status().isTooManyRequests() (HTTP 429), but we're also using jsonPath() to inspect the JSON response body and ensure it contains the structured error message from our GlobalExceptionHandler. This confirms the entire flow is working.
3.3. Ensuring Test Isolation
There's a subtle but critical problem with the tests above. They share the same application context, which means they share the same in-memory RateLimiter bean and its underlying ConcurrentHashMap. If shouldBlockRequestsExceedingLimit runs before shouldAllowRequestsWithinLimit, the latter will fail because the request counter has already been incremented.
Tests must be independent. We need to reset the state before each test. The most efficient way to do this is to clear our in-memory store.
First, let's add a clear() method to your RateLimiter interface and its FixedWindowCounter implementation.
src/main/java/com/example/ratelimiter/core/RateLimiter.java:
public interface RateLimiter {
    boolean tryAcquire(String key);
    void clear(); // Add this method
}
src/main/java/com/example/ratelimiter/core/FixedWindowCounter.java:
// ...
@Override
public void clear() {
    windows.clear();
}
// ...
Now, we can use a @BeforeEach method in our test class to reset the state.
src/test/java/com/example/ratelimiter/RateLimiterIntegrationTest.java:
import com.example.ratelimiter.core.RateLimiter;
import org.junit.jupiter.api.BeforeEach;
// ... other imports

@SpringBootTest
@AutoConfigureMockMvc
public class RateLimiterIntegrationTest {

    @Autowired
    private MockMvc mockMvc;

    @Autowired
    private RateLimiter rateLimiter; // Inject the RateLimiter bean

    @BeforeEach
    void setUp() {
        // Reset the state of the rate limiter before each test
        rateLimiter.clear();
    }

    // ... your @Test methods here ...
}
With this setup, each test starts with a clean slate, ensuring they are independent and can run in any order.
Key Takeaways
@SpringBootTestis used for integration tests that require the full application context, making it ideal for verifying the interaction between multiple components like controllers, interceptors, and services.MockMvcprovides a fluent API to simulate HTTP requests and make assertions on the responses (status, headers, and body).- Test Isolation is Crucial: When testing stateful components like an in-memory rate limiter, you must reset the state before each test (e.g., using
@BeforeEach) to ensure your tests are independent and reliable. - Assert Thoroughly: Don't just check for the correct status code. Use tools like
jsonPathto verify the structure and content of the response body, ensuring the entire end-to-end flow is correct.
Next Steps
Congratulations! You've successfully built and tested the first version of your rate limiter. You have a solid foundation with a working in-memory algorithm, a flexible key resolver, and a robust integration test suite.
However, the Fixed Window Counter has known limitations, such as the "boundary burst problem." In the next module, Advanced In-Memory Implementations, we will start by implementing the in-memory sliding window counter algorithm, which provides a much more accurate way to enforce rate limits.