Hello! Welcome back to your project on building a rate limiter.
In our previous lessons, we've built the foundational components of our system:
- A
RateLimiterstrategy, with an initialFixedWindowCounterimplementation. This component knows how to enforce a limit. - A
RateLimitKeyResolverstrategy, with anIpAddressKeyResolverimplementation. This component knows who is making the request.
Now it's time to connect these pieces to our Spring Boot application and make them do their job: protecting our API endpoints.
Your learning outcome for this lesson:
By the end of this lesson, you will be able to integrate the rate limiter into the Spring Boot request lifecycle using the configured interceptor and return an HTTP 429 (Too Many Requests) response when a limit is exceeded.
1. Intercepting Requests with HandlerInterceptor
To check if a request should be rate-limited, we need to execute our logic before the request reaches the controller's handler method. If we wait until the controller method is executing, we've already wasted server resources on a request that should have been blocked.
Spring MVC provides a powerful mechanism for this called a HandlerInterceptor. It allows you to "intercept" the request-response cycle at three key points.

The HandlerInterceptor interface has three default methods you can override:
preHandle(): Executed before the target controller method. This is where we will implement our rate-limiting check. It returns a boolean:trueto continue processing the request,falseto stop it.postHandle(): Executed after the controller method but before the response is sent to the client. Useful for modifying the response or adding common headers.afterCompletion(): Executed after the complete request has finished and the response has been sent. Useful for cleanup tasks.
Let's watch a video that introduces the concept and demonstrates how to create and register a basic interceptor.
Using Interceptor in Spring Boot
This video from The Tech Mojo provides a clear, practical introduction to Spring Boot interceptors. It will show you how to implement the HandlerInterceptor interface and its key methods.
Watch from 00:50 to 02:05 to understand the purpose of interceptors. Then, watch from 04:18 to 10:43 to see a demonstration of creating an interceptor class, overriding the preHandle method, and registering it.
2. Implementing the RateLimitInterceptor
Now, let's create our own RateLimitInterceptor. This class will be the central point of our integration, bringing together the key resolver and the rate limiter logic.
Here are the steps we'll follow in our implementation:
- Create the class: It will implement the
HandlerInterceptorinterface. - Make it a Spring Bean: We'll annotate it with
@Componentso Spring's dependency injection container can manage it. - Inject Dependencies: We'll use constructor injection to get the
RateLimiterandRateLimitKeyResolverbeans. Since we've defined only one implementation for each so far (FixedWindowCounterandIpAddressKeyResolver, which should also be annotated as@Components), Spring will automatically wire them in. - Implement
preHandle(): This is where the core logic resides. We'll resolve the key, check the rate limit, and either allow or block the request.
The article snippets below provide excellent templates for our RateLimitInterceptor and its configuration.
Rate Limiter in Distributed Systems: Protecting Your APIs with Java ...
This article from Baeldung... wait, it's from Medium. This article from Medium, 'Rate Limiter in Distributed Systems', provides a very clear and direct example of a RateLimiterInterceptor that uses Redis. We will adapt its structure for our in-memory implementation.
Focus on the preHandle method in the RateLimiterInterceptor.java code snippet. Notice how it gets an identifier (the IP address), checks a counter, and then returns false while setting the response status if the limit is exceeded.
Based on this structure, here is the complete code for our RateLimitInterceptor.java. It cleanly integrates the components we've already built.
package com.example.ratelimiter.interceptor;

import com.example.ratelimiter.core.RateLimiter;
import com.example.ratelimiter.core.RateLimitKeyResolver;
import jakarta.servlet.http.HttpServletRequest;
import jakarta.servlet.http.HttpServletResponse;
import org.springframework.http.HttpStatus;
import org.springframework.stereotype.Component;
import org.springframework.web.servlet.HandlerInterceptor;

@Component
public class RateLimitInterceptor implements HandlerInterceptor {

    private final RateLimiter rateLimiter;
    private final RateLimitKeyResolver keyResolver;

    // Using constructor injection to get our strategy beans from the Spring context.
    public RateLimitInterceptor(RateLimiter rateLimiter, RateLimitKeyResolver keyResolver) {
        this.rateLimiter = rateLimiter;
        this.keyResolver = keyResolver;
    }

    @Override
    public boolean preHandle(HttpServletRequest request, HttpServletResponse response, Object handler) throws Exception {
        // 1. Resolve the client key using our configured strategy.
        String key = keyResolver.resolve(request);

        // 2. Check if the request is allowed by the rate limiter.
        if (rateLimiter.tryAcquire(key)) {
            // If allowed, continue to the controller.
            return true;
        } else {
            // If denied, set the 429 status and stop the request.
            response.setStatus(HttpStatus.TOO_MANY_REQUESTS.value());
            response.getWriter().write("Too Many Requests");
            return false;
        }
    }
}
3. Registering the Interceptor with Spring
Creating the interceptor class isn't enough. We need to tell Spring when and where to apply it. This is done by creating a configuration class that implements WebMvcConfigurer.
This configuration class will:
- Be annotated with
@Configurationto mark it as a source of bean definitions. - Implement the
addInterceptorsmethod. - Inside
addInterceptors, we'll add ourRateLimitInterceptorto theInterceptorRegistry. - We'll use
addPathPatternsto specify that our interceptor should only apply to API endpoints, for example, everything under/api/.
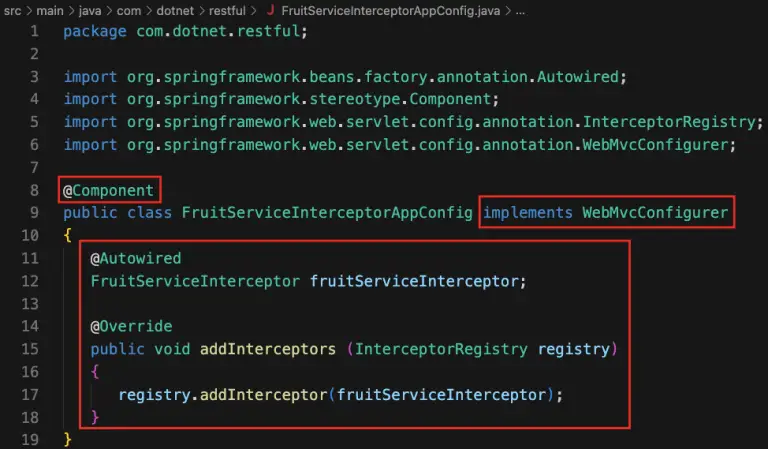
Let's look at another code example and a short video segment that solidify this concept.
How to Implement Sliding Window Rate Limiting in Spring
The WebConfig.java file from the OneUptime article is a perfect example of how to register our interceptor and apply it to specific API endpoints.
Scroll down to the WebConfig.java snippet. Note the @Configuration annotation and the use of registry.addInterceptor() along with addPathPatterns().
Here's the code for our WebConfig.java:
package com.example.ratelimiter.config;

import com.example.ratelimiter.interceptor.RateLimitInterceptor;
import org.springframework.context.annotation.Configuration;
import org.springframework.web.servlet.config.annotation.InterceptorRegistry;
import org.springframework.web.servlet.config.annotation.WebMvcConfigurer;

@Configuration
public class WebConfig implements WebMvcConfigurer {

    private final RateLimitInterceptor rateLimitInterceptor;

    // Spring injects our interceptor bean here.
    public WebConfig(RateLimitInterceptor rateLimitInterceptor) {
        this.rateLimitInterceptor = rateLimitInterceptor;
    }

    @Override
    public void addInterceptors(InterceptorRegistry registry) {
        // Register the interceptor and define which paths it should apply to.
        registry.addInterceptor(rateLimitInterceptor)
                .addPathPatterns("/api/**"); // Protect all endpoints under /api/*
    }
}
With this configuration in place, any HTTP request to a URL like /api/users or /api/products will first pass through our RateLimitInterceptor's preHandle method before it ever reaches the corresponding controller.
Key Takeaways
HandlerInterceptoris the Spring MVC component used to inject logic into the request lifecycle, perfect for cross-cutting concerns like rate limiting.- The
preHandlemethod is the ideal place for our check, as it runs before the controller and can prevent the request from proceeding by returningfalse. - We use
WebMvcConfigurerand theaddInterceptorsmethod to register our interceptor with Spring. addPathPatternsgives us fine-grained control over which endpoints are protected by the interceptor.- When a limit is exceeded, we stop the request processing and return an HTTP 429 (Too Many Requests) status code.
Next Steps
Fantastic work! You have now fully integrated the core components of the rate limiter. You have an algorithm, a key resolver, and an interceptor that ties them into the request pipeline.
But how do we know it actually works? In the next lesson, we will focus on verification. You will learn how to write an integration test using @SpringBootTest to simulate a burst of requests and verify that our rate-limited endpoint correctly allows some requests and blocks others with a 429 status.