Introduction
In our last lesson, we explored the heart of the Spring Framework: the ApplicationContext, or IoC container. We learned that its primary job is to manage the lifecycle of your application's objects, which we call Spring Beans. A key responsibility we identified was "Bean Definition and Discovery"—the process by which the container finds out which objects it's supposed to manage.
This lesson directly addresses that discovery process. Our goal is to learn how to define Spring beans using component scanning and stereotype annotations like @Component, @Service, and @Repository. You will learn how to mark your Java classes so that the Spring container can automatically find them, instantiate them, and add them to its registry of managed beans. This is the first practical step in handing control over to the framework, allowing us to build a declarative, loosely-coupled application.
Component Scanning and the @Component Annotation
The primary mechanism for automatic bean discovery in modern Spring is component scanning. When the application starts, Spring scans your project's classpath (the set of directories and JAR files where your compiled code resides) looking for classes that are marked as candidates for bean creation.
The most fundamental way to mark a class is with the @Component annotation. It's a generic stereotype annotation that effectively tells Spring, "This class is a component of my application; please create and manage an instance of it."
To start, let's get a clear definition of @Component and how it relates to the ApplicationContext. This article from Baeldung provides a concise overview.
Read sections '2. Spring ApplicationContext' and '3. @Component'. Focus on how @Component is the fundamental annotation that allows Spring to automatically detect your custom classes as beans.
By placing @Component above your class definition, you are flagging it for the container. During startup, the component scan will find this class, and the ApplicationContext will create a single instance of it by default (the singleton scope we discussed previously).
Specialized Stereotypes: @Service, @Repository, and @Controller
While you could theoretically use @Component for every bean, doing so would be like using a generic Object type for every variable. It works, but it lacks clarity and intent. Spring provides more specialized annotations that serve as specializations of @Component. These are known as stereotype annotations because they classify beans according to their "stereotype" or role in the application architecture.
The three most common stereotypes are:
@Service: Used for the service layer, which contains business logic.@Repository: Used for the persistence or data access layer (DAOs), which interacts with the database.@Controller(or@RestController): Used for the presentation layer, which handles incoming web requests. We will explore this one in detail in a later module.
Functionally, annotating a class with @Service is the same as annotating it with @Component. The container will still create a bean from it. However, using the specialized annotations provides two key benefits:
- Semantic Clarity: It clearly communicates the role of the class to other developers. When you see
@Service, you know you're looking at business logic. This aligns with the principles of clean, layered architecture. - Additional Framework Processing: Some stereotypes enable extra features. For example,
@Repositoryenables a Spring feature that automatically translates low-level persistence exceptions (like aSQLExceptionfrom JDBC) into Spring's consistentDataAccessExceptionhierarchy, preventing you from having to handle specific database vendor errors.
Top 10 Spring Annotations to know in 2024
This video from Java Brains offers an excellent explanation of @Component and its relationship to the specialized stereotype annotations.
Please watch from 01:38 to 09:01. The first part (up to 04:08) describes @Component as the foundational annotation. The second part introduces @Service, @Repository, and @Controller and explains their purpose in structuring an application.
As the video explains, @Service, @Repository, and @Controller are themselves annotated with @Component. This is a concept in Java called meta-annotations. It means they inherit the core behavior of @Component while adding their own specific meaning.
The following diagram visualizes this relationship:

The Link Between Annotations and Bean Creation
It's crucial to understand that it's the stereotype nature of these annotations that triggers the automatic bean registration during a component scan. Other Spring annotations, like @RequestMapping or @Autowired (which we'll see soon), serve different purposes and do not cause a bean to be created.
Difference between Component Service Repository Controller & RestController annotation | Code Decode
So, how does an annotation actually lead to a bean being created? This next video provides a practical demonstration showing that only stereotype annotations trigger automatic bean registration.
Watch from 07:41 to 10:47. The presenter demonstrates that removing a stereotype annotation (@RestController) causes the application to fail because the bean is no longer created and registered in the container. This clearly shows the direct link between stereotypes and the bean creation process.
This automatic registration is the essence of component scanning. The framework scans for these specific markers, reads the class definition, and then creates the bean instance for you.
This entire process is summarized in the diagram below:
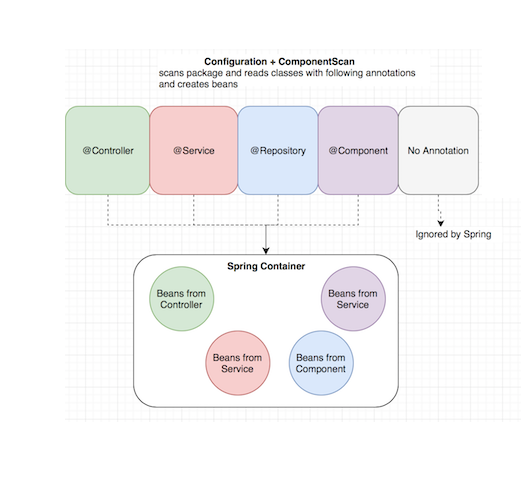
Component Scanning in a Spring Boot Application
Now for the practical part: how do you enable and configure component scanning?
In a modern Spring Boot application, this is handled for you automatically. The @SpringBootApplication annotation, which is placed on your main application class, is a composite annotation that includes @ComponentScan.
By default, @ComponentScan tells Spring to scan the package where the main application class is located, and all of its sub-packages.
This convention has a strong influence on how you should structure your project. A standard layout looks like this:
src/main/java/
└── com/yourapp/
    ├── MySpringBootApplication.java    // Annotated with @SpringBootApplication
    │
    ├── controller/
    │   └── UserController.java         // Annotated with @RestController
    │
    ├── service/
    │   └── UserService.java            // Annotated with @Service
    │
    └── repository/
        └── UserRepository.java         // Annotated with @Repository
In this structure, the main class MySpringBootApplication is in the root package com.yourapp. Because @SpringBootApplication enables component scanning from this root package, Spring will automatically scan the controller, service, and repository sub-packages and find UserController, UserService, and UserRepository, creating beans for each.
Component Scanning with Spring Boot
The following article from Reflectoring provides a clear explanation of this default behavior in Spring Boot.
Read the section titled 'When to Use Component Scanning'. It concisely explains how @SpringBootApplication implies @ComponentScan and defines the default scanning scope. This is a core convention you'll use in every Spring Boot project.
This "convention over configuration" approach is powerful. As long as you place your components within the sub-packages of your main application class, they will be automatically detected without any explicit configuration.
Conclusion
In this lesson, we bridged the gap between the theoretical ApplicationContext and the practical creation of beans. You now know how to use component scanning and stereotype annotations to declaratively define the components of your application.
Here are the key takeaways:
- Component Scanning is Spring's process for automatically discovering beans by scanning the classpath.
@Componentis the generic stereotype annotation that marks a class as a candidate for bean creation.@Service,@Repository, and@Controllerare specialized stereotypes that add semantic meaning for the business, data access, and presentation layers, respectively.- Using specialized stereotypes is preferred as it improves code clarity and can enable additional framework features.
- In Spring Boot, component scanning is enabled by default via
@SpringBootApplication, which scans the current package and all its sub-packages.
We've now told the Spring container which objects to create. The next logical question is: how do we connect them to each other? For example, how does our UserService get a reference to the UserRepository bean it needs to function?
That is the topic of our next lesson, where we will cover injecting dependencies using constructor injection with @Autowired. This will complete our understanding of the fundamental IoC/DI mechanism in Spring.