Introduction
In our last lesson, we learned how to declare our application's components using stereotype annotations like @Service and @Repository. This allows the Spring ApplicationContext to scan our project, find these classes, and create instances of them, known as beans. We now have a container full of managed objects, but they are isolated. The next logical step is to connect them. For instance, a UserService needs a UserRepository to function; it has a dependency on it.
This lesson focuses on exactly that: injecting dependencies using constructor injection with @Autowired. We will explore the core concept of Dependency Injection (DI), see how it manifests in Spring, and, most importantly, understand why constructor injection is the recommended and most robust method for wiring your components together. This completes the fundamental cycle of Inversion of Control: the framework not only creates your objects but also manages their dependencies for you.
What is Dependency Injection?
Before we look at Spring's annotations, let's solidify the concept of Dependency Injection itself. In any non-trivial application, objects collaborate to get work done. This means one object needs a reference to another.
The naive approach is for an object to create its own dependencies:
public class UserService {
    // Tightly coupled dependency creation
    private UserRepository userRepository = new UserRepository();

    public void findUser(long id) {
        // ... uses userRepository
    }
}
This creates a tight coupling between UserService and the concrete UserRepository class. It makes the code rigid, difficult to test (you can't easily substitute UserRepository with a mock version), and hard to manage.
Dependency Injection inverts this. Instead of creating its own dependencies, an object declares what it needs, and an external entity (the Spring IoC container) "injects" those dependencies into it.
To see this principle in action without the complexity of Spring, let's watch a short segment of a video.
Top 5 Reasons Why Constructor Injection is Recommended ? Spring dependency injection | Spring Boot
This video from Selenium Express uses a simple, non-Spring example of a Human class that depends on Air and Water to survive. It's an excellent illustration of the core problem and how providing dependencies from the outside (injection) solves it.
Watch from 02:55 to 13:20. The video first demonstrates the problem of uninitialized dependencies. It then shows two ways to inject them manually: through a constructor and through setter methods. Pay close attention to the comparison between these two approaches, especially the discussion around why the constructor makes dependencies mandatory.
As the video demonstrates, passing dependencies through the constructor is a robust way to ensure an object is always in a valid, usable state upon creation.
Dependency Injection Methods in Spring
Spring provides three primary ways to perform dependency injection, all of which typically use the @Autowired annotation to signal to the container that a dependency needs to be supplied.
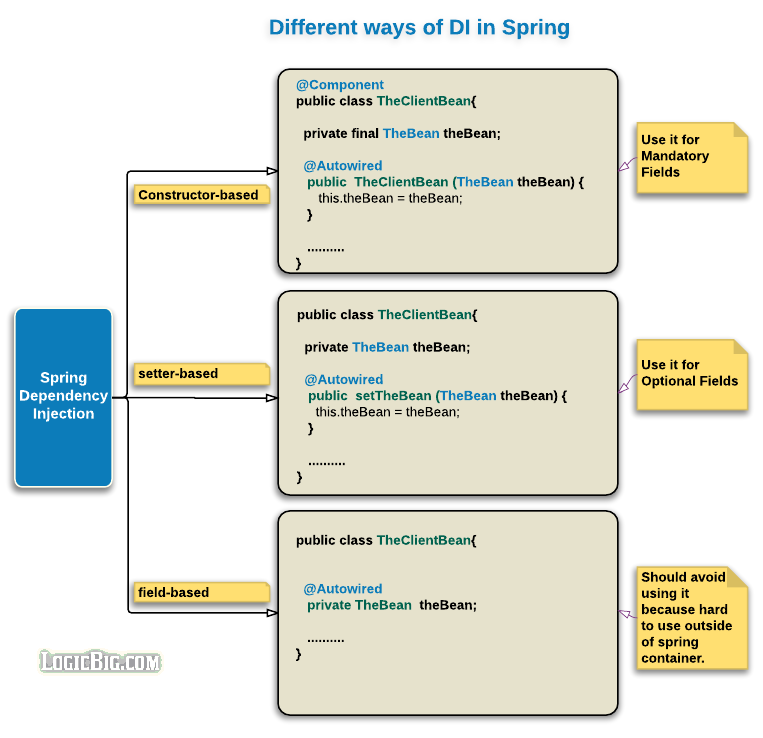
- Constructor Injection: Dependencies are provided as parameters to the class's constructor. This is the recommended method.
- Setter Injection: Dependencies are provided through public setter methods. This is generally used for optional dependencies.
- Field Injection: Dependencies are injected directly into the class fields. This is discouraged as it makes testing more difficult and hides dependencies from the outside world.
Given your background in system design, the benefits of making dependencies explicit and ensuring object immutability will be clear. Constructor injection is the only method that robustly supports these principles.
Implementing Constructor Injection
Now, let's apply this to a Spring context. Imagine we have a UserService that depends on a UserRepository. Both are defined as Spring beans.
@Service // This is a Spring bean
public class UserService {

    private final UserRepository userRepository; // The dependency

    // Spring will see this constructor and look for a bean of type UserRepository
    public UserService(UserRepository userRepository) {
        this.userRepository = userRepository;
    }

    // ... methods that use userRepository
}

@Repository // This is also a Spring bean
public class UserRepository {
    // ... data access logic
}
When Spring creates the UserService bean, it inspects its constructor. It sees a required parameter of type UserRepository. It then looks in its container for a bean that matches this type. Finding the UserRepository bean, it passes that instance into the constructor, and the UserService is born fully formed and ready to use.
The Role of @Autowired
You will often see @Autowired on the constructor:
@Service
public class UserService {
    private final UserRepository userRepository;

    @Autowired // Explicitly marks the constructor for injection
    public UserService(UserRepository userRepository) {
        this.userRepository = userRepository;
    }
}
However, as the official Spring documentation states, this is often optional.
Using @Autowired - Spring Framework Documentation
Let's read the official Spring documentation on constructor injection. It's concise and provides the definitive rule on when @Autowired is necessary.
Read the first two parts of the page, focusing on the example of constructor injection and the note directly below it. This note explains the crucial rule: if a class has only one constructor, @Autowired is not required.
Key Rule: As of Spring 4.3, if a class has only one constructor, you do not need to annotate it with @Autowired. Spring will automatically use that constructor for dependency injection. If you have multiple constructors, you must use @Autowired to tell Spring which one to use.
Since it is a best practice for your beans to have only one constructor for injecting mandatory dependencies, you will often find that you don't need to write @Autowired at all.
How Does It Work Internally?
Your preference for understanding the "why" behind framework features is valuable. Spring's "magic" is just well-written code, often using a powerful Java feature called Reflection.
Spring Autowiring - It's a kind of magic - Part 1
This blog post from Scott Logic peels back the curtain and investigates how Spring accomplishes constructor injection without an explicit @Autowired annotation.
Read the sections 'Autowiring with a single constructor' and the analysis that follows. The author uses logs and a debugger to show that Spring uses Java Reflection (specifically Class.getDeclaredConstructors()) to find the single constructor and then invokes it (Constructor.newInstance()) after resolving its parameters from the bean container. This provides a clear, low-level view of the mechanism.
Why Constructor Injection is a Best Practice
We've established that constructor injection is the recommended approach. Let's dive into the specific design and engineering reasons why this is the case. These principles are universal and align with robust system design practices you're likely familiar with from other ecosystems.
Top 5 Reasons Why Constructor Injection is Recommended ? Spring dependency injection | Spring Boot
The following video is an excellent deep dive into the practical benefits of constructor injection over other methods. It covers immutability, testability, and design principles.
This is the core of our lesson. Please watch these segments carefully: Mandatory Dependencies (31:02 - 32:22): Explains how constructors make dependencies explicit and unavoidable. Immutability (36:35 - 44:03): This is a key benefit. It shows how using final fields with constructor injection prevents dependencies from being accidentally changed after object creation, leading to more stable and predictable components. Identifying Bad Design (44:03 - 49:20): Discusses how a constructor with too many parameters is a "design smell," signaling a violation of the Single Responsibility Principle. This is a point that resonates strongly with good architectural practice. Simplified Unit Testing (50:04 - 58:57): Demonstrates how easy it is to unit test a class that uses constructor injection by simply passing mock objects, without needing the Spring framework or complex reflection utilities.
To summarize the key advantages:
- Immutability: Dependencies can be declared as
final, guaranteeing they are assigned only once during construction. This is crucial for building thread-safe and reliable components. - Explicit Dependencies: A class's contract clearly states what it needs to function. An object cannot be created in an incomplete state, which helps prevent
NullPointerExceptions at runtime. - Improved Testability: It's trivial to instantiate a class in a unit test and pass it mock implementations of its dependencies. This decouples your tests from the Spring framework.
- Avoids Circular Dependencies: If
ServiceAneedsServiceBandServiceBneedsServiceA, constructor injection will cause the application startup to fail with a clear error. Other injection types can mask this problem, leading to aStackOverflowErrorat runtime. - Code Quality Signal: A constructor with a large number of arguments (e.g., > 5) is a strong indicator that the class may be taking on too many responsibilities and should be refactored.
A Brief Look at Ambiguity
A natural question arises: what happens if the container has multiple beans that satisfy a dependency? For example, what if we have a Computer interface, and two beans that implement it: Laptop and Desktop?
public interface Computer {
    void compile();
}

@Component
public class Laptop implements Computer { ... }

@Component
public class Desktop implements Computer { ... }

@Service
public class Developer {
    private final Computer computer;

    // Which bean gets injected here? Laptop or Desktop?
    public Developer(Computer computer) {
        this.computer = computer;
    }
}
If you run this, Spring will throw an exception at startup, telling you it found two eligible beans and doesn't know which one to choose. Spring requires you to resolve this ambiguity. We will cover this in detail later in the course, but it's good to be aware of the solutions.
This video from Telusko demonstrates this exact problem and introduces two annotations used to solve it: @Primary and @Qualifier.
Watch from 08:00 to 14:41. The first part (up to 10:29) sets up the scenario using an interface and multiple implementations. The second part introduces @Primary to mark a default choice and @Qualifier to specify exactly which bean you want by name. Just focus on understanding the problem and the purpose of these annotations; we will apply them ourselves in a future lesson.
Conclusion
In this lesson, we completed our initial tour of Spring's core dependency management. We now understand not just how Spring creates beans, but also how it wires them together to form a functioning application.
Here are the key takeaways:
- Dependency Injection (DI) is a design pattern where an object's dependencies are provided to it by an external entity, rather than the object creating them itself. This promotes loose coupling.
- Spring supports constructor, setter, and field injection, but constructor injection is the highly recommended best practice.
- With constructor injection, dependencies are passed as parameters to the constructor, allowing them to be marked as
finalfor immutability. - The
@Autowiredannotation on a constructor is optional if it's the only constructor in the class. - Constructor injection improves code quality by making dependencies explicit and mandatory, enhancing testability, and helping to identify design issues like circular dependencies or violations of the Single Responsibility Principle.
We've now seen how to let Spring automatically discover our beans (@Component) and automatically wire them together (constructor injection). In the next lesson, we will explore another way to define beans: explicitly, using Java-based configuration with @Configuration and @Bean. This method is particularly useful when you need to create beans from classes you don't own, such as those from a third-party library.