Hello! Welcome to our next lesson in the "Basics of Spring Framework" course.
In our previous lesson, we explored WebClient and the asynchronous, non-blocking communication model it enables. We saw how its foundation in Spring WebFlux and Netty allows a service to handle many concurrent I/O operations efficiently. This non-blocking philosophy is central to building scalable distributed systems.
Today, we'll leverage that same foundation to address a key architectural challenge: how should external clients interact with our growing collection of microservices? The answer is an API Gateway, and we will learn how to use Spring Cloud Gateway to create an API gateway that routes requests to different microservices.
This lesson is highly relevant to your background in system design. An API Gateway acts as the single "front door" for your system, providing a unified interface, simplifying client logic, and centralizing cross-cutting concerns like security, rate limiting, and monitoring.
1. The Role and Mechanics of Spring Cloud Gateway
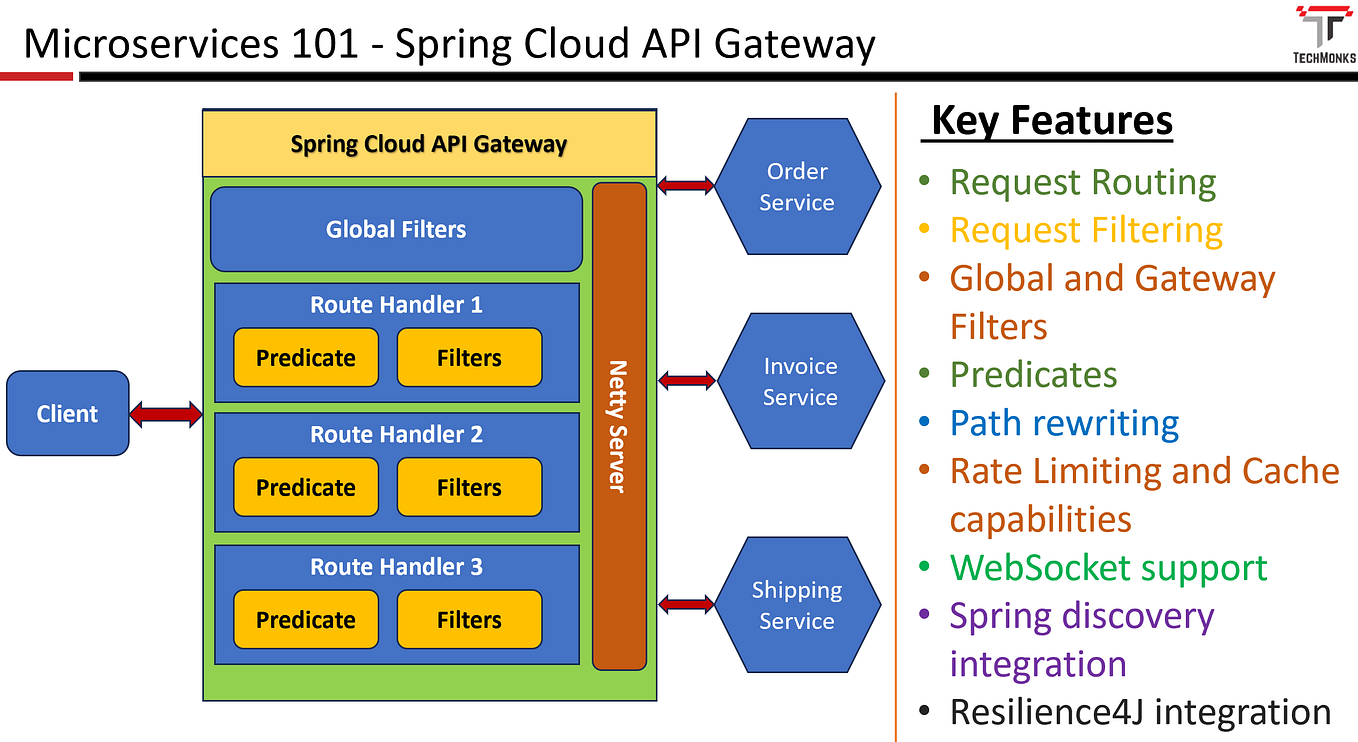
Before we build our gateway, it's important to understand what it does and how it works. An API Gateway sits between your clients and your backend services, abstracting the complexity of your microservice architecture.
To get a solid overview, let's start with a video that introduces the core concepts.
Building an API Gateway in Java with Spring Cloud Gateway
The video 'Building an API Gateway in Java with Spring Cloud Gateway' by Dan Vega provides an excellent introduction to the purpose of an API Gateway and the key features of the Spring Cloud implementation.
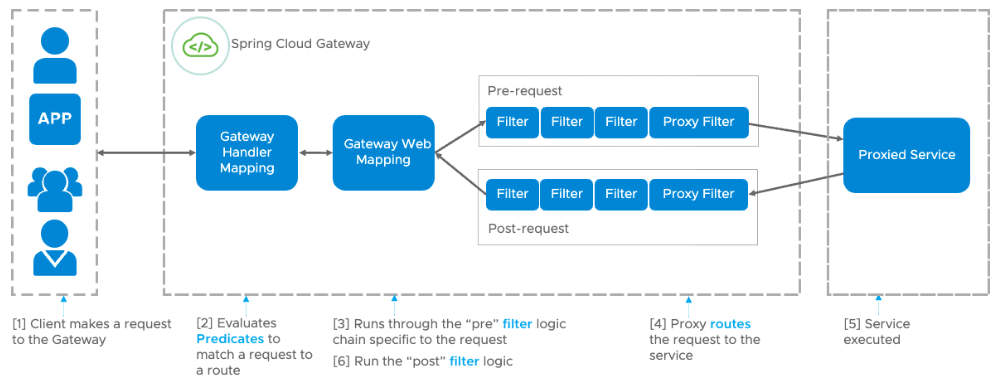
Please watch the first section of the video (00:00 - 06:41). Pay close attention to: The two main functions of a gateway: providing a single point of entry and handling cross-cutting concerns. The fact that Spring Cloud Gateway is built on Spring WebFlux, making it reactive and non-blocking—just like the WebClient we studied. The explanation of the request processing flow: a request is matched to a route, evaluated by predicates, and modified by filters.
As the video explained, the three core building blocks of Spring Cloud Gateway are:
- Route: The fundamental unit, defined by an ID, a destination URI, a set of predicates, and a set of filters.
- Predicate: A condition that must be met for a request to be matched to a route. This could be based on the request path, HTTP method, headers, etc.
- Filter: A piece of logic that can modify the incoming HTTP request before it's sent to the downstream service or modify the outgoing HTTP response before it's sent back to the client.
The diagram below from the Spring documentation illustrates this internal flow in more detail.
2. Building and Configuring the Gateway
Now, let's put theory into practice. We'll create a new Spring Boot application to serve as our API Gateway. It will route requests to the post and comment services we've been working with.
Step 1: Create the Project
First, create a new Spring Boot project using the Spring Initializr. The only dependency you need to add for now is Spring Cloud Gateway.
Dan Vega demonstrates this initial setup in the next segment of the video.
Building an API Gateway in Java with Spring Cloud Gateway
Let's continue with the video to see how to create the gateway project.
Watch from 07:05 to 09:29. This will walk you through creating the project on start.spring.io and will also give a quick refresher on the two downstream services (posts and comments) that our gateway will route to.
Step 2: Configure Routes using YAML
Spring Cloud Gateway routes can be configured in two ways: via properties/YAML files or programmatically using a Java-based fluent API. We'll start with YAML, as it's a very common and readable way to define static routes.
Our goal is to configure the gateway so that:
- Requests to
http://localhost:8080/posts/**are forwarded to thepost-service(running on port 8081). - Requests to
http://localhost:8080/comments/**are forwarded to thecomment-service(running on port 8082).
The following video segment provides a detailed, step-by-step guide to setting this up.
Building an API Gateway in Java with Spring Cloud Gateway
This is the core practical part of our lesson. You will see how to define a route, a path predicate, and two different filters in application.yml.
Watch from 09:29 to 16:21. The presenter will configure and test the route for the 'posts' service. Follow along with these key steps: Renaming application.properties to application.yml. Defining the route with an id and a target uri. Adding a Path predicate to match incoming requests. Using a PrefixPath filter to modify the request path before forwarding it. Adding an AddResponseHeader filter to modify the response.
After watching the video, your application.yml for the post-service should look similar to this. You can then add a second route for the comment-service following the same pattern.
# In your gateway's application.yml
server:
  port: 8080

spring:
  cloud:
    gateway:
      routes:


        # Route for the Post service
        - id: post_route
          uri: http://localhost:8081 # Target service address
          predicates:
            - Path=/posts/** # Match requests starting with /posts
          filters:


            # The StripPrefix filter is often more intuitive than PrefixPath.
            # It removes the first part of the path before forwarding.
            # e.g., /posts/1 becomes /1
            - StripPrefix=1


        # Route for the Comment service
        - id: comment_route
          uri: http://localhost:8082
          predicates:
            - Path=/comments/**
          filters:
            - StripPrefix=1
Note: The video uses PrefixPath, while the example above uses StripPrefix=1. Both can achieve similar goals. StripPrefix=1 is very common for this pattern, as it forwards the rest of the path directly (e.g., a request to /posts/1/details becomes /1/details on the downstream service).
3. Exploring Predicates and Filters
We've used the Path predicate and StripPrefix filter, but Spring Cloud Gateway offers a rich set of built-in options for more sophisticated routing logic.
For a comprehensive list of what's available, the following article is an excellent reference.
How to Build API Gateways with Spring Cloud Gateway
The article 'How to Build API Gateways with Spring Cloud Gateway' from OneUptime provides a concise summary of common predicates and filters.
Please read the sections 'Route Predicates' and 'Gateway Filters'. Pay attention to the variety of matching options available, such as Method, Header, and Query. This shows how you can create very specific routing rules.
4. Alternative: Java-based Route Configuration
For more dynamic or complex routing logic, you can define routes programmatically using a Java fluent API. This involves creating a @Bean that returns a RouteLocator. This approach aligns with your preference for understanding the different ways to achieve a goal.
Building an API Gateway in Java with Spring Cloud Gateway
Let's return to the Dan Vega video to see the Java configuration in action.
Watch from 18:03 to 19:46. The presenter comments out the YAML configuration and replaces it with a RouteLocator bean, demonstrating that it achieves the exact same routing behavior.
Here is a code example of what this configuration looks like, defining the same two routes we created in YAML. You would add this class to your gateway application.
import org.springframework.cloud.gateway.route.RouteLocator;
import org.springframework.cloud.gateway.route.builder.RouteLocatorBuilder;
import org.springframework.context.annotation.Bean;
import org.springframework.context.annotation.Configuration;

@Configuration
public class GatewayConfig {

    @Bean
    public RouteLocator customRouteLocator(RouteLocatorBuilder builder) {
        return builder.routes()
                .route("post_route", r -> r.path("/posts/**")
                        .filters(f -> f.stripPrefix(1))
                        .uri("http://localhost:8081"))
                .route("comment_route", r -> r.path("/comments/**")
                        .filters(f -> f.stripPrefix(1))
                        .uri("http://localhost:8082"))
                .build();
    }
}
5. Dynamic Routing with Service Discovery
Given your expertise in microservices architecture, you know that hardcoding URIs (http://localhost:8081) is brittle and doesn't scale. In a real-world system, services are deployed dynamically, and their locations can change.
This is where service discovery comes in. When integrated with a service registry like Netflix Eureka or Consul, Spring Cloud Gateway can discover service locations dynamically.
You simply change the uri scheme from http to lb (for "load-balancer") and use the service's registration name.
Build a Real API Gateway With Spring Cloud Gateway, Eureka
Let's look at the 'Why' of an API Gateway again and see how it integrates with service discovery.
First, read the section 'Why You Need an API Gateway' to reinforce the architectural benefits.
Now, see how the configuration changes to support this.
How to Build API Gateways with Spring Cloud Gateway
The 'OneUptime' article provides a clear example of this configuration.
Read the section 'Service Discovery Integration'. Notice how the uri is changed to lb://USER-SERVICE. The gateway will query the Eureka server to find a running instance of 'USER-SERVICE' and route the request there.
This setup makes your system much more resilient and scalable. While we won't implement the full Eureka server in this lesson, understanding this lb:// mechanism is key to using Spring Cloud Gateway in a production-like environment.
Conclusion
In this lesson, you learned how to stand up an API Gateway, a critical component in any microservices-based system. We saw how Spring Cloud Gateway, with its non-blocking architecture, provides a powerful and efficient way to manage and route traffic to your backend services.
Key Takeaways:
- An API Gateway acts as a single entry point, simplifying client interactions and centralizing cross-cutting concerns.
- Spring Cloud Gateway is built on Spring WebFlux, making it fully non-blocking and highly scalable.
- The core components are Routes (the rule), Predicates (the
ifcondition), and Filters (thethenaction). - Routes can be configured statically in
application.ymlor programmatically using the Java fluent API (RouteLocatorBuilder). - For real-world systems, integrating with a service registry like Eureka and using
lb://<service-id>URIs enables dynamic, discovery-aware routing.
In our next and final lesson for this course, we will focus on packaging our applications for deployment. You'll learn how to build self-contained, executable JAR files and externalize configuration, preparing our microservices and gateway for the real world.