Hello! Welcome to our next lesson.
In our last session, we used RestTemplate to enable synchronous communication between our microservices. While effective, we noted its primary limitation: it's blocking. The thread that makes the request waits idly for the response, which can become a performance bottleneck in a system with many I/O-bound operations.
Today, we'll explore Spring's modern, powerful solution to this problem. We will learn to use WebClient to make asynchronous, non-blocking HTTP calls between services. You'll discover the fundamental design shift that makes this possible and see its benefits in action. This will allow our services to communicate more efficiently, using fewer resources.
1. From Blocking to Non-Blocking: A Paradigm Shift
Before we write any code, it's crucial to understand the "why" behind WebClient. Its asynchronous, non-blocking nature isn't just a feature; it's a completely different approach to handling requests compared to the traditional thread-per-request model used by default with RestTemplate.
WebClient is part of Spring WebFlux, which runs on an asynchronous server like Netty. Instead of assigning one thread to handle one request from start to finish, Netty uses a small, fixed number of threads (called an event loop) to manage many connections at once.
When a request involving a slow I/O operation (like a network call or database query) is made, the event loop doesn't wait. It registers a callback and moves on to handle other events. Once the I/O operation completes, the event loop is notified and executes the callback to finish processing the original request.
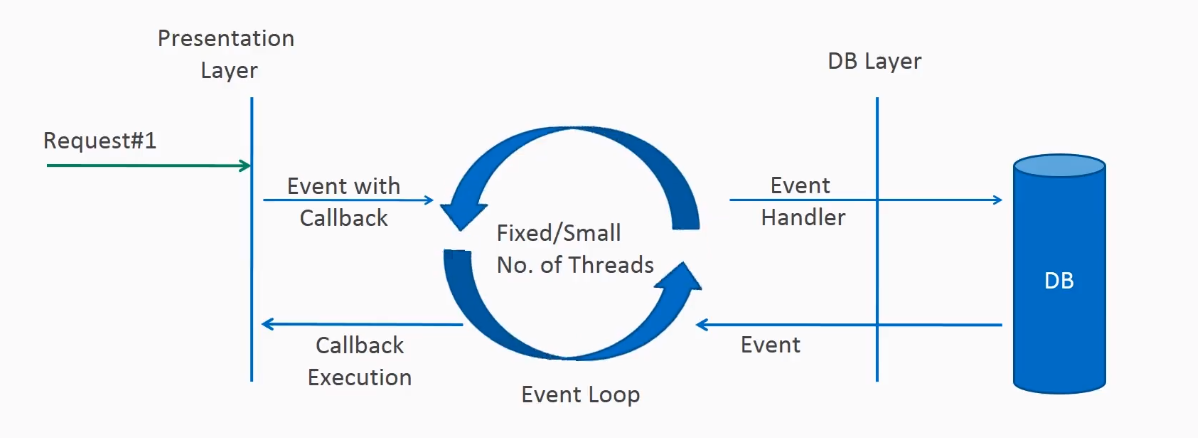
To get a detailed understanding of this model, the following video provides an excellent explanation of the Netty event loop.
Spring Boot WebFlux Complete Flow | Netty Event Loop Explained ! | Reactive Programming
The video 'Spring Boot WebFlux Complete Flow' from Selenium Express provides a deep dive into the event loop model that powers WebClient.
Please watch the following sections: Introduction (00:00 - 02:32): This part contrasts the Tomcat thread-per-request model with Netty's event loop model. Event Loop Explained (02:32 - 19:55): Focus on how a single event loop thread handles multiple requests using a task queue and how it registers channels for communication. Offloading Blocking Calls (19:55 - 24:26): This is the most critical part. Pay close attention to how the event loop offloads I/O-intensive tasks to a separate thread pool to remain non-blocking, and how results are returned via callbacks.
This event-driven architecture is what allows a service to handle a high number of concurrent connections with very few threads, leading to significantly better resource utilization and scalability.
2. Introducing WebClient and Reactive Types
Now that we understand the underlying model, let's meet the client that enables it: WebClient.

WebClient is the reactive, non-blocking successor to RestTemplate. To use it, you must include the spring-boot-starter-webflux dependency in your project.
WebClient as a Reactive HTTP Client in Spring WebFlux
The article 'WebClient as a Reactive HTTP Client in Spring WebFlux' from Volito gives a concise introduction.
Read the sections 'Understanding WebClient and Its Role in Spring WebFlux' and 'Adding WebClient to Your Spring Boot Application'. This will formalize the concepts we've discussed and show you the required Maven/Gradle dependency.
The most significant difference you'll see in code is that WebClient operations don't return plain objects. Instead, they return reactive types from a library called Project Reactor:
Mono<T>: A publisher that will emit 0 or 1 item of typeT. This is used for requests that expect a single object or no result (e.g., fetching an entity by ID, creating a resource).Flux<T>: A publisher that will emit 0 to N items of typeT. This is used for requests that expect a collection of objects (e.g., fetching all entities, streaming data).
These are not the results themselves; they are publishers that will provide the result when it becomes available. Your code defines a pipeline of operations to perform on the data when it arrives.
3. Making Asynchronous Calls with WebClient
Let's refactor the inter-service call from our last lesson. We will change the Job service to use WebClient instead of RestTemplate to fetch company details.
Step 1: Configure a WebClient Bean
Just as we did with RestTemplate, the best practice is to define WebClient as a shared Spring bean. This allows for centralized configuration (e.g., setting a base URL, timeouts).
Getting Started with the Web Client in Spring Boot & Writing Tests
This clip from Dan Vega's 'Getting Started with the Web Client' shows how to create a WebClient bean in a configuration class.
Watch from 11:00 to 12:17. This demonstrates creating a @Bean for WebClient using WebClient.Builder, which is the recommended approach.
Here is the code for our Job service. We can add this to a new @Configuration class or to the main application class.
@Configuration
public class AppConfig {

    @Bean
    public WebClient webClient() {
        // You can configure the builder with base URLs, default headers, etc.
        // For now, a simple build is sufficient.
        return WebClient.builder().build();
    }
}
Step 2: Implement the Asynchronous Call
Now, we can inject and use this WebClient bean in our JobServiceImpl. The API is a "fluent" builder style, which makes it very readable.
@Service
public class JobServiceImpl implements JobService {

    private final JobRepository jobRepository;
    private final WebClient webClient;

    public JobServiceImpl(JobRepository jobRepository, WebClient webClient) {
        this.jobRepository = jobRepository;
        this.webClient = webClient;
    }

    @Override
    public JobDto getJobById(Long id) {
        Job job = jobRepository.findById(id).orElse(null);
        if (job == null) {
            return null;
        }

        // 1. Make the call, which returns a Mono<Company>
        String companyServiceUrl = "http://localhost:8081/companies/" + job.getCompanyId();
        Mono<Company> companyMono = webClient.get()
                .uri(companyServiceUrl)
                .retrieve()
                .bodyToMono(Company.class);

        // 2. Block to get the result (for now)
        Company company = companyMono.block();

        // 3. Create the DTO
        JobDto jobDto = new JobDto();
        jobDto.setJob(job);
        jobDto.setCompany(company);

        return jobDto;
    }
    // ... other methods
}
Let's break this down:
webClient.get().uri(...).retrieve().bodyToMono(Company.class): This chain defines the request. It makes a GET request to the specified URI and declares that the response body should be converted into aMonothat will eventually contain aCompanyobject.companyMono.block(): This is the crucial part for this initial step. We are subscribing to theMonoand blocking the current thread until the result arrives. While this seems to defeat the purpose of non-blocking I/O, it's a necessary bridge when integrating reactive code into a traditional, blocking execution model (like our current controller). We will see how to avoid.block()in a fully reactive pipeline later.
Step 3: Composing Reactive Pipelines (The "Right" Way)
Calling .block() is often considered an anti-pattern in a pure reactive system. The true power of reactive programming comes from composing operations on the Mono or Flux without ever blocking.
Imagine we wanted to fetch a Job, then use its companyId to fetch the Company, all without blocking. You would use an operator like flatMap.
public Mono<JobDto> getJobByIdReactive(Long id) {
    Mono<Job> jobMono = Mono.fromCallable(() -> jobRepository.findById(id).orElse(null));

    return jobMono.flatMap(job -> {
        if (job == null) {
            return Mono.empty();
        }

        String companyServiceUrl = "http://localhost:8081/companies/" + job.getCompanyId();

        // Fetch the company reactively
        Mono<Company> companyMono = webClient.get()
                .uri(companyServiceUrl)
                .retrieve()
                .bodyToMono(Company.class);

        // When the company arrives, map it to a JobDto
        return companyMono.map(company -> {
            JobDto jobDto = new JobDto();
            jobDto.setJob(job);
            jobDto.setCompany(company);
            return jobDto;
        });
    });
}
In this example, nothing blocks. We define a sequence of dependent asynchronous operations. If this method were in a @RestController using WebFlux, you could return Mono<JobDto> directly, and Spring would handle the subscription and response sending.
For more advanced patterns like chaining multiple dependent calls or running independent calls in parallel, this article is an excellent resource.
Mastering Asynchronous API Calls with Spring WebClient
The article 'Mastering Asynchronous API Calls with Spring WebClient' provides clear examples of advanced reactive composition.
Read the section 'Chaining, Composition, and Parallel Calls'. Focus on the explanations and code for 'Chaining' (using flatMap for dependent calls) and 'Parallel Calls' (using Mono.zip for independent calls). This will be highly relevant given your system design experience.
4. Witnessing Non-Blocking Behavior
Theory and code are one thing, but seeing the non-blocking model in action is another. The following practical demonstration uses a setup very similar to what you've just learned about.
The presenter will:
- Create a "producer" service with a slow endpoint (simulating a long I/O operation).
- Create a "consumer" service that calls this endpoint using
WebClient. - Crucially, restrict the consumer to a single event loop thread.
- Hit the slow endpoint, and while it's "loading," immediately hit a fast endpoint on the same service.
In a blocking model, the second call would have to wait for the first one to finish. Here, you will see the same thread serve the fast request instantly, because the work for the slow request was offloaded.
Spring Boot WebFlux Complete Flow | Netty Event Loop Explained ! | Reactive Programming
Let's return to the Selenium Express video to see a live demonstration of WebClient's non-blocking power.
Watch from 40:10 to 48:24 and then from 01:11:48 to 01:19:24. This shows the setup of the two services and then the final demonstration where one event loop thread handles multiple requests concurrently, proving it is not blocked by the slow network call.
This experiment perfectly demonstrates the efficiency of the event loop model. The thread is not wasted waiting; it's always available to do more work.
Conclusion
In this lesson, we transitioned from the synchronous, blocking world of RestTemplate to the asynchronous, non-blocking paradigm of WebClient. This is a fundamental concept for building modern, scalable, and resilient microservices in the Spring ecosystem.
Key Takeaways:
WebClientis Spring's modern, non-blocking HTTP client, built on the reactive Spring WebFlux framework.- It operates on an event loop model (powered by Netty), which uses a small number of threads to handle many concurrent I/O operations without blocking.
WebClientreturns reactive types:Mono(for 0-1 items) andFlux(for 0-N items), which represent eventual results.- Reactive pipelines are built by composing operators like
mapandflatMapto process data as it arrives, avoiding calls to.block()in a fully reactive system. - This model leads to superior resource efficiency and scalability, especially for applications with many I/O-bound tasks.
In our next lesson, we will step back and look at the bigger architectural picture. Now that we have services communicating with each other, how should external clients interact with our system? We will answer this by learning how to use Spring Cloud Gateway to create an API gateway, providing a single, managed entry point to our microservices.