Hello!
In our last lesson, we explored the theory behind JSON Web Tokens, understanding their structure, purpose, and role in creating stateless authentication systems. We covered the "what" and the "why." Now, it's time to move from theory to practice and focus on the "how."
Today's learning outcome is to create a utility class to generate and validate JWTs. We will build a JwtService class from the ground up using Java and a popular library. This service will become the engine of our token-based security, responsible for creating tokens for authenticated users and verifying tokens on incoming requests.
This is a hands-on lesson that directly applies your programming experience to the Spring ecosystem, setting the stage for fully integrating JWT authentication into our application.
1. Setting Up the JWT Environment
While Spring Security provides the framework for authentication, JWT generation and parsing are not part of its core dependencies. We need to include a specialized third-party library. The most widely used one in the Java world is JJWT (Java JWT).
Dependencies
First, we need to add the necessary dependencies to our pom.xml file. JJWT is modular, so we'll add three artifacts:
jjwt-api: Contains the core interfaces and classes (Jwts,Claims, etc.).jjwt-impl: Provides the default implementation of the API.jjwt-jackson: Provides the JSON processing capabilities using the Jackson library, which is already a standard part of Spring Boot.
How to Implement JWT Authentication with Spring Security
The following article, 'How to Implement JWT Authentication with Spring Security', shows the exact dependencies we need. Please review this short section to see the Maven configuration.
Read the first part of the article, which shows the list of dependencies to be added to pom.xml and the JWT configuration for application.yml (or application.properties). We will use this configuration next.
Configuration
A critical aspect of JWT security is the secret key used for signing the token. This key must be kept confidential and should never be hardcoded in your source code. A standard practice is to externalize it in the application.properties (or application.yml) file. We will also externalize the token's expiration time.
Add the following properties to your src/main/resources/application.properties file:
jwt.secret=your-256-bit-super-strong-and-long-secret-key-that-you-generate
jwt.expiration=86400000 # 24 hours in milliseconds
Note: For a real application, you would use a randomly generated, 256-bit key. You can find online generators for this. For now, a long, complex string will suffice.
2. Creating the JwtService
We'll encapsulate all JWT-related logic into a single utility class, JwtService. This aligns with the single-responsibility principle and makes our code cleaner and easier to maintain.
Create a new class JwtService inside your service package and annotate it with @Service so that Spring's IoC container can manage it as a bean.
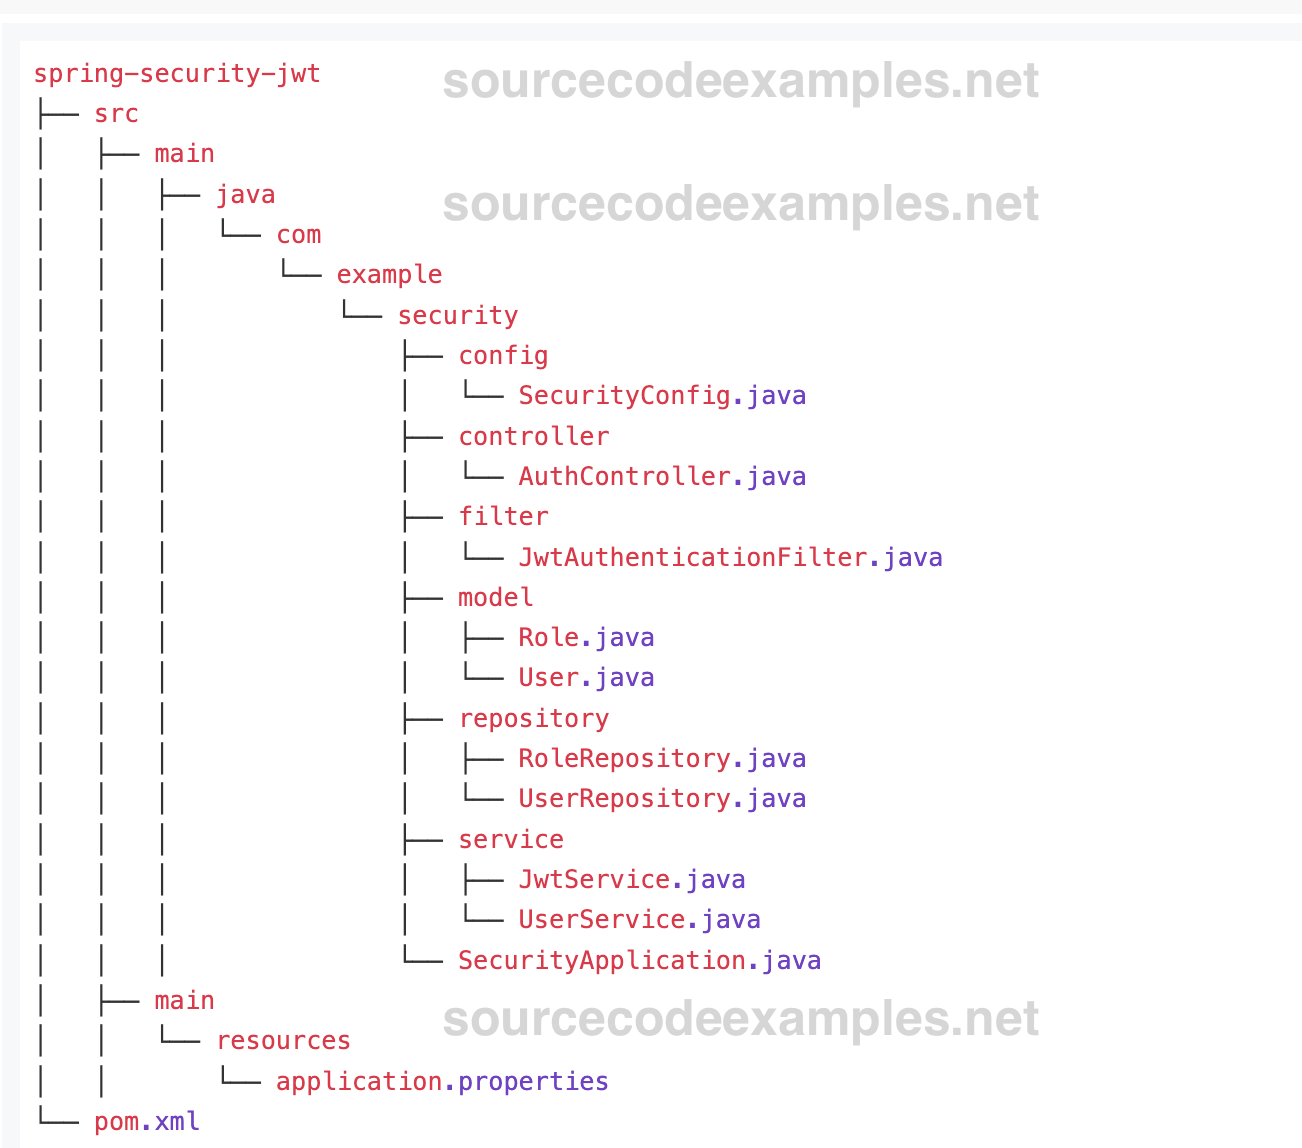
Inside the class, we'll use the @Value annotation to inject the properties we just defined:
import org.springframework.beans.factory.annotation.Value;
import org.springframework.stereotype.Service;

@Service
public class JwtService {

    @Value("${jwt.secret}")
    private String secretKey;

    @Value("${jwt.expiration}")
    private long jwtExpiration;

    // ... methods for generation and validation will go here
}
3. Generating a JWT
Now for the core logic. We will create a generateToken method. This method will take a username as input and build a signed JWT.
The JJWT library provides a fluent builder API that makes this process straightforward. The steps are:
- Set the claims (subject, issued-at, expiration).
- Sign the token with our secret key and a chosen algorithm (we'll use HMAC-SHA256).
- Compact the result into its final URL-safe string format.
The video below provides an excellent walkthrough of creating the token generation method.
Json Web Token (JWT) Explained from Scratch | Spring Security 6
Watch this section from the 'Json Web Token (JWT) Explained from Scratch' video by The Curious Coder. The presenter does a great job of implementing the token generation method step-by-step.
Watch from 19:14 to 24:10. Pay close attention to how the JJWT builder pattern is used (Jwts.builder()) and how the claims (setSubject, setIssuedAt, setExpiration) are added before the token is signed and compacted.
Based on the video, let's implement our generateToken and its helper methods inside JwtService.
import io.jsonwebtoken.Jwts;
import io.jsonwebtoken.SignatureAlgorithm;
import io.jsonwebtoken.io.Decoders;
import io.jsonwebtoken.security.Keys;
import java.security.Key;
import java.util.Date;
import java.util.Map;
import java.util.HashMap;

// ... inside JwtService class

public String generateToken(String username) {
    return generateToken(new HashMap<>(), username);
}

public String generateToken(Map<String, Object> extraClaims, String username) {
    return Jwts.builder()
            .setClaims(extraClaims)
            .setSubject(username)
            .setIssuedAt(new Date(System.currentTimeMillis()))
            .setExpiration(new Date(System.currentTimeMillis() + jwtExpiration))
            .signWith(getSigningKey(), SignatureAlgorithm.HS256)
            .compact();
}

private Key getSigningKey() {
    byte[] keyBytes = Decoders.BASE64.decode(secretKey);
    return Keys.hmacShaKeyFor(keyBytes);
}
Here’s a breakdown of the code:
- We have two
generateTokenmethods. One is a convenience method, and the other allows for adding extra claims (like roles or permissions) to the payload. - The builder sets the standard claims:
sub(subject, which is our username),iat(issued at), andexp(expiration). signWith()is the crucial step. It takes aKeyobject and theSignatureAlgorithm.- The
getSigningKey()helper method is responsible for converting our Base64-encoded secret string fromapplication.propertiesinto thejava.security.Keyobject that JJWT requires for the HMAC-SHA algorithm.
For a deeper dive into the builder API and different ways to construct a JWT, the Baeldung article is an excellent resource.
Supercharge Java Auth with JSON Web Tokens (JWTs) - Baeldung
The article 'Supercharge Java Auth with JSON Web Tokens (JWTs)' by Baeldung provides a detailed textual explanation of the token-building process with JJWT.
Read section 4, 'Building JWTs With JJWT'. This covers the fluent interface, how to set claims, and importantly, discusses signing anti-patterns, which is valuable knowledge.
4. Validating a JWT and Extracting Claims
Once a token is generated, the server needs to be able to validate it on subsequent requests. Validation involves two main checks:
- Is the signature valid? (i.e., was it signed with our secret key and has it not been tampered with?)
- Has the token expired?
JJWT's parser handles both of these checks in a single operation. If the signature is invalid or the token is expired, the library will throw an exception.
This next video segment demonstrates how to build the validation logic.
Json Web Token (JWT) Explained from Scratch | Spring Security 6
Let's continue with the same video from The Curious Coder to see how validation is implemented.
Watch from 31:18 to 36:03. This part covers creating methods to parse the token, extract all claims, and then use those claims to get specific information like the username and expiration date.
Following the pattern from the video, we'll add methods to parse the claims and validate the token.
import io.jsonwebtoken.Claims;
import io.jsonwebtoken.Jwts;
// ... other imports

// ... inside JwtService class

public boolean isTokenValid(String token, String username) {
    final String tokenUsername = extractUsername(token);
    return (tokenUsername.equals(username)) && !isTokenExpired(token);
}

private boolean isTokenExpired(String token) {
    return extractExpiration(token).before(new Date());
}

public String extractUsername(String token) {
    return extractClaim(token, Claims::getSubject);
}

public Date extractExpiration(String token) {
    return extractClaim(token, Claims::getExpiration);
}

public <T> T extractClaim(String token, Function<Claims, T> claimsResolver) {
    final Claims claims = extractAllClaims(token);
    return claimsResolver.apply(claims);
}

private Claims extractAllClaims(String token) {
    return Jwts
            .parserBuilder()
            .setSigningKey(getSigningKey())
            .build()
            .parseClaimsJws(token)
            .getBody();
}
Let's analyze this validation logic:
- The entry point for validation is
isTokenValid, which checks if the username in the token matches the expected username and if the token has not expired. - The private method
extractAllClaimsis the heart of the validation process.Jwts.parserBuilder()...parseClaimsJws(token)does the heavy lifting. It uses our secret key to verify the signature. If the verification fails or the token is expired, it will throw an exception, which we'll handle in a later lesson. If successful, it returns the payload as aClaimsobject. extractClaimis a generic helper method that uses a Java 8Functionto extract a specific piece of information (like the subject or expiration date) from the claims. This is a clean, reusable design pattern.
5. Security Best Practices
With your background in system design, it's worth noting that a working implementation is just the first step. For a production environment, consider these best practices:
- Strong Secrets: Use a cryptographically secure random generator to create your secret key. It should have at least 256 bits of entropy.
- Use HTTPS: JWTs are encoded, not encrypted. The payload can be read by anyone who intercepts the token. Always transmit JWTs over HTTPS to prevent eavesdropping.
- Reasonable Expiration: Short-lived access tokens (e.g., 15-60 minutes) are a security best practice. They limit the damage if a token is stolen. Use them in combination with long-lived refresh tokens, a pattern we'll explore later.
- Token Revocation: Statelessness means you can't easily "log out" a user before their token expires. For high-security applications, you might need a token blacklist (a database of revoked tokens), which reintroduces a small amount of state.
The article from OneUptime has a great summary of these points.
How to Implement JWT Authentication with Spring Security
To round out your understanding, read the 'Security Best Practices' section from the OneUptime article.
Read the section titled 'Security Best Practices'. This provides crucial context for deploying a JWT-based system in production.
Conclusion
Congratulations! you've successfully built a self-contained JwtService that can generate and validate JSON Web Tokens. This class is the cornerstone of the security model we're building.
Key Takeaways:
- JJWT Library: We used the
jjwtlibrary to handle the complexities of JWT creation and parsing. - Builder & Parser: Token generation uses a fluent
builder, while validation uses aparserthat automatically verifies the signature and expiration. - Externalized Configuration: We stored the JWT secret key and expiration time in
application.properties, a critical security practice. - Service-Oriented Design: We encapsulated all JWT logic within a single, reusable
JwtServiceclass.
In our next lesson, we will put this service to work. We'll implement a custom filter to process a JWT from an HTTP request, integrating our JwtService into the Spring Security filter chain to protect our API endpoints.