Hello!
In our last lesson, we built the JwtService, our engine for creating and validating JSON Web Tokens. We now have the core token-handling logic encapsulated and ready to use.
Today, we'll bridge the gap between that service and live HTTP requests. Our learning outcome is to implement a custom filter to process a JWT from an HTTP request. This filter will act as a security checkpoint, inspecting every incoming request, looking for a valid JWT, and establishing the user's identity before the request reaches our API controllers.
Given your experience with system design, you can think of this as implementing a piece of middleware that sits within the request processing pipeline, a common pattern in web frameworks.
1. The Role of Filters in Spring Security
Before we write code, let's understand where our custom filter will live. Spring Security protects an application by passing incoming requests through a series of filters, known as the FilterChain. Each filter has a specific responsibility, such as handling logins, checking for CSRF tokens, or managing sessions.
A client request first enters the standard servlet container's filter chain. A special Spring filter called DelegatingFilterProxy acts as a bridge, delegating the request to a Spring-managed FilterChainProxy, which in turn directs it to the specific Spring SecurityFilterChain.
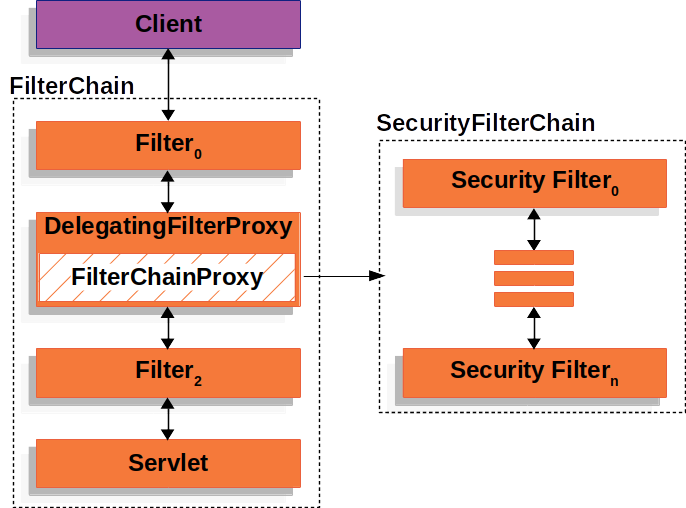
Our goal is to insert our own custom JWT filter into this chain. It will execute on every request, allowing us to implement stateless, token-based authentication.
To create our filter, we will extend Spring's OncePerRequestFilter. This abstract base class is convenient because it guarantees our filter logic is executed only once for a single request, even in the case of internal server-side forwards or dispatches.
2. Creating the JwtAuthenticationFilter
Let's start by creating the filter class. In your project, create a new package (e.g., com.example.yourapp.config or com.example.yourapp.filter) and add a new Java class named JwtAuthenticationFilter.
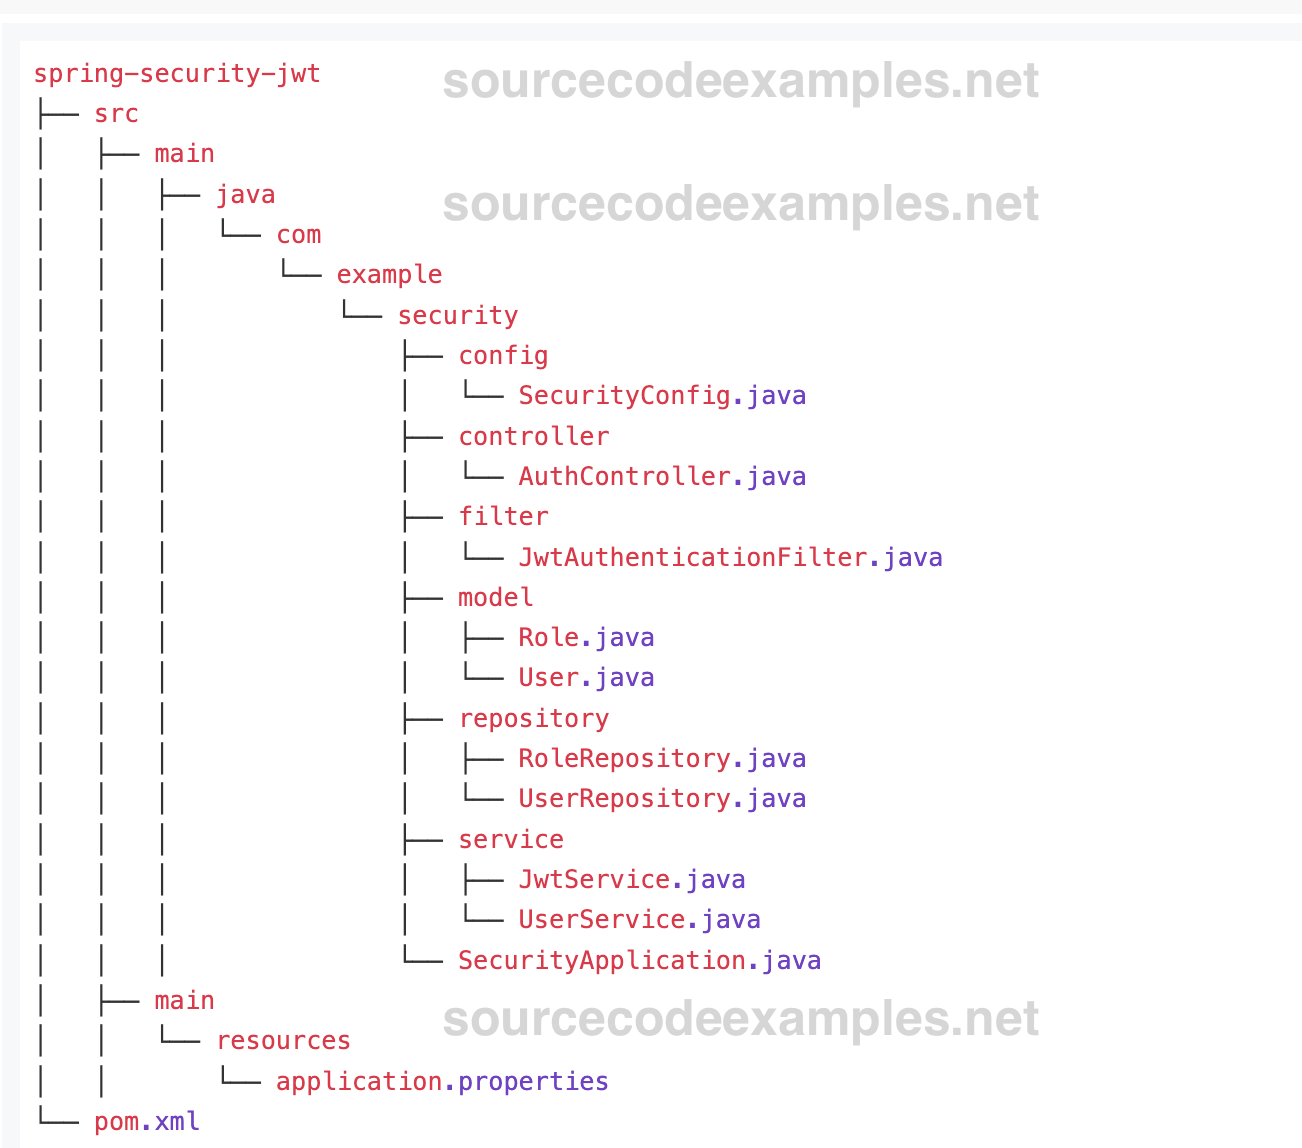
This class will need to:
- Extend
OncePerRequestFilter. - Be annotated with
@Componentto make it a Spring-managed bean, allowing us to inject other dependencies into it. - Inject our
JwtServicefrom the previous lesson and Spring'sUserDetailsServicevia its constructor. TheUserDetailsServiceis a core Spring Security interface for loading user-specific data.
Here's the initial skeleton of the class:
package com.example.yourapp.config;

import com.example.yourapp.service.JwtService;
import jakarta.servlet.FilterChain;
import jakarta.servlet.ServletException;
import jakarta.servlet.http.HttpServletRequest;
import jakarta.servlet.http.HttpServletResponse;
import org.springframework.lang.NonNull;
import org.springframework.security.core.userdetails.UserDetailsService;
import org.springframework.stereotype.Component;
import org.springframework.web.filter.OncePerRequestFilter;
import java.io.IOException;

@Component
public class JwtAuthenticationFilter extends OncePerRequestFilter {

    private final JwtService jwtService;
    private final UserDetailsService userDetailsService;

    public JwtAuthenticationFilter(JwtService jwtService, UserDetailsService userDetailsService) {
        this.jwtService = jwtService;
        this.userDetailsService = userDetailsService;
    }

    @Override
    protected void doFilterInternal(
            @NonNull HttpServletRequest request,
            @NonNull HttpServletResponse response,
            @NonNull FilterChain filterChain) throws ServletException, IOException {

        // Our JWT processing logic will go here

        filterChain.doFilter(request, response); // Pass the request to the next filter
    }
}
The most important method is doFilterInternal, which we must override. This is where we will implement the logic to check for and validate the JWT.
3. Implementing the Filter Logic
The doFilterInternal method needs to perform a sequence of steps for every request:
- Extract the JWT from the
Authorizationheader. - If a token is found, validate it using our
JwtService. - If the token is valid, load the user's details.
- Set the user's identity in the
SecurityContextHolder, which authenticates them for the current request. - Pass the request down the filter chain.
The following video provides an excellent and detailed walkthrough of implementing this logic from scratch.
Json Web Token (JWT) Explained from Scratch | Spring Security 6
Watch these sections from the video 'Json Web Token (JWT) Explained from Scratch' by The Curious Coder. The presenter clearly demonstrates how to build the filter, extract the token, and integrate it with the security context.
Watch from 36:16 to 46:55. This covers the entire implementation of the doFilterInternal method. Pay close attention to: How the Authorization header is read from the HttpServletRequest. How the JwtService is used to validate the token and extract the username. The creation of UsernamePasswordAuthenticationToken. The crucial step of setting the authentication object in the SecurityContextHolder.
Drawing from the video and common practice, let's fill in the doFilterInternal method. Below is the complete code with explanations.
Implement JWT authentication in a Spring Boot 3 application - Medium
For a textual reference, this article from Medium provides a clean, complete example of the JwtAuthenticationFilter. You can use it to compare with the video's implementation and your own.
Review the code snippet for JwtAuthenticationFilter.java in the section 'Create the authentication middleware'. Note how it handles header parsing, token validation, and security context updates.
Here is the full implementation of the doFilterInternal method inside your JwtAuthenticationFilter class:
// Inside JwtAuthenticationFilter class

@Override
protected void doFilterInternal(
        @NonNull HttpServletRequest request,
        @NonNull HttpServletResponse response,
        @NonNull FilterChain filterChain) throws ServletException, IOException {

    final String authHeader = request.getHeader("Authorization");
    final String jwt;
    final String userEmail; // Or username, depending on what you use as the subject

    // 1. Check if the Authorization header is present and correctly formatted
    if (authHeader == null || !authHeader.startsWith("Bearer ")) {
        filterChain.doFilter(request, response); // If not, pass the request to the next filter
        return;
    }

    // 2. Extract the token from the header
    jwt = authHeader.substring(7); // "Bearer ".length() is 7

    // 3. Extract the username from the token using our JwtService
    userEmail = jwtService.extractUsername(jwt);

    // 4. Validate the token and set the security context
    if (userEmail != null && SecurityContextHolder.getContext().getAuthentication() == null) {
        // Load user details from the database
        UserDetails userDetails = this.userDetailsService.loadUserByUsername(userEmail);

        // Check if the token is valid
        if (jwtService.isTokenValid(jwt, userDetails)) {
            // If valid, create an authentication token
            UsernamePasswordAuthenticationToken authToken = new UsernamePasswordAuthenticationToken(
                    userDetails,
                    null, // Credentials are not needed for JWT auth
                    userDetails.getAuthorities()
            );

            // Set additional details from the request
            authToken.setDetails(
                    new WebAuthenticationDetailsSource().buildDetails(request)
            );

            // Update the SecurityContextHolder with the new authentication token
            SecurityContextHolder.getContext().setAuthentication(authToken);
        }
    }

    // 5. Pass the request along to the next filter in the chain
    filterChain.doFilter(request, response);
}
Key Logic Explained:
- Header Check: We first check if the
Authorizationheader exists and starts with "Bearer ". If not, we immediately proceed to the next filter without trying to authenticate. This allows unauthenticated access to public endpoints. SecurityContextHolder.getContext().getAuthentication() == null: This check is important. It ensures that we only perform the authentication logic once per request. If the user is already authenticated (perhaps by a previous filter), we don't need to do it again.SecurityContextHolderuses aThreadLocalto store the security context, making it available throughout the request processing thread.UsernamePasswordAuthenticationToken: This is a standardAuthenticationimplementation in Spring Security. We create an instance to represent the authenticated user.principal: The user object (UserDetails).credentials:null, as the JWT itself is the credential, and it has already been verified.authorities: The user's roles or permissions (e.g.,ROLE_USER,ROLE_ADMIN).
SecurityContextHolder.getContext().setAuthentication(...): This is the most critical line. By setting theAuthenticationobject in the context, we are officially telling Spring Security that the user for the current request is authenticated. Subsequent security checks (like@PreAuthorizeannotations on controllers) will use this object to make authorization decisions.
Conclusion
Well done! You have now implemented a custom JwtAuthenticationFilter, a fundamental component for securing a stateless API with Spring Security. This filter acts as the gatekeeper for your application, ensuring that only requests with a valid JWT are authenticated.
Key Takeaways:
OncePerRequestFilter: This is the standard base class for creating custom, idempotent filters in Spring Web.doFilterInternal: The core method where you implement your filter's logic.SecurityContextHolder: The central place to store the identity of the currently authenticated user for the duration of a request.- Filter Logic: The process involves extracting the token, validating it with a service, loading user details, and setting the
Authenticationobject in the security context.
Our filter is now built, but Spring Security doesn't know it exists or how to use it. In our next lesson, we will configure Spring Security for stateless, token-based authentication. This involves registering our JwtAuthenticationFilter in the security filter chain and telling Spring Security not to create sessions, completing our transition to a fully stateless authentication model.