Hello!
In our last lesson, we successfully built the JwtAuthenticationFilter, a crucial piece of middleware designed to intercept HTTP requests, extract a JWT, and validate it. However, that filter currently exists in isolation; Spring Security doesn't yet know it exists or how to use it.
Today, we will bring everything together. The learning outcome for this lesson is to configure Spring Security for stateless, token-based authentication. We will create a central configuration class to instruct Spring Security on how to behave. This involves disabling stateful features like sessions, defining which API endpoints are public versus protected, and, most importantly, integrating our JwtAuthenticationFilter into the security pipeline.
This is a pivotal step in achieving your goal of building secure, scalable microservices, as it establishes the security foundation upon which your REST APIs will operate.
1. The SecurityConfig Class: Central Command for Security
In modern Spring Security (version 6 and later), all security wiring is done through one or more @Configuration classes. We will create a class, typically named SecurityConfig, to define a SecurityFilterChain bean. This bean is responsible for configuring all HTTP security aspects.
Let's start by creating the SecurityConfig.java file in your configuration package. It should be annotated with @Configuration and @EnableWebSecurity to activate Spring Security's web security support.
package com.example.yourapp.config;

import org.springframework.context.annotation.Configuration;
import org.springframework.security.config.annotation.web.configuration.EnableWebSecurity;

@Configuration
@EnableWebSecurity
public class SecurityConfig {
    // Our configuration beans will go here
}
2. Defining the Security Filter Chain
The core of our configuration is the SecurityFilterChain bean. It uses a builder pattern with lambda expressions, which offers a clean and expressive way to define security rules.
We will configure several key aspects:
- CSRF Protection: We'll disable it, as it's not typically necessary for stateless REST APIs.
- Session Management: We'll set the policy to
STATELESSto ensure noHttpSessionis created. - Authorization Rules: We'll define which endpoints are public (like login/register) and which require authentication.
- Filter Integration: We'll add our
JwtAuthenticationFilterto the chain.
The following video and article walk through this entire process. They provide a complete picture of building the SecurityConfig from scratch.
Implement JWT Auth with Refresh Tokens in Spring Security (Full Tutorial)
Watch these sections from 'Implement JWT Auth with Refresh Tokens in Spring Security'. The presenter clearly explains how to create the SecurityConfig class and configure the essential components for a stateless JWT setup.
First, watch from 40:37 to 47:58. This part covers the initial setup of the SecurityFilterChain, including disabling CSRF and defining authorization rules. Then, watch from 1:06:01 to 1:11:44, where the presenter adds the custom JWT filter and configures stateless session management. Pay close attention to how each .and() or lambda block contributes to the overall security policy.
Let's break down the configuration step by step inside our SecurityConfig class.
@Configuration
@EnableWebSecurity
public class SecurityConfig {

    private final JwtAuthenticationFilter jwtAuthFilter;

    // We'll inject other dependencies later

    public SecurityConfig(JwtAuthenticationFilter jwtAuthFilter) {
        this.jwtAuthFilter = jwtAuthFilter;
    }

    @Bean
    public SecurityFilterChain securityFilterChain(HttpSecurity http) throws Exception {
        http
            // 1. Disable CSRF
            .csrf(csrf -> csrf.disable())

            // 2. Define authorization rules
            .authorizeHttpRequests(auth -> auth
                .requestMatchers("/api/auth/**").permitAll() // Public auth endpoints
                .anyRequest().authenticated()               // All other requests need auth
            )

            // 3. Configure stateless session management
            .sessionManagement(session -> session.sessionCreationPolicy(SessionCreationPolicy.STATELESS))

            // 4. Add the custom JWT filter
            .addFilterBefore(jwtAuthFilter, UsernamePasswordAuthenticationFilter.class);

        return http.build();
    }
}
Key Configuration Points:
-
CSRF (
.csrf(csrf -> csrf.disable())): Cross-Site Request Forgery is an attack that tricks a victim into submitting a malicious request. It relies on the browser automatically including stateful cookies with requests. Since our API is stateless and doesn't rely on cookies for authentication (it uses theAuthorizationheader), this attack vector is not relevant. Disabling it is standard practice for stateless APIs. -
Stateless Session Management (
.sessionCreationPolicy(SessionCreationPolicy.STATELESS)): This is the cornerstone of our stateless architecture. This instruction tells Spring Security not to create or use anHttpSession. Every request must be independently authenticated via the provided JWT. This is critical for scalability in a microservices environment, as it removes the need for session replication or sticky sessions. -
Authorization Rules (
.authorizeHttpRequests(...)): Here, we define our access policies. We userequestMatchersto specify URL patterns./api/auth/**: This pattern whitelists all endpoints under/api/auth(e.g., for login and registration), allowing anyone to access them..anyRequest().authenticated(): This is a powerful catch-all rule. It specifies that any other request not previously matched must be authenticated.
-
Adding the Filter (
.addFilterBefore(...)): This is where we plug in theJwtAuthenticationFilterfrom our previous lesson. We instruct Spring Security to place it before theUsernamePasswordAuthenticationFilter. This is logical: we want to check for a JWT first. If a valid token is found and the user is authenticated, the request can proceed. TheUsernamePasswordAuthenticationFilteris primarily used for session-based authentication from a form login, which we are not using.
3. Configuring the Authentication Machinery
Our filter handles requests that already have a token. But how does a user get a token in the first place? They need to log in with their credentials (e.g., username and password). We need to configure Spring Security's AuthenticationManager to handle this process.
The AuthenticationManager delegates the task to one or more AuthenticationProviders. We'll use the DaoAuthenticationProvider, which is designed to authenticate against a data store like a database.
For a clear, code-first example of these components, you can refer to this article.
How to Configure Spring Security with JWT - OneUptime
The 'How to Configure Spring Security with JWT' article from OneUptime provides a very clean and complete SecurityConfig class. It's an excellent textual reference for what we are building.
Review the code in the 'Security Configuration' section. Note the beans for AuthenticationProvider, AuthenticationManager, and PasswordEncoder. This shows how all the necessary components are declared and wired together in one place.
Let's add the necessary beans to our SecurityConfig class.
// ... imports
import org.springframework.security.authentication.AuthenticationManager;
import org.springframework.security.authentication.AuthenticationProvider;
import org.springframework.security.authentication.dao.DaoAuthenticationProvider;
import org.springframework.security.config.annotation.authentication.configuration.AuthenticationConfiguration;
import org.springframework.security.core.userdetails.UserDetailsService;
import org.springframework.security.crypto.bcrypt.BCryptPasswordEncoder;
import org.springframework.security.crypto.password.PasswordEncoder;

@Configuration
@EnableWebSecurity
public class SecurityConfig {

    private final JwtAuthenticationFilter jwtAuthFilter;
    private final UserDetailsService userDetailsService;

    public SecurityConfig(JwtAuthenticationFilter jwtAuthFilter, UserDetailsService userDetailsService) {
        this.jwtAuthFilter = jwtAuthFilter;
        this.userDetailsService = userDetailsService;
    }

    @Bean
    public SecurityFilterChain securityFilterChain(HttpSecurity http) throws Exception {
        // ... (as before)
        http
            .csrf(csrf -> csrf.disable())
            .authorizeHttpRequests(auth -> auth
                .requestMatchers("/api/auth/**").permitAll()
                .anyRequest().authenticated()
            )
            .sessionManagement(session -> session.sessionCreationPolicy(SessionCreationPolicy.STATELESS))
            .authenticationProvider(authenticationProvider()) // Add the provider
            .addFilterBefore(jwtAuthFilter, UsernamePasswordAuthenticationFilter.class);

        return http.build();
    }

    @Bean
    public AuthenticationProvider authenticationProvider() {
        DaoAuthenticationProvider authProvider = new DaoAuthenticationProvider();
        authProvider.setUserDetailsService(userDetailsService); // How to find the user
        authProvider.setPasswordEncoder(passwordEncoder());    // How to check the password
        return authProvider;
    }

    @Bean
    public PasswordEncoder passwordEncoder() {
        return new BCryptPasswordEncoder();
    }

    @Bean
    public AuthenticationManager authenticationManager(AuthenticationConfiguration config) throws Exception {
        return config.getAuthenticationManager();
    }
}
Authentication Components Explained:
UserDetailsService: This is a core Spring Security interface you would have implemented already. Its job is to load a user by their username. We inject it into ourSecurityConfigto wire it into theAuthenticationProvider.PasswordEncoder: Another crucial bean. TheBCryptPasswordEncoderis the industry standard for hashing passwords. OurAuthenticationProvideruses it to compare the submitted password with the hashed password from the database.AuthenticationProvider: TheDaoAuthenticationProviderbean we've defined orchestrates the credential validation. It uses theUserDetailsServiceto find the user and thePasswordEncoderto verify the password.AuthenticationManager: This is the primary interface for authentication. We expose it as a bean so we can inject it directly into our future login controller. When its.authenticate()method is called, it will delegate to our configuredDaoAuthenticationProvider.
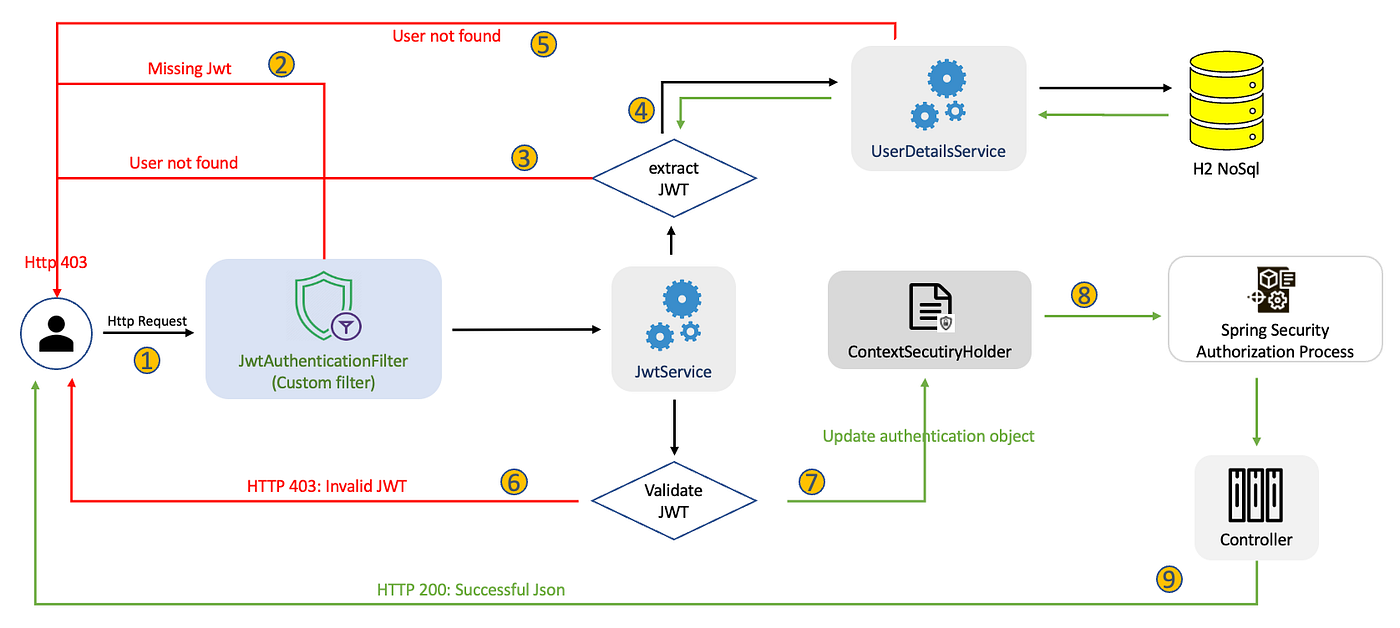
The following diagram provides a great high-level overview of how an incoming request flows through our newly configured system.
Conclusion
Excellent work! You have now fully configured Spring Security for stateless, token-based authentication. By creating the SecurityFilterChain bean, you have defined the complete security policy for your application.
Key Takeaways:
SecurityConfig: The central class for defining your application's security rules using@Configurationand@EnableWebSecurity.- Stateless Policy: Setting the session creation policy to
STATELESSis fundamental for building scalable, token-based microservices. - Filter Chain Customization: You can precisely control the security pipeline by defining authorization rules and adding custom filters like our
JwtAuthenticationFilterusing.addFilterBefore(). - Authentication Machinery: The
AuthenticationManagerandAuthenticationProviderare configured to handle the initial credential-based login, which is the source of the JWTs.
With the security filter and its configuration in place, our application is now ready to handle both the issuance of tokens (via login) and the validation of tokens for protected API calls.
In our next module, we will shift our focus to Building and Integrating Microservices. We'll begin by looking at how to refactor a service into an independent microservice, applying the principles and components we've built, including this robust security setup.