Hello!
In our last lesson, we secured our API using HTTP Basic Authentication. While simple and effective, it requires sending the user's password with every request. Today, we'll explore a more modern, flexible, and widely-used standard for securing APIs, especially in a microservices context: JSON Web Tokens (JWT).
This lesson directly addresses your goal of building secure REST APIs and microservices. We will focus entirely on the "what" and "why" of JWTs, leaning on your system design expertise to understand their architectural benefits. The goal is to explain the structure and purpose of a JSON Web Token (JWT) for stateless authentication. We'll cover what a JWT is, how it's structured, and why its stateless nature makes it a cornerstone of modern distributed systems.
1. From Stateful to Stateless Authentication
In traditional web applications, authentication often relies on server-side sessions. After a user logs in, the server creates a session in its memory or a database and sends a session ID back to the client (usually in a cookie). For every subsequent request, the client sends this ID, and the server looks up the corresponding session to identify the user.
This model has challenges, particularly for the scalable, distributed systems you're familiar with:
- Scalability: If you have multiple instances of a service behind a load balancer, where is the session state stored? It either needs to be replicated across all instances (complex) or stored in a centralized cache like Redis (another dependency and potential point of failure).
- Coupling: Other microservices that need to validate the user would have to query this central session store, creating tight coupling and performance overhead.
JWTs solve this by moving the session state from the server to the client in the form of a self-contained, digitally signed token.
The video below gives an excellent overview of the difference between session-based and JWT-based authentication flows.
What Is JWT and Why Should You Use JWT
Watch this clip from Web Dev Simplified to see a clear visual comparison between the traditional session-based authentication flow and the modern JWT-based flow.
Watch from the beginning to 05:21. Focus on the diagrams that illustrate where user information is stored in each model—on the server for sessions versus on the client within the token for JWTs.
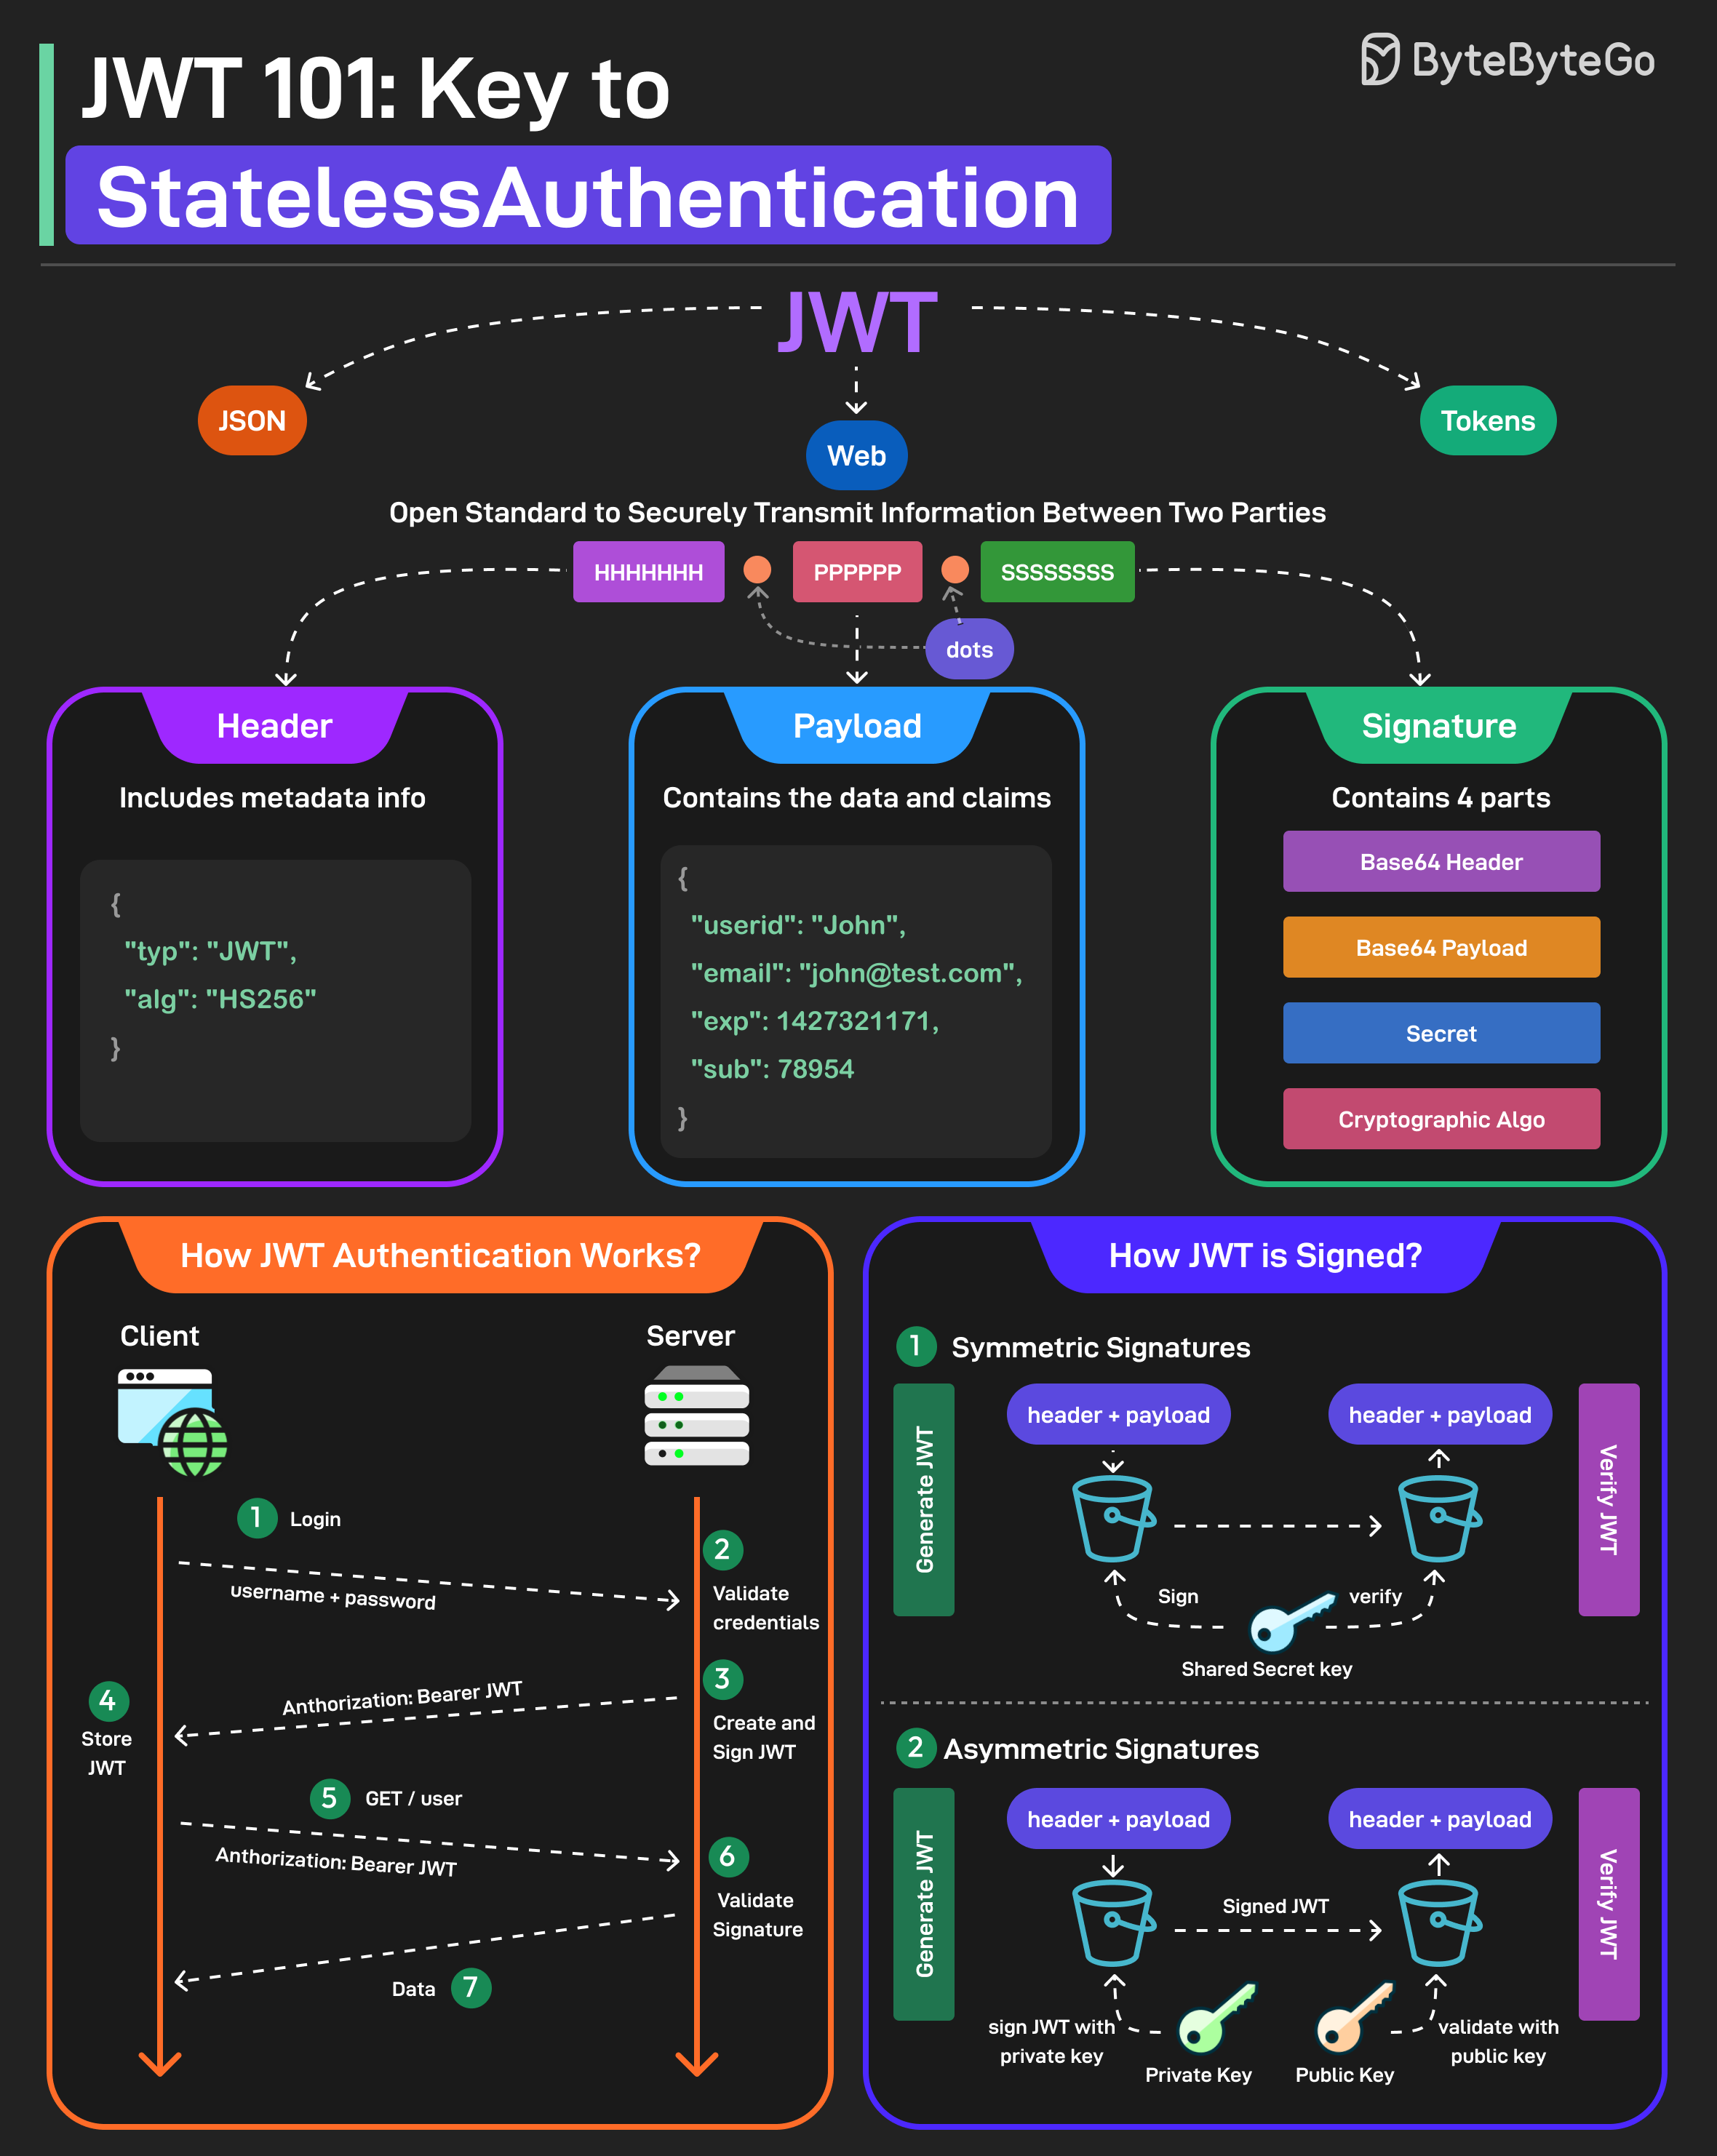
The core idea is that after the initial login, the server creates a JWT containing user information (like user ID and roles), signs it with a secret key, and sends it to the client. The client then includes this JWT in the Authorization header of every subsequent request. The server can verify the token's authenticity using the signature without needing to look up any state. This is stateless authentication.
2. The Anatomy of a JWT
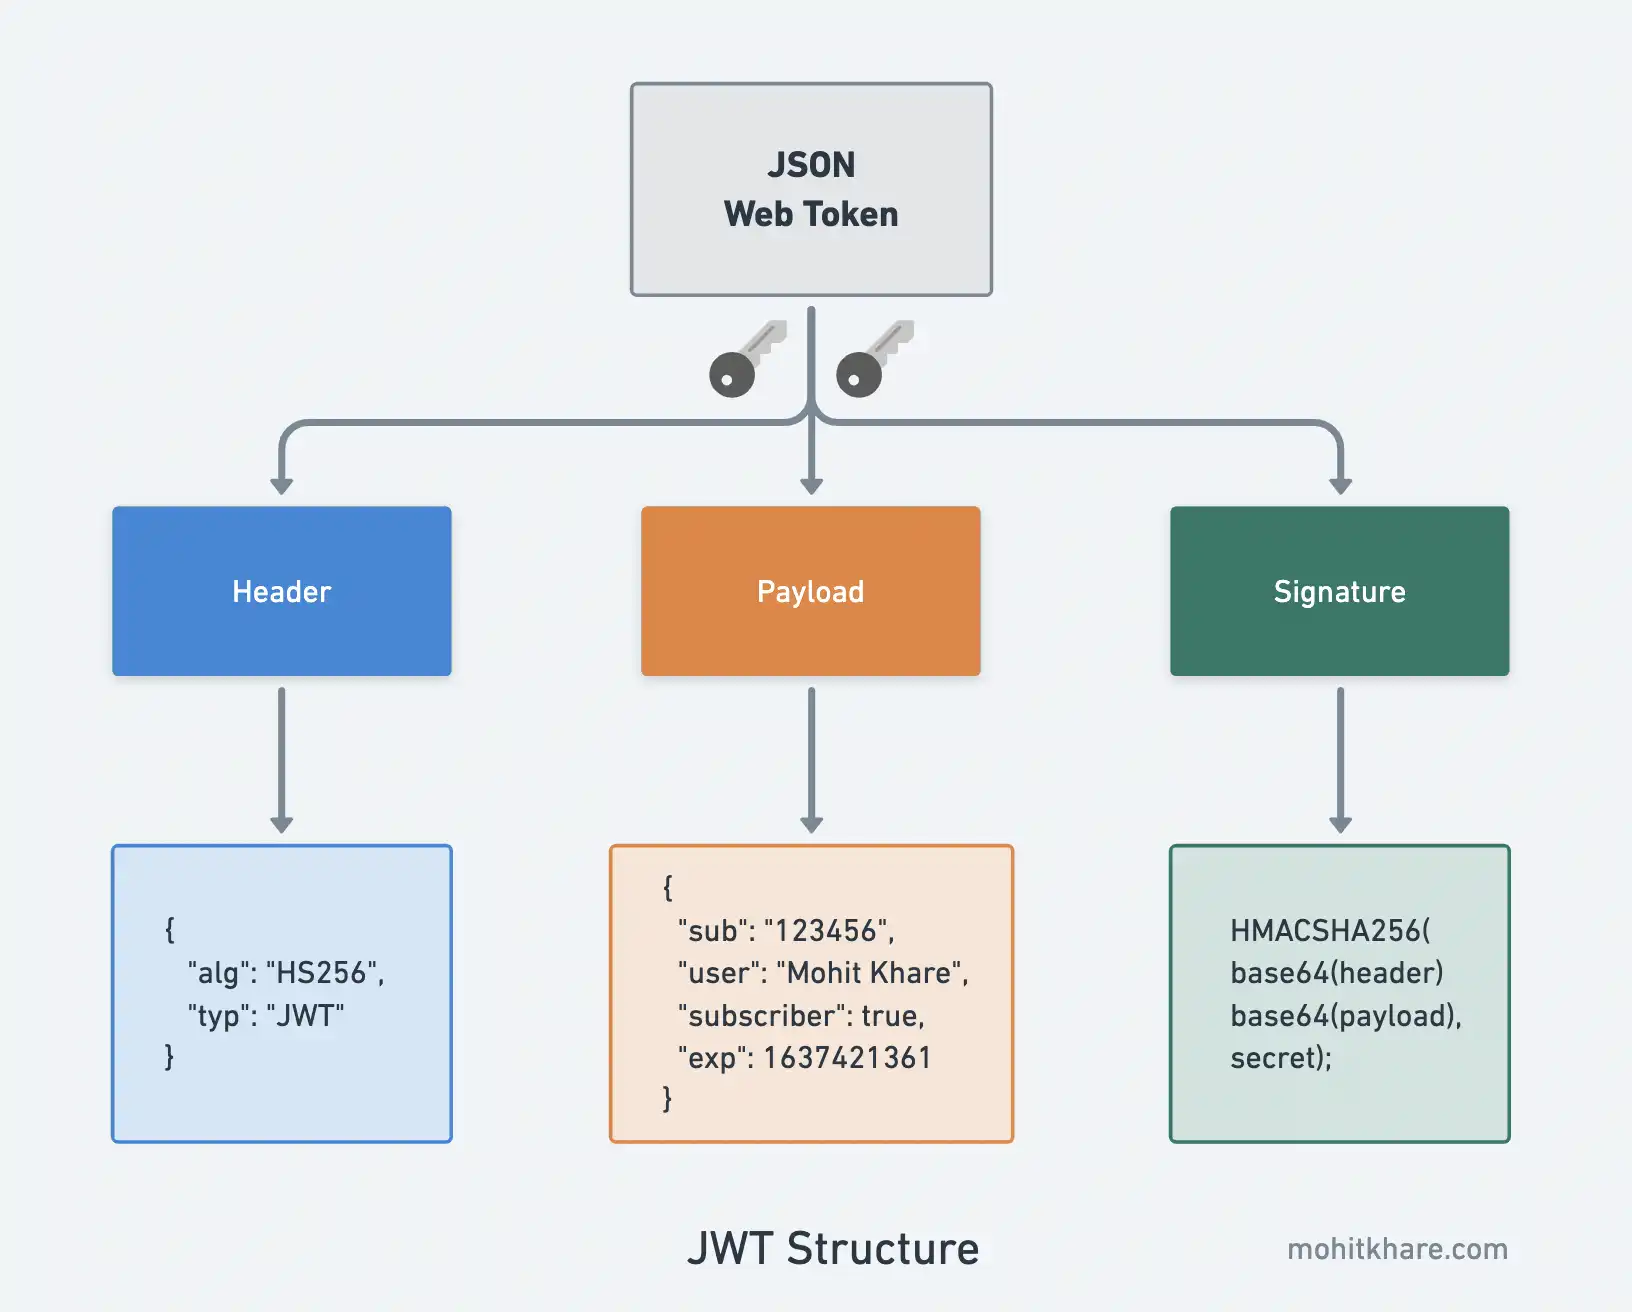
A JWT is not an encrypted blob of data; it's a compact, URL-safe string composed of three distinct parts, separated by dots (.):
header.payload.signature
Let's break down each part.
Header
The header is a JSON object that provides metadata about the token itself.
alg: The signing algorithm used (e.g.,HS256orRS256).typ: The type of the token, which is always"JWT".
Example: {"alg": "HS256", "typ": "JWT"}
This JSON is then Base64Url encoded to form the first part of the JWT.
Payload
The payload is a JSON object containing the claims, which are statements about the user and additional data.
There are three types of claims:
- Registered Claims: A set of predefined claims recommended by the JWT standard, like
iss(issuer),sub(subject, often the user ID), andexp(expiration time). - Public Claims: Custom claims defined by you, but they should be named carefully to avoid collisions (e.g., by using a URI as a name).
- Private Claims: Custom claims created to share information between parties that agree on using them (e.g.,
roles,permissions).
Example: {"sub": "12345", "name": "John Doe", "roles": ["ADMIN"], "iat": 1516239022}
Crucially, the payload is only Base64Url encoded, not encrypted. This means anyone can decode it and read its contents. Never store sensitive information like passwords in the payload.
Signature
The signature is what makes a JWT secure. It's used to verify that the token was not tampered with and that it was created by a trusted source. It is generated by taking the encoded header, the encoded payload, a secret key known only to the server, and signing them with the algorithm specified in the header.
For example, using HMAC-SHA256:HMACSHA256(base64UrlEncode(header) + "." + base64UrlEncode(payload), secret)
This signature ensures the token's integrity. If a malicious user changes a role in the payload from "USER" to "ADMIN", the signature will no longer be valid because the payload used to generate it has changed. When the server re-calculates the signature on an incoming request, it won't match the one on the token, and the request will be rejected.
The following article provides a great textual breakdown of these three parts.
The article 'JWT | System Design' from AlgoMaster.io offers a concise yet thorough explanation of the JWT structure.
Please read the section titled '2. The Anatomy of a JWT'. It details the Header, Payload (including the different types of claims), and Signature, reinforcing what we've just discussed.
3. Symmetric vs. Asymmetric Signing
Your system design experience will find the choice of signing algorithm particularly interesting. The alg in the header dictates how the signature is created and verified.
-
Symmetric (HMAC): Algorithms like
HS256use a single secret key for both signing and verifying the token. This is simple and fast. However, any service that needs to verify a token must have access to the same secret key. This is suitable for monolithic applications or within a trusted cluster of microservices. -
Asymmetric (RSA/ECDSA): Algorithms like
RS256use a public/private key pair. The token is signed with a private key (kept secret on the authentication server), but it can be verified by anyone who has the corresponding public key. This is more powerful in a distributed architecture. The authentication service is the only one that can issue tokens, but any other microservice can independently verify them just by having the public key, without needing a shared secret.
The video below explains this distinction and its architectural implications very well.
Session Vs JWT: The Differences You May Not Know!
This clip from ByteByteGo discusses the different signing algorithms and their trade-offs.
Watch from 02:40 to 03:52. The video explains the difference between symmetric (HMAC) and asymmetric (RSA) signing and when you might choose one over the other, which is a key architectural decision.
4. Practical Realities: Expiration and Refresh Tokens
A JWT is valid until its exp (expiration) time is reached. Using short-lived access tokens (e.g., 15 minutes) is a crucial security practice. It limits the window of opportunity for an attacker if a token is stolen.
But forcing the user to log in every 15 minutes would be a terrible user experience. The standard solution is the Access Token / Refresh Token pattern.
- Access Token: A short-lived JWT used to access protected resources. It's sent with every API request.
- Refresh Token: A long-lived token (e.g., days or weeks) that is stored securely by the client. Its only purpose is to request a new access token when the old one expires.
This flow is seamless to the user. When the client detects that the access token has expired (or is about to), it makes a call to a special endpoint (e.g., /api/auth/refresh) with the refresh token. The server validates the refresh token and, if valid, issues a new access token.
Session Vs JWT: The Differences You May Not Know!
The same ByteByteGo video also provides a fantastic explanation of the refresh token pattern.
Watch from 03:52 to 05:06. This part clearly explains how short-lived access tokens and long-lived refresh tokens work together to balance security and user experience.
5. Design Considerations and Trade-offs
As with any architectural pattern, JWTs come with trade-offs. Your experience in system design makes it important to consider these nuances.
- Staleness: A JWT is a snapshot of user data at the time it was issued. If a user's permissions are revoked, the token they hold will remain valid until it expires. The short-lived access token pattern helps mitigate this, but it's a fundamental characteristic of a stateless system.
- Token Size: Since JWTs are sent in HTTP headers, which have size limits, you should avoid stuffing too much data into the payload. Large tokens can increase network latency.
- Revocation: Revoking a JWT before its expiration is not straightforward because of their stateless nature. The most common solution is to maintain a "blacklist" of revoked tokens on the server, which re-introduces a small amount of state.
The article "Part 3 - implementing authorization using JWT-based access tokens" by Chris Richardson, a well-known expert in the microservices community, delves deep into these issues.
Part 3 - implementing authorization using JWT-based access tokens
This article discusses the practical design issues when using JWTs for authorization in a microservice architecture. It's a more advanced take that you might find interesting.
Read the section titled 'Design issues when using JWT-based access tokens for authorization'. This covers the risks of coupling, stale data, token size limits, and data exposure. It provides a balanced view of the trade-offs involved.
Conclusion
You've now covered the foundational theory of JSON Web Tokens. This conceptual understanding is vital before we dive into the code.
Key Takeaways:
- Purpose: JWTs enable stateless authentication, which is highly scalable and well-suited for microservice architectures.
- Structure: A JWT consists of three parts: the Header (metadata), the Payload (claims about the user), and the Signature (for integrity and authenticity).
- Security: The signature guarantees that the token has not been tampered with. The payload itself is only encoded, not encrypted.
- Signing: You can use symmetric (HMAC) algorithms with a shared secret or asymmetric (RSA) algorithms with a private/public key pair, each with different architectural implications.
- Lifecycle: The access token/refresh token pattern is the standard way to manage token expiration, balancing security with user experience.
In our next lesson, we will put this theory into practice. We'll create a Java utility class to generate and validate JWTs, which will become the core component of our token-based authentication system in Spring Security.