Hello! Welcome back to our course on Computerized Accounting.
In our previous lesson, we explored the purpose and effect of merging cells. We learned that it's a powerful tool for improving the layout of reports like Balance Sheets by creating clean, centered titles. We also covered the most critical rule: when merging, only the data in the top-left cell is kept.
Today, we transition from the "why" to the "how." This lesson is purely practical and directly targets a common exam question. Our goal is to ensure you can confidently outline the steps required to merge a range of cells. Mastering this simple procedure will prepare you to answer specific, mark-scoring questions on your CBSE exam.
1. The Official Steps: What Examiners Look For
For an exam-focused topic like this, our first stop should always be the official source. The CBSE marking scheme provides the exact, concise answer that examiners are trained to look for.
Marking Scheme Class XII (2025-26)
Let's begin by reviewing the steps as defined by the CBSE. This will give you the precise wording and format expected in your exam answers.
In the PDF, locate question number 34, titled 'Merging a range of Cells'. Read the two numbered points listed under the 'Steps:' heading. Commit these two steps to memory, as they form the perfect model answer.
As you can see from the marking scheme, the process is straightforward. It boils down to two core actions: selecting the cells and applying the command.
2. Seeing it in Action: A Visual Demonstration
Now that you know the steps in theory, let's watch a quick video to see how they are performed in a real spreadsheet. This will help solidify your understanding of the process.
Excel 2016 - Merge and Center - How to Merge Cells - Merging the Selected Cell Row Column in MS 365
This video from Professor Adam Morgan provides a clear, practical demonstration of the 'Merge & Center' function being used to create a title for a report.
Watch from 01:53 to 02:42. Observe how the presenter first clicks and drags to select the cell range (A1 to F1) and then navigates to the 'Merge & Center' button to complete the action.
3. Step-by-Step Breakdown
Let's break down the process into a clear sequence, pinpointing exactly where to find the necessary tool in the Excel interface.
Step 1: Select the Cells to Merge
Click on the first cell you want to include in the merge, hold the mouse button down, and drag across the adjacent cells you wish to combine. The selected cells will be highlighted. Remember, you can only merge cells that form a continuous rectangular block.
Step 2: Find and Use the Merge Command
Navigate to the Home tab on the Excel ribbon. In the Alignment group, you will find the Merge & Center button.
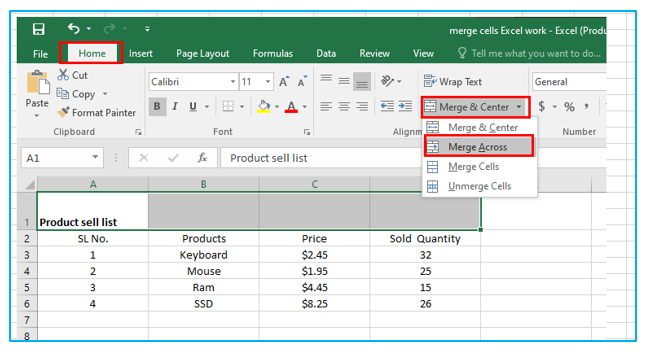
Clicking this button will merge the selected cells into one and center the content from the original top-left cell.
4. Important Variations and Considerations
The "Merge & Center" option is the most common, but it's not the only one. For a complete understanding (and to handle more complex exam questions), it's useful to know the other options available.
Merge and unmerge cells in Excel
The official Microsoft Excel guide explains these variations clearly. It also provides another essential reminder about data loss, which we discussed in the last lesson.
Read the section titled 'Merge cells'. First, reinforce your understanding by reading the 'Important' note about data retention. Then, review the 'Tips' section, which explains the difference between 'Merge & Center', 'Merge Across', and 'Merge Cells'.
Based on that reading, here is a quick summary of the options available in the 'Merge & Center' dropdown menu:
- Merge & Center: Combines the selected cells and centers the content. This is the default and most-used option, ideal for main titles.
- Merge Across: Merges the selected cells in each row individually. This is useful if you have selected a range spanning multiple rows and want each row to have its own merged cell (e.g., for multiple subheadings).
- Merge Cells: Combines the selected cells into a single cell but does not center the content. The content will retain its original alignment (e.g., left-aligned).
- Unmerge Cells: Reverts a merged cell back to its original individual cells.
Exam-Style Practice
Let's put this into practice. How would you answer the following exam question?
Question: You are creating a 'Cash Flow Statement' in a spreadsheet. The main title of the report, located in cell A1, needs to span across columns A through F to cover the entire width of your data table. Outline the steps you would take to merge the cells for this title.
Model Answer:
- Select the range of adjacent cells from A1 to F1.
- On the Home tab, in the Alignment group, click the Merge & Center command.
This two-step answer is concise, accurate, and directly reflects the format valued by the CBSE marking scheme.
Conclusion
In this lesson, you have mastered a fundamental and testable spreadsheet skill. You can now confidently outline the exact steps needed to merge cells, a key technique for professional report formatting.
Key Takeaways:
- The process involves two main steps: selecting a range of adjacent cells and clicking the merge command.
- The primary command is Merge & Center, located on the Home tab in the Alignment group.
- Variations like Merge Across and Merge Cells offer additional formatting flexibility.
- For exam purposes, a clear, two-step explanation is the best approach.
In our next lesson, we will continue improving the presentation of our accounting data. We will focus on how to apply various number formatting tools, such as currency symbols (₹), percentages (%), and date formats, to make financial figures instantly understandable.