Hello! Welcome to the third lesson in our "Spreadsheet Essentials" module.
In our last session, we learned how to work with groups of cells using cell ranges. We saw how a range like A1:D10 can be used in formulas to make calculations efficient. Today, we'll build on that by learning how to change the very structure of these cells to improve the layout and presentation of your accounting data.
This lesson focuses on a common formatting technique you'll see in any professionally prepared report. By the end of our 60 minutes, you will be able to: Describe the purpose and effect of merging and splitting cells in a spreadsheet.
This skill is crucial for creating clear and readable financial statements, turning a plain grid of numbers into a polished, easy-to-understand document.
1. The Purpose of Merging Cells
The primary reason to merge cells in an accounting context is for presentation and readability. Imagine you are creating a "Balance Sheet" or a "Sales Report". You would want that title to be prominently displayed and centered above all the relevant data columns. Merging cells allows you to do just that.
Merging is the process of combining two or more adjacent cells (either in a row or a column) into one single, larger cell.
Take a look at the image below.
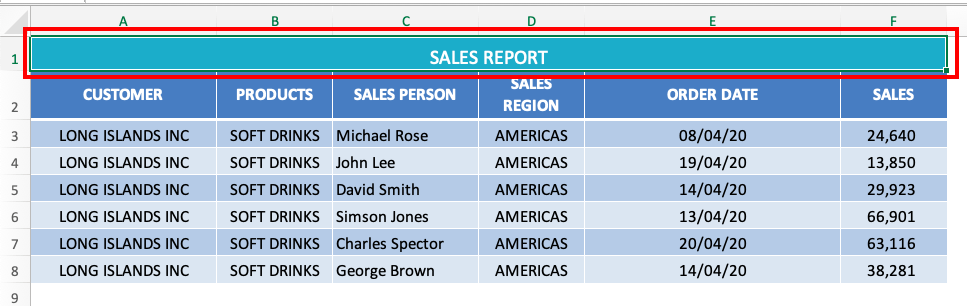
Without merging, the title "SALES REPORT" would be stuck in cell A1, leaving it misaligned with the rest of the data table. Merging provides a simple way to create titles, headings, and subheadings that span multiple columns or rows.
2. The Effect of Merging Cells
When you merge cells, two things happen:
- Visually: The individual cell borders disappear, and the selected cells become one large cell. The content is usually centered by default, which is perfect for titles.
- Data-wise: This is a critical point and a common area for mistakes. When you merge cells, only the data in the top-left cell of the selected range is kept. Any data in the other cells you selected will be permanently deleted.
It is essential to remember this rule to avoid accidentally losing important data. Let's see a short video that demonstrates the process and highlights this important warning.
Excel: Modifying Columns, Rows, and Cells
This video from LearnFree demonstrates how merging works and gives a crucial warning about potential data loss.
Watch from 03:40 to 04:24. First, you'll see how the 'Merge & Center' command creates a title. Then, pay very close attention to the warning at 04:14 about what happens when you merge multiple cells that already contain data.
3. Splitting Merged Cells
As the name suggests, splitting cells is the exact opposite of merging. It is the process of reverting a single merged cell back into its original group of individual cells.
Purpose of Splitting:
- To correct a formatting error if you merged the wrong cells.
- To restructure the layout of your worksheet.
Effect of Splitting:
When you split a merged cell, the content that was in the merged cell is placed into the top-left cell of the newly un-merged range. The other cells in that range will be empty.
4. Formal Definitions and Exam Focus
To ensure your understanding is perfectly aligned with what CBSE examiners expect, let's review the official definitions and descriptions. The following reading is taken from a CBSE Marking Scheme, which provides the model answers for board exams.
This document provides the exact terminology and explanations used by examiners. Focusing on these definitions will help you craft precise answers in your exam.
In the PDF, locate question 34, titled 'Merging a range of Cells'. Read the descriptive paragraphs for both merging and splitting. Focus on understanding: The definition of a merged cell. What happens to the cell reference. Where the content of the merged cell comes from and where it goes after splitting. You will also see the steps listed. We will practice these steps in our next lesson, so for now, just focus on being able to describe the 'what' and 'why'.
This reading confirms the key effects we've discussed: a merged cell takes the cell reference of the upper-left cell, and upon splitting, the content returns to that same upper-left cell.
Conclusion
You now have a solid conceptual understanding of merging and splitting cells. This isn't just about making things look pretty; it's about structuring information logically, which is at the heart of accounting.
Key Takeaways:
- Purpose: Merging is used to create clear titles and headings that span multiple columns or rows, improving a report's readability.
- Effect of Merging: A single large cell is created. Crucially, only the content from the top-left cell in the original range is preserved; all other data is discarded.
- Effect of Splitting: A merged cell is reverted to its original individual cells, and its content is placed in the top-left cell of the resulting range.
In our next lesson, we'll get practical. We will go through the step-by-step process for both merging and splitting cells, ensuring you can apply this knowledge confidently in any spreadsheet task.