Hello! Let's get started on our next lesson.
In our previous session, we explored the three main types of codes used in accounting: sequential, block, and mnemonic. You learned to identify each one and understand its specific purpose. This was the "what" and "why" of codification.
Today, we transition from theory to practice. This lesson is all about the "how"—you will learn the systematic process for creating a coding scheme from scratch. This is a crucial skill because questions on your board exam often require you to develop a code structure for a given list of accounts, especially for higher-mark questions.
By the end of this lesson, you will be able to: Develop an appropriate coding scheme for a given list of accounts.
1. The Starting Point: Hierarchical Grouping
Before you can assign a single code, you must first organize the accounts into a logical hierarchy. In accounting, this structure is universal and is based on the fundamental accounting equation and the components of financial statements.
The main groups, or "Major Heads," are:
- Assets
- Liabilities
- Equity (Capital)
- Revenue (Income)
- Expenses
These major heads are then broken down into "Sub Heads." For example, Assets are split into Non-Current Assets and Current Assets. This creates a tree-like structure.
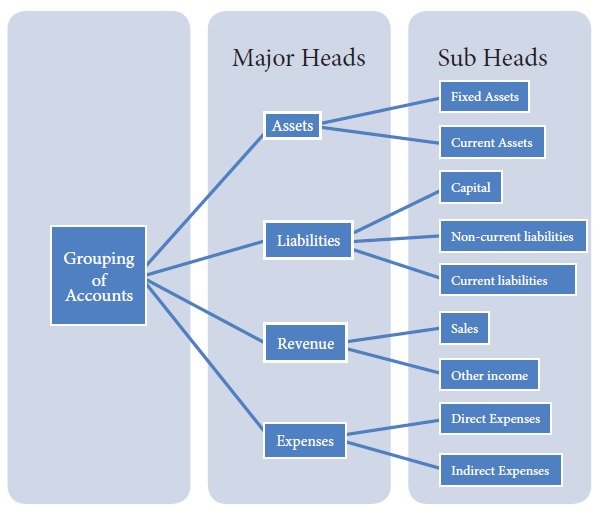
To see how these groups are formally laid out in your syllabus, you can refer to the NCERT text. The section titled "Grouping of Accounts" (before codification) lists these categories in detail. This structure is the foundation upon which we build our codes.
2. The Methodology: A Step-by-Step Guide
Developing a coding scheme is a logical process. It's not about randomly assigning numbers; it's about designing a system. The most common and effective method for creating a Chart of Accounts is using Block Codes, as we discussed in the last lesson.
Let's break down the process into clear steps.
Step 1: Analyze the Hierarchy and Define Categories
First, take the list of accounts you need to code and group them according to the hierarchy shown in the diagram above. Identify the major head and the sub-head for each account.
Step 2: Design the Coding Structure
This is the most critical step. You need to decide:
- Length: How many digits will the code have? (e.g., 4 digits, 6 digits). More digits allow for more accounts and more levels of detail.
- Blocks: Which digits will represent which level of the hierarchy? For example, in a 4-digit code:
- The first digit could represent the Major Head (1 for Assets, 2 for Liabilities, etc.).
- The second digit could represent the Sub Head (e.g., within Assets, 1 for Non-Current, 2 for Current).
- The last two digits could be a sequential number for the specific account within that sub-group.
- Flexibility: Plan for the future! It's wise to leave gaps between codes (e.g., use 1101, 1105, 1110 instead of 1101, 1102, 1103). This allows you to add new accounts later without having to redo the entire system.
The NCERT textbook provides an excellent guide on the thought process behind designing a coding structure. While it uses an example of coding students, the methodology is perfectly applicable to accounts.
ACCOUNTANCY - Knowledge Gallery
This section from the ACCOUNTANCY textbook by Knowledge Gallery explains the methodology for developing a coding structure. It demonstrates how to think about the number of digits needed for each category and how to assemble them into a meaningful code. The logic here is key to mastering this topic.
Please read the section titled '1.4.2 METHODOLOGY TO DEVELOP CODING STRUCTURE AND CODING' and the detailed example that follows. Focus on the reasoning for allocating a certain number of digits to each component (e.g., '2 digits can be allocated for the Entry-year'). This is the same logic you will apply when deciding the structure for account codes.
Step 3: Assign the Unique Codes
Once your structure is defined, you can systematically assign a unique code to each account based on the rules you've created.
3. Practical Application: A Worked Example
Let's apply this methodology to a typical exam-style problem.
Problem: You are asked to develop a 4-digit block coding scheme for the following accounts of a trading firm:
- Plant & Machinery
- Cash in Hand
- Debtors
- Capital
- Creditors
- Bank Loan (Long-term)
- Sales
- Rent Paid
- Salaries
- Furniture
Solution:
Step 1: Group the Accounts into the Hierarchy
| Account Name | Major Head | Sub Head |
|---|---|---|
| Plant & Machinery | Assets | Non-Current Assets |
| Furniture | Assets | Non-Current Assets |
| Cash in Hand | Assets | Current Assets |
| Debtors | Assets | Current Assets |
| Creditors | Liabilities | Current Liabilities |
| Bank Loan (Long-term) | Liabilities | Non-Current Liabilities |
| Capital | Equity | Shareholder's Funds |
| Sales | Revenue | Revenue from Ops. |
| Rent Paid | Expenses | Indirect Expenses |
| Salaries | Expenses | Indirect Expenses |
Step 2: Design the 4-Digit Coding Structure
Let's define our structure:
- First Digit (Block for Major Head):
1xxx- Assets2xxx- Liabilities3xxx- Equity4xxx- Revenue5xxx- Expenses
- Second Digit (Block for Sub Head):
x1xx- Currentx2xx- Non-Current
- Last Two Digits (Sequential ID):
xx01,xx02, etc., for each account within its group.
Step 3: Assign the Codes
Now we apply our structure to the grouped accounts.
| Account Name | Grouping | Code | Explanation |
|---|---|---|---|
| Assets | 1xxx |
||
| Non-Current | 12xx |
Asset (1), Non-Current (2) | |
| Plant & Machinery | 1201 |
||
| Furniture | 1202 |
||
| Current | 11xx |
Asset (1), Current (1) | |
| Cash in Hand | 1101 |
||
| Debtors | 1102 |
||
| Liabilities | 2xxx |
||
| Non-Current | 22xx |
Liability (2), Non-Current (2) | |
| Bank Loan (Long-term) | 2201 |
||
| Current | 21xx |
Liability (2), Current (1) | |
| Creditors | 2101 |
||
| Equity | 3xxx |
||
| Capital | 3001 |
Equity (3), No sub-group needed, so '0' used. | |
| Revenue | 4xxx |
||
| Sales | 4001 |
Revenue (4), No sub-group needed, so '0' used. | |
| Expenses | 5xxx |
||
| Rent Paid | 5001 |
Expense (5), Direct/Indirect sub-group could be added. | |
| Salaries | 5002 |
This structured table is exactly what you would need to produce in an exam. The visual below shows a similar professional layout.

Conclusion
You have now learned not just the types of codes, but the practical methodology for creating them. This is a powerful skill that transforms a simple list of accounts into a structured, machine-readable Chart of Accounts, which is the engine of any Computerized Accounting System.
Key Takeaways:
- Group First, Code Second: Always start by organizing accounts into the standard hierarchy (Assets, Liabilities, etc.).
- Design a Logical Structure: Use a block coding system for the Chart of Accounts. Decide on the code length and what each digit or block will represent.
- Plan for Flexibility: Leave gaps in your numbering to accommodate future growth and new accounts without breaking the system.
In our next lesson, we will shift gears from the conceptual framework of organizing accounting data to the most common tool used to manipulate it: the spreadsheet. We will begin with the absolute basics, distinguishing between different types of data you can enter in a spreadsheet cell.