Introduction
Hello! In our last lesson, we introduced the six fundamental bitwise operators (&, |, ^, ~, <<, >>) and discussed the importance of the "Read-Modify-Write" pattern for safely interacting with hardware. You now know what each operator does on a bit-by-bit level.
Today, we'll learn how to combine these operators with specially crafted values called bitmasks to achieve precise control over individual bits. This lesson is all about the core techniques of bit manipulation: how to reliably set, clear, and test any specific bit within a variable.
Mastering these techniques is not just an academic exercise; it's a fundamental skill for your goals in automation and embedded systems. When you work with an Arduino, you are often interacting directly with hardware registers where each bit acts as a switch or a status indicator. The methods we cover today are the standard, efficient way to flip those switches.
By the end of this lesson, you will be able to apply bitmasking to set, clear, and test individual bits in any integer variable.
1. What is a Bitmask?
A bitmask is simply an integer value that is used to select, or "mask," specific bits in another variable. The power of a mask isn't its overall decimal value, but its binary pattern of 1s and 0s. We use bitwise operators to combine the mask with our target variable, allowing us to change specific bits while leaving the others completely untouched.
The most common way to create a mask for a single bit is by using the left shift operator (<<). To create a mask that targets the n-th bit (counting from 0 on the right), you shift the number 1 to the left by n positions.
For example, to create a mask for bit 3:
- Operation:
1 << 3 - Binary:
00000001becomes00001000.
This simple pattern, 1 << bit_position, is the foundation for all the techniques that follow.
2. The Three Core Techniques: Set, Clear, Test
Let's dive into the three fundamental operations of bitmasking. We'll use an unsigned char variable named flags as our example, imagining it represents a set of 8 on/off switches.
Let's say unsigned char flags = 0b10010101; (decimal 149).
A. Setting a Bit (Forcing to 1)
To set a bit, we use the bitwise OR (|) operator. Remember its logic: x | 1 is always 1, and x | 0 is x (unchanged). This is perfect for forcing one bit to 1 while preserving all others.
- Goal: Set bit 2 of
flagsto1. - Current
flags:10010**0**01 - Mask: We need a mask with a
1at bit 2. We create this with1 << 2, which is00000100. - Operation:
flags = flags | (1 << 2);or more concisely,flags |= (1 << 2);
Let's see it in binary:
  10010001  (flags)
| 00000100  (mask)
-----------
  10010101  (new flags)
The bit at position 2 is now 1, and all other bits are unchanged.
B. Clearing a Bit (Forcing to 0)
To clear a bit, we use the bitwise AND (&) operator. Its logic is x & 0 is always 0, and x & 1 is x (unchanged). This lets us force a bit to 0 while preserving others.
For this, we need a mask with a 0 at the target position and 1s everywhere else. We create this by first making a simple mask (1 << bit_position) and then inverting it with the NOT (~) operator.
- Goal: Clear bit 4 of
flagsto0. - Current
flags:100**1**0101 - Simple Mask:
1 << 4is00010000. - Inverted Mask:
~(1 << 4)becomes11101111. - Operation:
flags = flags & ~(1 << 4);orflags &= ~(1 << 4);
Here's the visual:
  10010101  (flags)
& 11101111  (inverted mask)
-----------
  10000101  (new flags)
The bit at position 4 is now 0. The parentheses in ~(1 << 4) are crucial to ensure the shift happens before the inversion.

C. Testing a Bit (Checking its Value)
To test if a bit is 1 or 0, we again use the bitwise AND (&) operator.
- Goal: Check if bit 7 of
flagsis set. - Current
flags:**1**0000101 - Mask:
1 << 7is10000000. - Operation: We perform
flags & (1 << 7).
Let's see the result:
  10000101  (flags)
& 10000000  (mask)
-----------
  10000000  (result)
The result is non-zero. In C, any non-zero value is treated as true in a conditional. If we tested a bit that was 0 (e.g., bit 6), the result of the AND operation would be 00000000, which is false.
This makes it perfect for if statements:
if (flags & (1 << 7)) {
    // This code will run because bit 7 is set.
}

if (flags & (1 << 6)) {
    // This code will NOT run because bit 6 is 0.
}
The following article provides a fantastic, detailed walkthrough of these techniques, along with a fourth common one: toggling a bit using XOR (^).
Demystifying bitwise operations, a gentle C tutorial
The article 'Demystifying bitwise operations' provides excellent code examples and visual explanations for the techniques we just discussed. It also introduces how to toggle a bit.
Please read the section titled 'Getting, Setting, Clearing, Toggling the nth bit'. Focus on the C functions and the visual diagrams that explain how each operation works. Notice the pattern: | for setting, & ~ for clearing, & for testing, and ^ for toggling.
3. Application: Direct Port Manipulation on Arduino
These techniques are the bread and butter of embedded programming. The standard Arduino functions like digitalWrite() and pinMode() are convenient, but they are significantly slower than manipulating hardware registers directly. For performance-critical applications, programmers use bitmasking.
On an Arduino Uno, the digital pins are grouped into "ports" controlled by 8-bit registers. The three main ones are:
DDRx: The Data Direction Register. Sets each pin in the port to be anINPUT(0) orOUTPUT(1). This is whatpinMode()controls.PORTx: The Port Data Register. If a pin is anOUTPUT, writing a1here sets the pinHIGH, and0sets itLOW. This is whatdigitalWrite()controls.PINx: The Port Input Pins Register. Used to read the state of pins configured asINPUT.
Let's look at the pinout for an Arduino Uno to see how the physical pins map to these ports and bits.
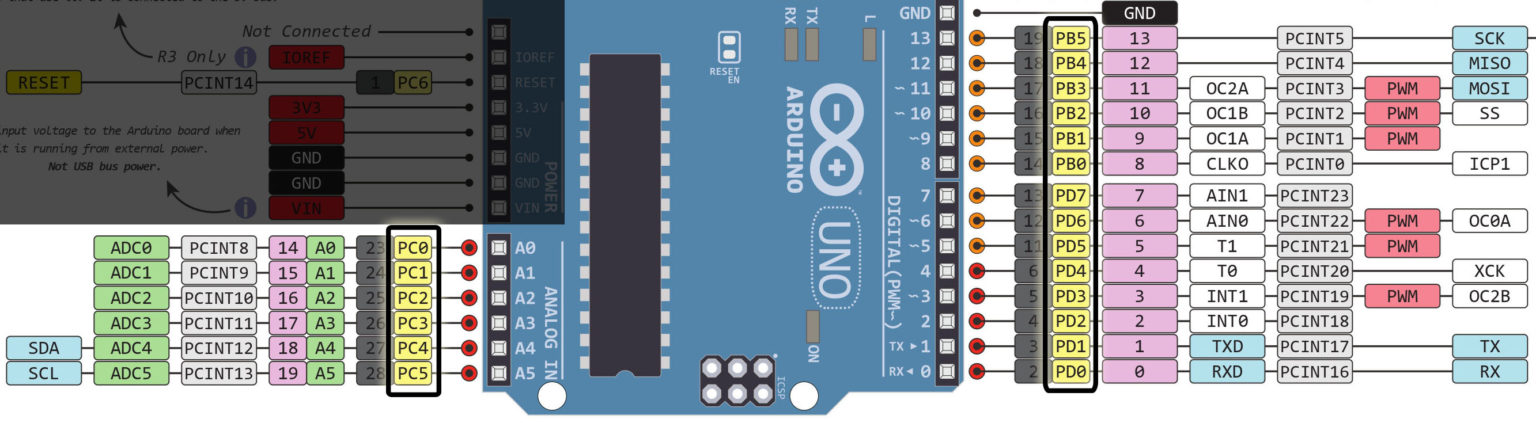
Let's write code to control an LED on pin 10 faster than digitalWrite() allows.
-
Set the direction: We need to set pin 10 (PB2) as an
OUTPUT. This means setting bit 2 of theDDRBregister to1.// Equivalent to pinMode(10, OUTPUT); DDRB |= (1 << PB2); // or DDRB |= (1 << 2); -
Turn the LED on: We need to set pin 10 (PB2)
HIGH. This means setting bit 2 of thePORTBregister to1.// Equivalent to digitalWrite(10, HIGH); PORTB |= (1 << PB2); -
Turn the LED off: We need to set pin 10 (PB2)
LOW. This means clearing bit 2 of thePORTBregister to0.// Equivalent to digitalWrite(10, LOW); PORTB &= ~(1 << PB2);
This might seem more complex, but it executes in one or two clock cycles, whereas a call to digitalWrite() can take over 50. This is the "under the hood" control you were interested in!
This next resource provides excellent Arduino-specific examples and further explains the registers.
Bit Manipulation with Arduino - Tech Explorations
The article 'Bit Manipulation with Arduino' reinforces these concepts in the context of Arduino programming. It provides clear examples and explains the roles of the different port registers.
Please read from the section 'Arduino Port DDRx Register' to the end of the 'Frequently asked questions' section. Pay close attention to the code examples showing how to use DDRD, PORTB, and PIND to control pins directly. The FAQ section provides a great, concise summary of the set, clear, and toggle operations.
Conclusion
In this lesson, you moved from knowing what bitwise operators are to knowing how to apply them for precise control. These bitmasking techniques are essential for any low-level programming, from writing device drivers to optimizing performance-critical code.
Key Takeaways:
- A bitmask is a value with a specific binary pattern used to target individual bits.
- The most common mask, for targeting bit
n, is created with1 << n. - The three core techniques are:
- Set a bit:
variable |= (1 << bit_position); - Clear a bit:
variable &= ~(1 << bit_position); - Test a bit:
if (variable & (1 << bit_position)) { ... }
- Set a bit:
- A fourth useful technique is toggling a bit:
variable ^= (1 << bit_position); - These operations are fundamental to controlling hardware registers directly in embedded systems, offering significant performance gains over standard library functions.
Next Up
We've spent the last two lessons deep in the world of bits and bytes. Now, we'll move to a higher-level, but equally essential, topic: File I/O. In the next lesson, you will learn how to use standard C functions like fopen, fprintf, and fscanf to read from and write to text files, a cornerstone of almost any desktop application.