Hello! Welcome back to your journey into Arduino programming.
In our last lesson, you successfully controlled a digital output by writing a sketch to blink an LED. You learned about the fundamental setup() and loop() structure, and used pinMode(), digitalWrite(), and delay() to bring your code into the physical world.
Today, we'll explore the other side of the coin: reading a digital input. Our goal is to read the state of a push button, a fundamental component in almost any interactive project. However, reading physical switches isn't as straightforward as it seems due to a mechanical issue called "bouncing." Therefore, this lesson will focus on how to read digital input from a push button, including implementing a robust software debouncing technique.
1. Reading a Digital Input
Just as digitalWrite() sets a pin to HIGH (5V) or LOW (0V), digitalRead(pin) does the opposite: it reads the voltage at a pin and returns HIGH if it detects a high voltage, or LOW if it detects a low voltage.
To use a button, we need a circuit that causes a pin to go from LOW to HIGH (or vice-versa) when pressed. But there's a problem: if an input pin isn't connected to anything, its state is "floating" and digitalRead() can return random values. To solve this, we use a resistor to "pull" the pin to a default state.
There are two ways to do this:
- Pull-down resistor: Connects the pin to Ground (GND) by default, making it read
LOW. Pressing the button connects it to 5V, making it readHIGH. - Pull-up resistor: Connects the pin to 5V by default, making it read
HIGH. Pressing the button connects it to GND, making it readLOW.
Fortunately, the ATmega microcontroller on your Arduino has built-in pull-up resistors you can enable in software. This is the preferred method as it simplifies your wiring.
You can enable it by setting the pin's mode to INPUT_PULLUP:pinMode(buttonPin, INPUT_PULLUP);
When you do this:
- The pin reads
HIGHwhen the button is not pressed. - The pin reads
LOWwhen the button is pressed (as it connects the pin to ground).
This logic is inverted, but it saves you an external component.
Ep. 58 - Arduino Advanced Input & Button Control, Debouncing, Counters & Multitasking
This video from Vlad Romanov provides a great explanation and demonstration of using the internal pull-up resistor, which simplifies our circuit significantly.
Watch from 01:54 to 04:41. The presenter explains how to declare input pins and, most importantly, how to use pinMode(pin, INPUT_PULLUP) to enable the Arduino's internal pull-up resistors, eliminating the need for external ones.
2. The Problem: Switch Bouncing
You might think you can just read the pin in a loop and check for a LOW signal. Let's see why that's problematic.
Buttons are mechanical devices. When you press one, the internal metal contacts don't form a perfect, clean connection. Instead, they bounce against each other for a few milliseconds, creating a series of rapid ON/OFF signals before settling into their final state. Your Arduino's microcontroller is so fast that it will read each of these bounces as a separate button press. This is called contact bouncing or switch bounce.
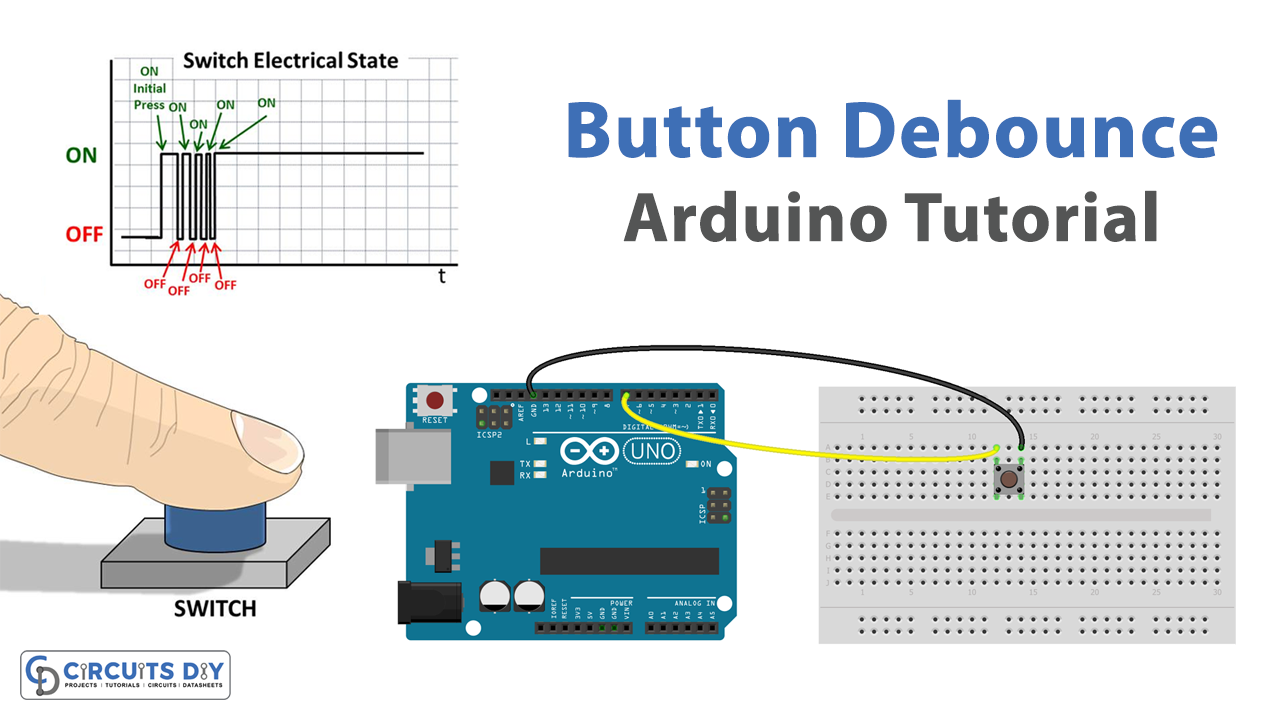
L3: Debouncing | Physical Computing
To get a deeper understanding of this physical phenomenon, let's look at an article from the Makeability Lab.
Read the first two sections, 'The contact bouncing problem' and 'What happens if we don’t debounce?'. This will give you a solid grasp of the physical cause of bouncing and show you a practical demonstration of the erroneous readings it produces.
3. The Solution: Software Debouncing
To get a reliable reading, we need to "debounce" the input. The core idea is to wait for the signal to stabilize before we consider it a valid press. While this can be done with hardware (capacitors), a software solution is more flexible and costs nothing.
A Naive Approach: delay()
The simplest approach is to detect a change, then use delay(50) to pause the program for 50 milliseconds, letting the bouncing finish. You then read the pin again to confirm its state.
However, as you know from our last lesson, delay() is a blocking function. It halts your entire program. If your project needs to do anything else—like blink another LED, monitor a sensor, or respond to a second button—it will be completely unresponsive during that delay. For any non-trivial project, this is not a viable solution.
A Better Approach: millis()
A much better, non-blocking approach uses the millis() function. This function returns the number of milliseconds that have passed since the Arduino board began running the current program.
The logic is as follows:
- Continuously read the button's current state.
- If the current state is different from its previous state, a change has occurred (the start of a potential press or release).
- When this change is detected, record the current time using
millis(). - Then, in the loop, check if enough time (a "debounce delay," typically 25-50ms) has passed since you last recorded a change.
- Only if enough time has passed do you read the button's state again. If it's still different from the last stable state, you can be confident the bouncing has stopped and a true state change has happened.
This method allows your loop() to run freely without pausing, checking the timer on each pass.
Arduino - Debounce a Push Button (+ Visual Explanation)
The video 'Arduino - Debounce a Push Button' provides an excellent visual explanation and code walkthrough of this millis()-based technique.
Watch from 01:06 to 06:50. This covers: A visual explanation of the bounce problem. The logic of ignoring state changes for a short duration. A step-by-step implementation of the debouncing code using millis().
4. Your Turn: Toggle an LED
Now it's time to put everything together. Let's write a sketch that uses a debounced button to toggle an LED on and off. This combines the output skills from our last lesson with the input skills from this one.
Here is the full, commented code. We will use the INPUT_PULLUP configuration, so the button will connect a digital pin (e.g., pin 2) to GND.
// Pin definitions
const int buttonPin = 2; // The pin the button is connected to
const int ledPin = 13;   // The pin the LED is connected to (or LED_BUILTIN)

// Variables for debouncing and state tracking
int ledState = LOW;             // Current state of the LED
int buttonState;                // Current reading from the input pin
int lastButtonState = HIGH;     // Previous reading from the input pin (HIGH because of pull-up)

// Debounce timing variables
unsigned long lastDebounceTime = 0; // The last time the output pin was toggled
unsigned long debounceDelay = 50;   // The debounce time; increase if the output flickers

void setup() {
  Serial.begin(9600); // Start serial communication to print messages
  pinMode(ledPin, OUTPUT);
  // Set the button pin as an input with the internal pull-up resistor enabled
  pinMode(buttonPin, INPUT_PULLUP);

  // Set initial LED state
  digitalWrite(ledPin, ledState);
}

void loop() {
  // Read the state of the switch into a local variable
  int reading = digitalRead(buttonPin);

  // Check if the button state has changed (due to noise or pressing)
  if (reading != lastButtonState) {
    // Reset the debouncing timer
    lastDebounceTime = millis();
  }

  // Check if enough time has passed since the last state change
  if ((millis() - lastDebounceTime) > debounceDelay) {
    // If the button state has stabilized and is different from its previous stable state...
    if (reading != buttonState) {
      buttonState = reading;

      // Only act if the new button state is PRESSED (LOW with INPUT_PULLUP)
      if (buttonState == LOW) {
        // Toggle the LED state
        ledState = !ledState;

        // Print a message to the Serial Monitor
        Serial.println("Button Pressed! Toggling LED.");
      }
    }
  }

  // Update the LED
  digitalWrite(ledPin, ledState);

  // Save the current reading for the next loop iteration
  lastButtonState = reading;
}
To build and run this:
- Circuit: Connect one leg of your push button to Arduino's digital pin 2. Connect the other leg to a GND pin. You do not need an external resistor. You can use the built-in LED or connect an external one to pin 13.
- Code: Copy the code above into the Arduino IDE.
- Upload: Upload the sketch to your board.
- Test: Open the Serial Monitor (
Tools > Serial Monitor). Now, each time you press the button, the LED should cleanly toggle between on and off, and you should see a single "Button Pressed!" message.
Try reducing the debounceDelay to 0 or 1. You'll likely see the LED flicker or get multiple serial prints for a single press, demonstrating the debouncing in action.
Conclusion
You have now mastered a critical skill for any interactive embedded project. Reading a simple switch revealed the complexities of bridging the physical and digital worlds, and you implemented a robust, non-blocking solution.
Key Takeaways:
digitalRead()is used to get the state (HIGHorLOW) of an input pin.- Using
pinMode(pin, INPUT_PULLUP)simplifies wiring by enabling an internal resistor, but inverts the logic (pressed =LOW). - Mechanical switches "bounce," creating noisy signals that fast microcontrollers misread.
- Software debouncing is the process of filtering out this noise.
- Using
millis()for a non-blocking delay is far superior todelay()for creating responsive, scalable programs.
Next Up
We've covered digital inputs and outputs, which are binary (ON/OFF). But what about inputs that have a range of values, like a dimmer knob or a temperature sensor? In the next lesson, we will explore analog inputs using analogRead() to read continuous values from a potentiometer.