Introduction
Hello! In our last lesson, we mastered typedef, learning how to create clean, readable, and portable aliases for complex types like structs and function pointers. We saw that typedef is essential for managing complexity.
Now, we'll take the next logical step in building robust programs. As projects grow beyond a single file, we need a strategy to keep our code organized, reusable, and maintainable. This lesson addresses the learning outcome: Organize a C project into multiple source (.c) and header (.h) files.
This is a fundamental skill in C and C++ development. By the end of this lesson, you'll understand:
- The critical difference between a function's declaration and its definition.
- The separate roles of the compiler and the linker in building a program.
- How to structure a project into header files (
.h) for public interfaces and source files (.c) for private implementations. - How to compile and link a multi-file project from the command line.
This knowledge is the bedrock for creating the kind of complex desktop applications and embedded systems you're aiming to build.
1. The Problem: Why Can't I Just Call a Function?
Imagine you have two files, main.c and helper.c. If you define a function in helper.c and try to call it from main.c without any extra setup, your build will fail. To understand why, we need to look at how a C program is actually built. The process involves two key stages: compilation and linking.
This first video provides an excellent "under the hood" explanation of these stages and illustrates the problem that header files are designed to solve. The "spiky ball" analogy is a great way to visualize how the linker resolves dependencies.
why do header files even exist?
This video from Low Level explains the distinct roles of the compiler and linker, defining compile-time vs. link-time errors and setting the stage for why header files are necessary.
Watch the first four minutes and fifty-two seconds of the video (00:00 - 04:52). Pay close attention to: The two types of errors shown at the beginning: the compiler's "implicit declaration" warning and the linker's "undefined reference" error. The breakdown of the build process into a compile pass (source code -> object files) and a link pass (object files -> executable).
To summarize the key ideas:
-
Declaration vs. Definition:
- A declaration (also called a prototype) tells the compiler that a function or variable exists, what it's called, what its parameters are, and what it returns. It's a promise.
int add(int a, int b);is a declaration. - A definition provides the actual code or value. It fulfills the promise. The body of the
addfunction is its definition.
- A declaration (also called a prototype) tells the compiler that a function or variable exists, what it's called, what its parameters are, and what it returns. It's a promise.
-
Compiler vs. Linker:
- The Compiler translates a single
.cfile into a machine-code object file (.o). It only needs to see declarations for the functions you call. If it doesn't find one, it might issue a warning ("implicit declaration") but will often proceed, assuming you know what you're doing. - The Linker takes all the object files (
.o) and standard library code and joins them into a single executable file. Its job is to find the definition for every function that was called. If it can't find the definition for a function, it fails with an "undefined reference" error.
- The Compiler translates a single
2. The Solution: Header and Source Files
The standard C solution to this problem is to separate our code into two types of files:
- Header files (
.h): These files contain the declarations. They act as the public "interface" or "API" of a module. Any other file that wants to use the module's functionality will#includethis header file. - Source files (
.c): These files contain the definitions. They are the "implementation" of the module's interface.
This structure allows the compiler to see the function declarations it needs from the header, and it allows the linker to find the function definitions in the compiled object files.
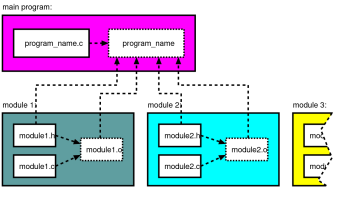
Let's see this in a practical demonstration. The following video walks through the process of taking a single-file program and splitting it into a multi-file project.
Writing & Compiling Multi-file C Programs
This video from Logic Lambda provides a concrete, step-by-step example of creating and compiling a multi-file program.
Watch the video from the beginning until 08:10. Focus on: The separation of code: macros and function declarations go into mystuff.h, while the function definition goes into mystuff.c. The use of #include "mystuff.h" in both main.c (to use the module) and mystuff.c (to verify the implementation matches the declaration). The final GCC command that compiles both .c files: gcc multifile.c mystuff.c -o multifile. The difference between #include "..." (for your own local files) and #include <...> (for system/library headers).
3. A Practical Example
Let's create a small project to solidify these concepts. We'll make a simple module for 2D vector math.
Step 1: Create the Header File (vector2d.h)
This file defines our public interface. It contains the struct definition and the function declarations.
// vector2d.h

// This is a 'header guard'. We'll explore it in detail next lesson.
// For now, know that it prevents errors if this file is included multiple times.


#ifndef VECTOR2D_H
#define VECTOR2D_H

// A struct for a 2D vector, using a typedef like we learned.
typedef struct {
    double x;
    double y;
} Vector2D;

// --- Function Declarations (the public API) ---

// Calculates the length of a vector
double vector_length(Vector2D v);

// Adds two vectors and returns the result
Vector2D vector_add(Vector2D v1, Vector2D v2);


#endif // VECTOR2D_H
Step 2: Create the Source File (vector2d.c)
This file provides the implementation for the functions we declared. Notice it includes its own header file. This is a best practice that allows the compiler to check that your definitions match your declarations.
// vector2d.c


#include <math.h> // We need this for sqrt()
#include "vector2d.h" // Include our own header

// --- Function Definitions (the implementation) ---

double vector_length(Vector2D v) {
    return sqrt(v.x * v.x + v.y * v.y);
}

Vector2D vector_add(Vector2D v1, Vector2D v2) {
    Vector2D result = {v1.x + v2.x, v1.y + v2.y};
    return result;
}
Step 3: Create the Main Program File (main.c)
This file will use our vector2d module. It only needs to include the header to gain access to the Vector2D type and the associated functions.
// main.c


#include <stdio.h>
#include "vector2d.h" // Include the module's interface

int main() {
    Vector2D a = {3.0, 4.0};
    Vector2D b = {1.0, 2.0};

    // Use the functions from the module
    double len_a = vector_length(a);
    Vector2D sum = vector_add(a, b);

    printf("Vector a is (%.1f, %.1f) with length %.1f\n", a.x, a.y, len_a);
    printf("Sum of a and b is (%.1f, %.1f)\n", sum.x, sum.y);

    return 0;
}
Step 4: Compile and Link
Now, you save these three files in the same directory and run the gcc command to build the final program.
# This command tells gcc to compile both .c files and link them into an executable named 'app'
gcc -Wall -g -o app main.c vector2d.c -lm
Note: The -lm flag is necessary to link the math library, which provides the sqrt function.
4. Guidelines for Good Modular Design
Organizing files is one thing, but organizing them well is another. For someone with your background in other languages, thinking in terms of "modules" or "components" is natural. Here are some key guidelines for C, drawn from professional best practices.
This document from the University of Michigan provides an excellent set of rules for writing clean, modular C code. We will focus on the most critical rules for getting started.
Please read the following rules from the document. They are concise and packed with valuable advice. Rule #1: Each module... should correspond to a clear piece of functionality. Rule #3: All of the declarations needed to use a module must appear in its header file... Rule #4: The header file contains only declarations, and is included by the .c file for the module. Rule #6: Keep a module’s internal declarations out of the header file. Rule #10: The A.c file should first #include its A.h file... Rule #11: Never #include a .c file for any reason!
Let me highlight a key point from Rule #6 that is extremely useful: the static keyword.
If a function is only a "helper" used inside a single .c file, you should declare it as static. This gives it internal linkage, meaning it is invisible to the linker and cannot be called from any other file. It's the C way of creating a "private" function within a module.
For example, if vector2d.c had a complex helper function, it would look like this:
// In vector2d.c


#include "vector2d.h"

// This function is 'private' to this file. It cannot be called from main.c.
static double calculate_square(double n) {
    return n * n;
}

double vector_length(Vector2D v) {
    // We can use our private helper function here
    return sqrt(calculate_square(v.x) + calculate_square(v.y));
}

// ... other function definitions
Conclusion
You've now learned one of the most important organizational principles in C programming. Moving from a single file to a modular, multi-file project is a huge step toward writing professional, scalable code.
Key Takeaways:
- Separation of Concerns: Header files (
.h) are for public declarations (the API), while source files (.c) are for the private definitions (the implementation). - Compilation Process: The compiler turns each
.cfile into an object (.o) file. The linker then combines all object files into a single executable. - Inclusion: Use
#include "..."for your own headers and#include <...>for system libraries. A source file should always include its own header file first. - Encapsulation: Use the
statickeyword to create functions and global variables that are "private" to a single.cfile, hiding implementation details from other modules. - Building: To compile a multi-file project, provide all the
.cfiles to the compiler (e.g.,gcc main.c utils.c -o program).
Next Up
In our vector2d.h example, you saw a structure called a "header guard" (#ifndef/#define/#endif). We noted that this prevents errors if a header is included multiple times. In the next lesson, we will dive deep into this mechanism, learn why it's absolutely essential, and master how to use header guards to prevent multiple inclusion errors.