Welcome back to your internship. In the last session, you built the essential scaffolding for our Smart Warehouse application: a command-line menu that uses control flow to respond to a user's choices. You probably noticed that all the logic is currently sitting inside the main method's switch statement. While this works for simple placeholder messages, it will quickly become unmanageable as we add real functionality for adding, removing, and viewing inventory.
In this lesson, we will address this by learning one of the most fundamental concepts in all of programming: methods. Methods are self-contained blocks of code that perform a specific task. By using them, we can break down our complex program into smaller, logical, and reusable pieces. This practice, known as modularity, is a hallmark of professional software development. You will learn how to define your own methods, pass information to them using parameters, and get results back using return values, ultimately transforming your main method from a cluttered workspace into a clean, high-level controller for the entire application.
The Problem: A Crowded main Method
Let's look at the structure you built in the previous lesson:
public class WarehouseSystem {
    public static void main(String[] args) {
        Scanner scanner = new Scanner(System.in);
        boolean isRunning = true;

        while (isRunning) {
            // ... code to display menu ...

            int choice = // ... code to get user input ...

            switch (choice) {
                case 1:
                    System.out.println("Executing 'Add Item'...");
                    // Imagine 20-30 lines of code here for adding an item
                    break;
                case 2:
                    System.out.println("Executing 'Remove Item'...");
                    // And another 20-30 lines of code here
                    break;
                // ... and so on
            }
        }
    }
}
Imagine adding the logic for each menu option directly into the switch block. The main method would become hundreds of lines long, making it incredibly difficult to read, debug, and maintain. This is where methods come to the rescue.
Anatomy of a Method
A method is like a named recipe. You give it a name, tell it what ingredients it needs (parameters), and define the steps to produce a result (the method body). The result might be an action performed (like printing to the screen) or a new piece of data that is returned to the caller.
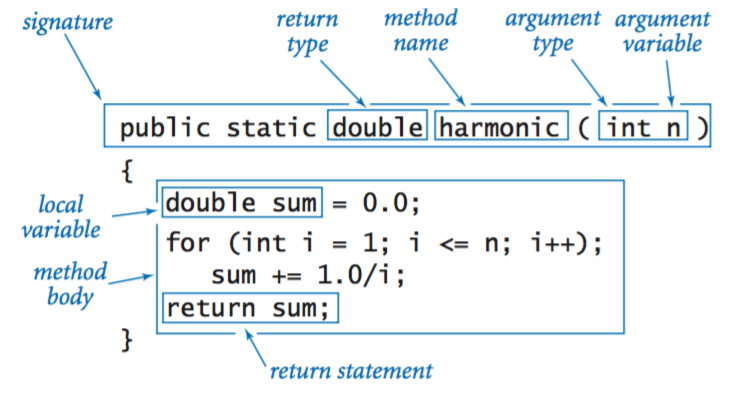
The following article provides a clear breakdown of these components. Focus on understanding the role of each part in the method declaration.
Creating and using Java methods: Parameters and return values | Reintech media
This article from Reintech offers a great overview of methods in Java. It clearly explains the purpose of each part of a method's structure and how they work together.
Please read the sections Method Anatomy, Working With Parameters, and Return Values. As you read, pay close attention to the calculateDiscount example and the distinction between parameters (the recipe's ingredient list) and arguments (the actual ingredients you provide when you call it).
Action-Only Methods: void Return Type
The simplest type of method performs an action but doesn't need to send any data back. The return type for such a method is void. A perfect candidate in our warehouse application is the logic for displaying the menu.
Let's create a displayMenu method.
public static void displayMenu() {
    System.out.println("\n--- Smart Warehouse Menu ---");
    System.out.println("1. Add Item");
    System.out.println("2. Remove Item");
    System.out.println("3. View Inventory");
    System.out.println("4. Exit");
    System.out.print("Enter your choice: ");
}
Now, we can replace the menu printing code in our main method's loop with a simple call to displayMenu();.
The video below provides a concise explanation of void methods and how to call them.
This clip from Neso Academy clearly distinguishes between a method's definition (the code inside the curly braces) and its invocation (the call to run it).
Watch from the beginning until the end of the sayHi example. Notice how the flow of execution jumps from main to the method and then returns.
Methods That Compute: Parameters and Return Values
Now for the more powerful case: methods that take in data, process it, and return a result. Let's refactor the part of our code that gets the user's input. We can create a method getUserChoice that handles prompting the user, reading the input, and returning the integer choice.
This method needs access to the Scanner to read input, so we will pass the scanner object as an argument.
public static int getUserChoice(Scanner scanner) {
    System.out.print("Enter your choice: ");
    String input = scanner.nextLine();
    int choice = Integer.parseInt(input); // We'll learn to handle bad input in the "Exceptions" module
    return choice;
}
When this method is called, it executes its code and, upon reaching the return statement, sends the value of choice back to where it was called.
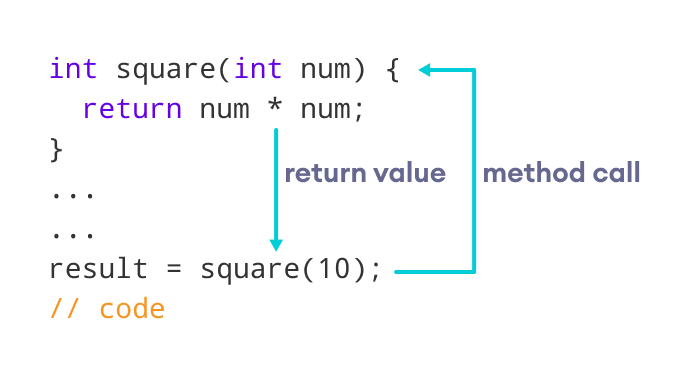
Our main method can now be simplified even further:
// Inside the while loop...
displayMenu();
int choice = getUserChoice(scanner);
switch (choice) {
    // ... cases
}
The video below demonstrates this concept of a value-returning method with a practical example. Notice how the returned value is captured and used by the caller.
This part of the Neso Academy video explains methods that return values.
Watch the section explaining the value-returning sum method. Pay close attention to how the return keyword works and how the returned value can be stored in a variable or used directly in another expression.
Putting It All Together: A Modular Design
By applying these principles, we can create separate methods for each of our menu actions. This is a crucial step in structuring our application. We are separating the "what" (the high-level flow in main) from the "how" (the detailed implementation in each method).
For now, these methods can just contain the placeholder print statements.
public static void handleAddItem() {
    System.out.println("Executing 'Add Item'...");
    // Future logic for adding an item will go here
}

public static void handleRemoveItem() {
    System.out.println("Executing 'Remove Item'...");
    // Future logic for removing an item will go here
}

public static void handleViewInventory() {
    System.out.println("Executing 'View Inventory'...");
    // Future logic for viewing inventory will go here
}
Our main method now becomes incredibly clean and readable. It serves as the central coordinator, delegating tasks to specialized methods.
public class WarehouseSystem {

    // ... (definitions for displayMenu, getUserChoice, handleAddItem, etc.)

    public static void main(String[] args) {
        Scanner scanner = new Scanner(System.in);
        boolean isRunning = true;

        while (isRunning) {
            displayMenu();
            int choice = getUserChoice(scanner);

            switch (choice) {
                case 1:
                    handleAddItem();
                    break;
                case 2:
                    handleRemoveItem();
                    break;
                case 3:
                    handleViewInventory();
                    break;
                case 4:
                    isRunning = false;
                    break;
                default:
                    System.out.println("Invalid choice. Please try again.");
                    break;
            }
        }
        System.out.println("Exiting Warehouse System. Goodbye!");
        scanner.close();
    }
}
The following resource walks through a very similar process of building a command-line application by encapsulating logic into different methods and classes. It's a great example of the design philosophy we are adopting.
This chapter from "Java, Java, Java" by Runestone Academy demonstrates how to build a modular command-line application. It shows how to separate user input handling from the main application logic.
Please read the sections Designing a Keyboard Reader Class and Designing a Command-Line Interface. As you read, focus on these key ideas: How the KeyboardReader class hides the "messy details" of input inside private methods. This is encapsulation in action. How the GreeterApp class uses the KeyboardReader but is not concerned with how it works. The structure of the GreeterApp, with its main, run, and greet methods, is a perfect model for how we are structuring our WarehouseSystem.
Conclusion
In this lesson, you've taken a massive step toward writing professional, organized code. By moving logic out of a monolithic main method and into smaller, focused methods, you've drastically improved the readability and maintainability of the warehouse application. This modular approach is not just a Java feature; it's a fundamental principle of software engineering.
Here are the key takeaways for your interns:
- Modularity: Methods allow you to break a large problem into smaller, manageable pieces.
- Encapsulation: Each method should have a single, well-defined responsibility. The "how" is hidden inside the method, and the caller only needs to know "what" it does via its signature.
- Parameters and Return Values: These are the mechanisms for passing data into and out of methods, allowing them to communicate and work together.
- Readability: A
mainmethod that delegates to well-named helper methods reads like a high-level summary of the program's logic, which is invaluable for anyone trying to understand the code.
The method signature (public int getChoice(Scanner s)) is the contract that a method offers to the rest of your program. Learning to read and understand these contracts is the first step to using pre-built Java libraries, which are known as Application Programming Interfaces (APIs).
In the next module, we will move beyond primitive types and simple methods. We'll begin exploring the core of Java's power—Object-Oriented Programming—by designing classes to model the real-world entities in our warehouse, such as Product, StorageSlot, and Order.