Welcome to your second lesson. In our first session, we focused on the "hardware" of the darkroom—establishing a safe and efficient physical workspace. Now, we turn our attention to the "software": the fundamental chemistry that makes photography possible. Understanding this process is the key to moving beyond simply making prints to skillfully controlling them.
This lesson unpacks the science behind how an image appears on photographic paper. We will explore:
- The essential components of a photographic emulsion.
- How light creates an invisible latent image in the emulsion.
- How the chemical process of development transforms this latent image into a visible photograph.
This knowledge is the theoretical bedrock for every practical technique you will learn, from controlling contrast to dodging and burning. Your background in chemistry and physics will be a great asset in grasping these core concepts.
The Anatomy of Photographic Paper
At its most basic, black and white photographic paper can be thought of as a sheet of plastic or paper coated with a special kind of gelatin containing microscopic salt crystals. This coating is called the emulsion.
Let's break this down:
- The "Salt": This isn't table salt (sodium chloride), but a different kind called a silver halide. The most common one used in photography is silver bromide (AgBr), but silver chloride (AgCl) and silver iodide (AgI) are also used. These silver halide molecules arrange themselves into an orderly, three-dimensional crystal lattice structure.
- The Gelatin: This is similar to the gelatin used in food. Its primary job is to hold the silver halide crystals in a stable suspension on the paper base. Crucially, gelatin is porous; it swells when wet, allowing the processing chemicals to reach the crystals, and then shrinks as it dries.
The SciShow video "How Does a Photon Become a Film Photo?" provides an excellent animated overview of these components.
How Does a Photon Become a Film Photo?
This video gives a great introduction to the composition of a photographic emulsion.
Please watch the first part of the video, which explains what film emulsion is. Notice the distinction between a chemical emulsion and this photographic suspension of silver halide crystals in gelatin.
The Action of Light: Forming the Latent Image
When you expose photographic paper to light from the enlarger, you don't see an image form immediately. Instead, an invisible change occurs within the silver halide crystals. This is called a latent image. It's "latent" because it exists but is not yet visible.
This process is what separates modern photography from its earliest forms. Early "printing-out" papers required very long exposures until an image was visibly formed by light alone. The "developing-out" process we use relies on a short exposure to create the latent image, which is then massively amplified by a chemical developer.
The Gelatin Silver Process - Photographic Processes Series - Chapter 10 of 12
The George Eastman Museum video, "The Gelatin Silver Process," clearly explains this pivotal concept.
Watch the segment that distinguishes between developing out vs. printing out. This highlights the importance of the latent image.
So, how is this latent image formed? The process is explained by the Gurney-Mott theory, which describes a sequence of events at the atomic level.
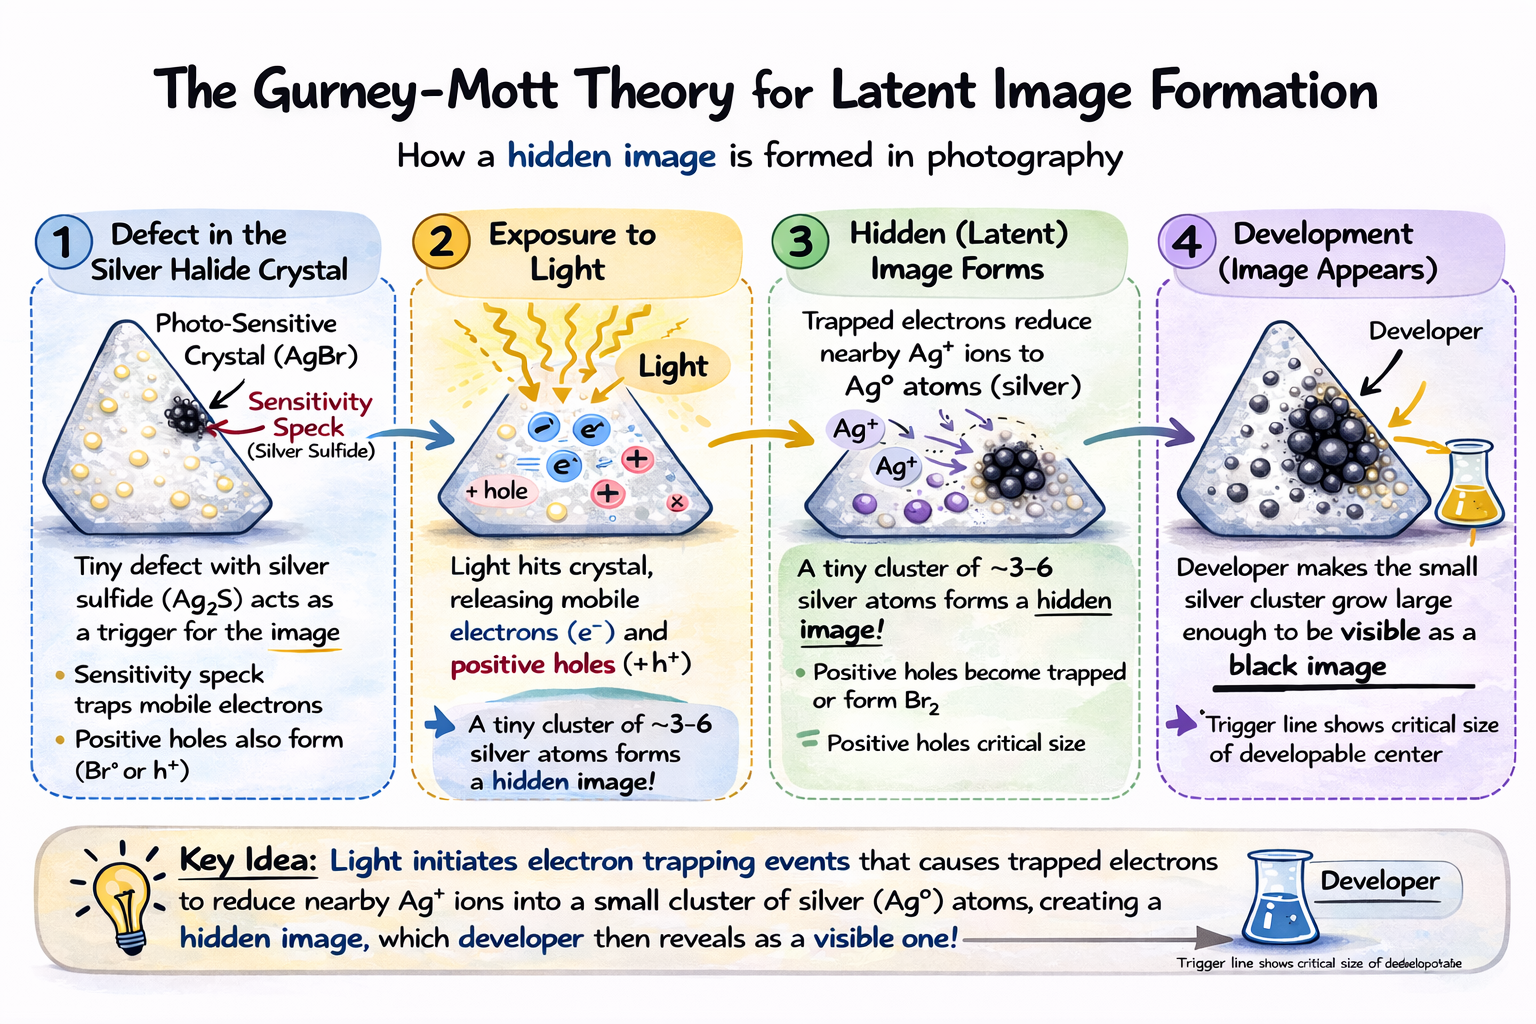
Let's walk through the steps shown in the diagram:
- Defect in the Crystal: Real-world silver halide crystals are not perfect. They contain tiny imperfections, often specks of silver sulfide (Ag₂S), called sensitivity specks. These specks are crucial, acting as electron traps.
- Exposure to Light: When a photon of light strikes the crystal, its energy is absorbed and knocks an electron loose from a bromide ion (Br⁻). This is an oxidation reaction. The electron is now free to move within the crystal lattice.
- Latent Image Formation: The free electron migrates to and is trapped by a sensitivity speck, giving it a negative charge. This negative charge attracts a mobile, positively charged silver ion (Ag⁺) that is also present in the crystal lattice. When the silver ion reaches the speck, it combines with the electron and is reduced to a neutral, metallic silver atom (Ag⁰).
If enough photons strike the crystal, this process repeats, building a small, stable cluster of several metallic silver atoms at the sensitivity speck. This tiny, invisible cluster of metallic silver is the latent image.
For a more detailed chemical explanation of this process, the following reading is excellent.
Chemistry and the Black and White Photographic Process
This text describes the chemistry of latent image formation in detail.
Read the section beginning with this paragraph. As you read, note the chemical equations that formalize the process of the bromide ion releasing an electron and the silver ion being reduced to metallic silver.
A crucial point is that a crystal must accumulate a minimum number of silver atoms (typically 3-6) to become developable. An exposure that creates fewer atoms than this minimum is called a sub-latent image; it is unstable and cannot initiate development.
From Invisible to Visible: The Power of Development
The latent image is far too small to be seen. The role of the developer is to amplify this tiny silver speck by a factor of billions, turning the entire crystal into black metallic silver.
The developer is a reducing agent, which means it is a chemical solution eager to donate electrons. The small speck of metallic silver in the latent image acts as a catalyst. It creates an active site where the reducing agents in the developer can rapidly and efficiently donate electrons to all the other silver ions in that same crystal.
This reaction reduces the entire crystal to a grain of black metallic silver.
Crucially, crystals without a latent image lack this catalytic site and therefore react with the developer extremely slowly. This selectivity is what allows an image to form. The areas of the paper that received more light have more crystals with latent images, and they develop into the dark, dense parts of the print. Areas that received no light have no latent images and remain white.
This video segment provides a clear visualization of the development process and its outcome.
How Does a Photon Become a Film Photo?
Let's return to the SciShow video to see how development creates the final image.
Watch the section explaining how developers work. It explains why the developed silver appears black and how this creates a negative image on film.
Induction Time: The Key to Continuous Tone
You might ask: if development of a crystal is an all-or-nothing event, how do we get continuous tones (greys) in a print?
The answer lies in a concept called induction time: the delay between the developer first reaching a crystal and the moment the catalytic reaction "explodes". This delay is inversely proportional to the size of the latent image speck.
- A crystal that received high exposure (a future shadow in the print) has a large latent image speck and a very short induction time. It starts developing almost immediately.
- A crystal that received low exposure (a future highlight) has a tiny latent image speck and a long induction time. It will only begin developing much later in the process.
A photographic print is made up of billions of crystals of varying sizes, all with different induction times based on the exposure they received. The final tone of any given area is the sum of all the individual crystals that managed to complete development within the given development time. This elegant mechanism is how a simple on/off process at the crystal level produces the rich, continuous tones of a final print.
This final reading provides a superb deep dive into the practical implications of the latent image and induction time. It's a slightly longer read, but it directly connects this theory to the results you'll see in the developing tray.
How B&W photographic film works - AlternativePhotography.com
This article from AlternativePhotography.com offers a fantastic, in-depth explanation of developability and induction time.
Please read these two key sections: Start with the section titled "Latent vs. Sub-Latent Image". This clarifies why a minimum exposure is necessary to make a crystal developable. Next, read the section that begins "Induction Time is Everything". This is the most important part, as it explains how varying induction times create the continuous tones that form your image.
Conclusion
In this lesson, we've journeyed into the microscopic world of the photographic emulsion to understand how an image is born. By grasping this chemical process, you are no longer just following a recipe; you are beginning to understand how to control the fundamental variables of the medium.
Key takeaways from this lesson:
- Photographic paper contains silver halide crystals suspended in gelatin.
- Exposure to light creates an invisible latent image—a tiny, catalytic speck of metallic silver—within the exposed crystals.
- Developer, a reducing agent, amplifies this latent image by converting the entire crystal into a visible grain of black metallic silver.
- The concept of induction time explains how different exposure levels lead to different rates of development, producing the continuous tones of the final print.
In our next lesson, we will step back from the microscopic and look at the macroscopic, comparing the two main types of photographic paper: Resin-Coated (RC) and Fiber-Based (FB). We'll discuss their practical differences and explain why RC paper, your chosen material, is the ideal starting point for mastering your printing craft.