Welcome to your first lesson. Since your goal is to advance from basic printing to creating refined, exhibition-quality prints, our journey begins by establishing a workspace that is both efficient and, most importantly, safe. Your background in industrial engineering and management gives you a unique perspective on the importance of process design and safety protocols, which are the bedrock of consistent, high-quality work in any production environment, including the darkroom.
This lesson will formalize the principles of an effective darkroom setup. We will cover:
- The fundamental concept of the "wet side" and "dry side" for workflow efficiency and contamination prevention.
- An overview of the essential equipment and its logical placement.
- A thorough review of chemical safety, handling, and emergency procedures.
While you've already spent time in a darkroom, systematically reinforcing these foundational principles is the first step toward the precision required for advanced techniques like split-grade printing and dodging and burning.
The Foundation: Wet Side vs. Dry Side
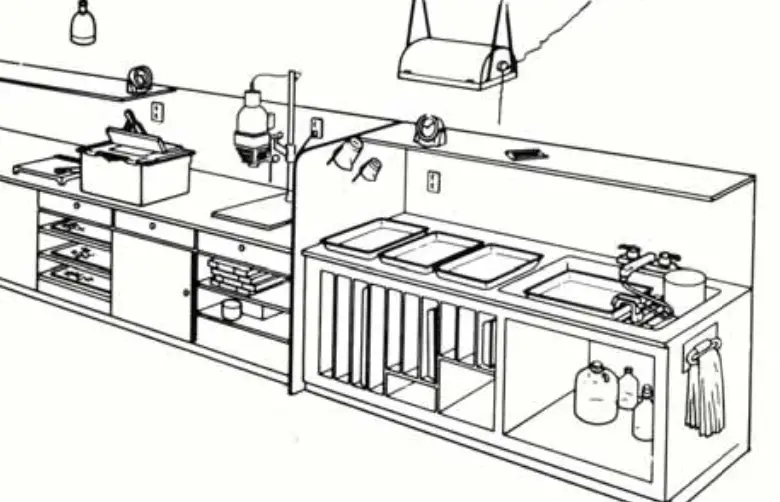
The single most important organizational principle in a darkroom is the strict separation of "dry" and "wet" areas.
- The dry side is for all operations involving light-sensitive materials before they are processed. This includes the enlarger, negatives, photographic paper, timers, and focusing aids.
- The wet side is exclusively for chemical processing: developer, stop bath, fixer, and washing.
This division is non-negotiable. A single misplaced splash of fixer can contaminate your paper or workspace, ruining prints. A wet hand touching a negative can permanently damage the emulsion. Thinking about the darkroom as a linear production line—from dry to wet—helps to streamline your workflow and minimize costly errors.
The images below illustrate this concept. The first is a clear, conceptual drawing showing the division, and the second is a photograph of a real-world home darkroom, where you can see the principles in practice.

Equipping Your Workspace
Having the right tools is essential, but placing them logically is what creates an efficient workflow. The following video from ILFORD PHOTO provides an excellent overview of the essential equipment for a home darkroom. As you watch, consider how the placement of each item contributes to a smooth and safe process.
Home Darkroom Essentials with ILFORD PHOTO
This video, "Home Darkroom Essentials," covers the key components of a darkroom. Pay attention not just to what the items are, but where they are placed in relation to the workflow.
Watch the segment on choosing a space, which reinforces the wet/dry concept. Next, focus on the processing trays, the core of the wet side. Note the recommendation for a fourth tray for a preliminary rinse. Then, review the equipment for the dry side, including the enlarger and accessories like easels and focus finders. Finally, learn about the safelight, a critical component for the entire room.
To supplement the video, the "Home Darkroom Design for Small Spaces" guide provides a concise checklist that neatly summarizes the equipment for each side of the darkroom.
Home Darkroom Design for Small Spaces - Instructables
This Instructables guide offers a practical checklist for setting up a home darkroom.
Please review the list of essential items under the headings THE ROOM, DRY SIDE, and WET SIDE. Compare this list to your own setup to identify any potential gaps or areas for improvement.
Darkroom Safety: A Non-Negotiable Priority
Your university-level chemistry knowledge means you understand the nature of the chemicals we use. However, the enclosed, low-light environment of a darkroom introduces specific risks that require strict protocols. Inadequate ventilation, repeated skin contact, or improper mixing can lead to health issues ranging from contact dermatitis to respiratory problems.
1. Ventilation and Chemical Mixing
Fumes from stop bath (acetic acid) and some fixers can be irritants. Proper ventilation is not a luxury; it's essential for your health. The author of the Instructables guide you just looked at described his unventilated room as a "death zone"—this is not an exaggeration. An extraction fan venting to the outside is the ideal solution.
Mixing chemicals, especially from powders, poses the highest risk of exposure. The following video demonstrates safe mixing procedures and highlights the necessary personal protective equipment (PPE).
Mixing Things Up A Little: How to Mix Up Darkroom Chemicals
In "Mixing Things Up A Little," the presenter demonstrates how to handle different chemical forms safely.
First, watch the detailed segment on mixing powdered chemicals. Pay close attention to the use of gloves, an exhaust fan, proper water temperature, and storage solutions. Then, watch the final safety summary, which reinforces the most critical practices.
2. Comprehensive Safety Guidelines
For a definitive guide on darkroom safety, we will turn to a formal university safety document. It covers everything from PPE and chemical storage to spill procedures and waste disposal. Applying these rules systematically will ensure your darkroom is a safe environment for creative work.
[PDF] UVM DARKROOM SAFETY GUIDE
This guide from the University of Vermont provides a comprehensive set of rules for safe darkroom operation.
Please read the following sections carefully: GENERAL SAFETY IN THE DARKROOM: Focus on the lists under Safety Equipment and Clothing. This outlines your basic PPE. CHEMICAL SAFETY: Review the subsections on Handling Darkroom Chemicals and Storing Chemicals. These are the core rules for day-to-day work. CHEMICAL WASTE DISPOSAL: Read this section to understand the importance of properly managing waste, particularly silver fixer. PRACTICE GOOD HOUSEKEEPING: This short section reinforces the principle that a clean workspace is a safe workspace. SPILL PROCEDURES: Finally, familiarize yourself with the procedures for handling both Minor and Major Spills. Knowing this in advance is crucial for a calm and effective response.
Conclusion
In this introductory lesson, we have laid the groundwork for your entire printing practice. By understanding and implementing these principles, you create an environment where you can focus on the creative aspects of printing, confident in your safety and the efficiency of your workflow.
Key takeaways from this lesson include:
- The wet side/dry side principle is the cornerstone of darkroom organization, preventing contamination and streamlining your process.
- A logical arrangement of essential equipment—from the enlarger to the processing trays—minimizes movement and potential errors.
- Safety is paramount. This includes ensuring adequate ventilation, always using PPE (nitrile gloves and safety glasses), and following strict protocols for chemical handling, storage, and waste disposal.
In our next lesson, we will shift our focus from the physical workspace to the photographic paper itself. We will explore the science of how a silver gelatin emulsion works, examining how it responds to light and chemistry to form the final image. This will provide the theoretical foundation for all the exposure and development techniques we will explore later in the course.