Welcome to the final lesson of our first module. In our last session, we explored how developer choice, dilution, and temperature function as a control system for influencing print contrast and tone. This understanding of process variables provides a perfect foundation for what we'll cover today.
You've mentioned that you find making basic contact sheets a poor use of resources. This is a common sentiment among printers who see them merely as a page of thumbnails. This lesson aims to challenge that perspective. We will reframe the contact sheet, not as a simple catalog, but as an efficient and powerful diagnostic tool. By creating a standardized and effective contact sheet, you can quickly gather critical data about an entire roll of film, which directly addresses your goal of learning to evaluate your negatives for printability.
The Contact Sheet as a Diagnostic Tool
Before we dive into the "how," let's solidify the "why." A contact sheet is more than just a way to see your images as positives. When made with a systematic approach, it becomes the first and most efficient step in evaluating your photographic process.

There are several key reasons why a well-made contact sheet is indispensable.
3 Ways to Make Contact Sheets and What They Can Tell Us - 35mmc
This article from 35mmc by Sroyon Mukherjee is an excellent, systematic exploration of contact printing. It forms the backbone of today's lesson.
To begin, please read the introductory sections "Preliminaries" and "Why make contact sheets". Pay close attention to the list of reasons. We are moving beyond reason #1 ("Reviewing all photos") and focusing on #2 ("To evaluate exposure and development") and #3 ("As a guide to printing").
As the article suggests, an effective contact sheet provides immediate feedback on your exposure and development consistency across an entire roll. It's the "biography of that roll of film," as another author puts it.
The "Proper Proof": Establishing a Standard
To turn the contact sheet into a reliable diagnostic tool, we need a standardized process that yields comparable results every time. This approach, popularized by the late photographer and teacher Fred Picker, is called the "Proper Proof." The goal is not to make a pretty picture, but to create a print that provides the maximum amount of information about your negatives.
The definition of a Proper Proof is precise:
- It is printed at a normal contrast grade (Grade 2).
- It is given just enough exposure to render the unexposed parts of the negative (the film rebate or "sprocket holes" area in 35mm) as the maximum black the paper can produce.
This calibration to the film base provides a consistent reference point. It allows you to objectively assess the density of your negatives relative to this known black.
Creating the Proper Proof: A Systematic Approach
Making a proper proof involves two main steps: first, determining the Standard Printing Time (SPT), and second, making the full contact sheet using that time.
1. Enlarger and Darkroom Setup
Consistency starts with your setup. For contact printing, you want to ensure the light from your enlarger evenly illuminates the entire sheet of paper.
Darkroom Printing Pt2 - The Contact Sheet
The video "Darkroom Printing Pt2" by Pictorial Planet offers some excellent practical tips for setting up.
Watch from the setup demonstration. The key takeaways for creating a repeatable setup are: Use a 50mm lens (for 35mm negatives) to get a wider circle of illumination. Raise the enlarger head high enough so the light circle is significantly larger than your paper. Make a note of this height so you can use it every time. Stop the lens down to an aperture like f/8 or f/11. This helps even out the light and gives you a reasonably long exposure time (aim for around 10-15 seconds) which is easier to control than a very short one. Set your filtration to Grade 2.
2. Determining the Standard Printing Time (SPT)
The SPT is the cornerstone of the proper proof. The article from 35mmc provides a clear, paper-efficient method for finding it.
3 Ways to Make Contact Sheets and What They Can Tell Us - 35mmc
This next section provides the core technical procedure for the Proper Proof.
Read the sections titled "Proper proof" and the test strip method. The author describes a methodical process of using a small test strip to find the first exposure time where the film rebate becomes maximum black. This is your SPT. Then, read the short section on making the final sheet.
The logic here, which should appeal to your engineering mindset, is that you are calibrating your process to a known constant: the density of the unexposed film base. Once you find the SPT for a given film stock and paper combination, it should remain relatively consistent, provided your film development is also consistent.
Reading the Proper Proof: Extracting Data from the Print
This is where the true power of the Proper Proof becomes evident. It's not just a gallery; it's a data sheet that tells you about your negatives.
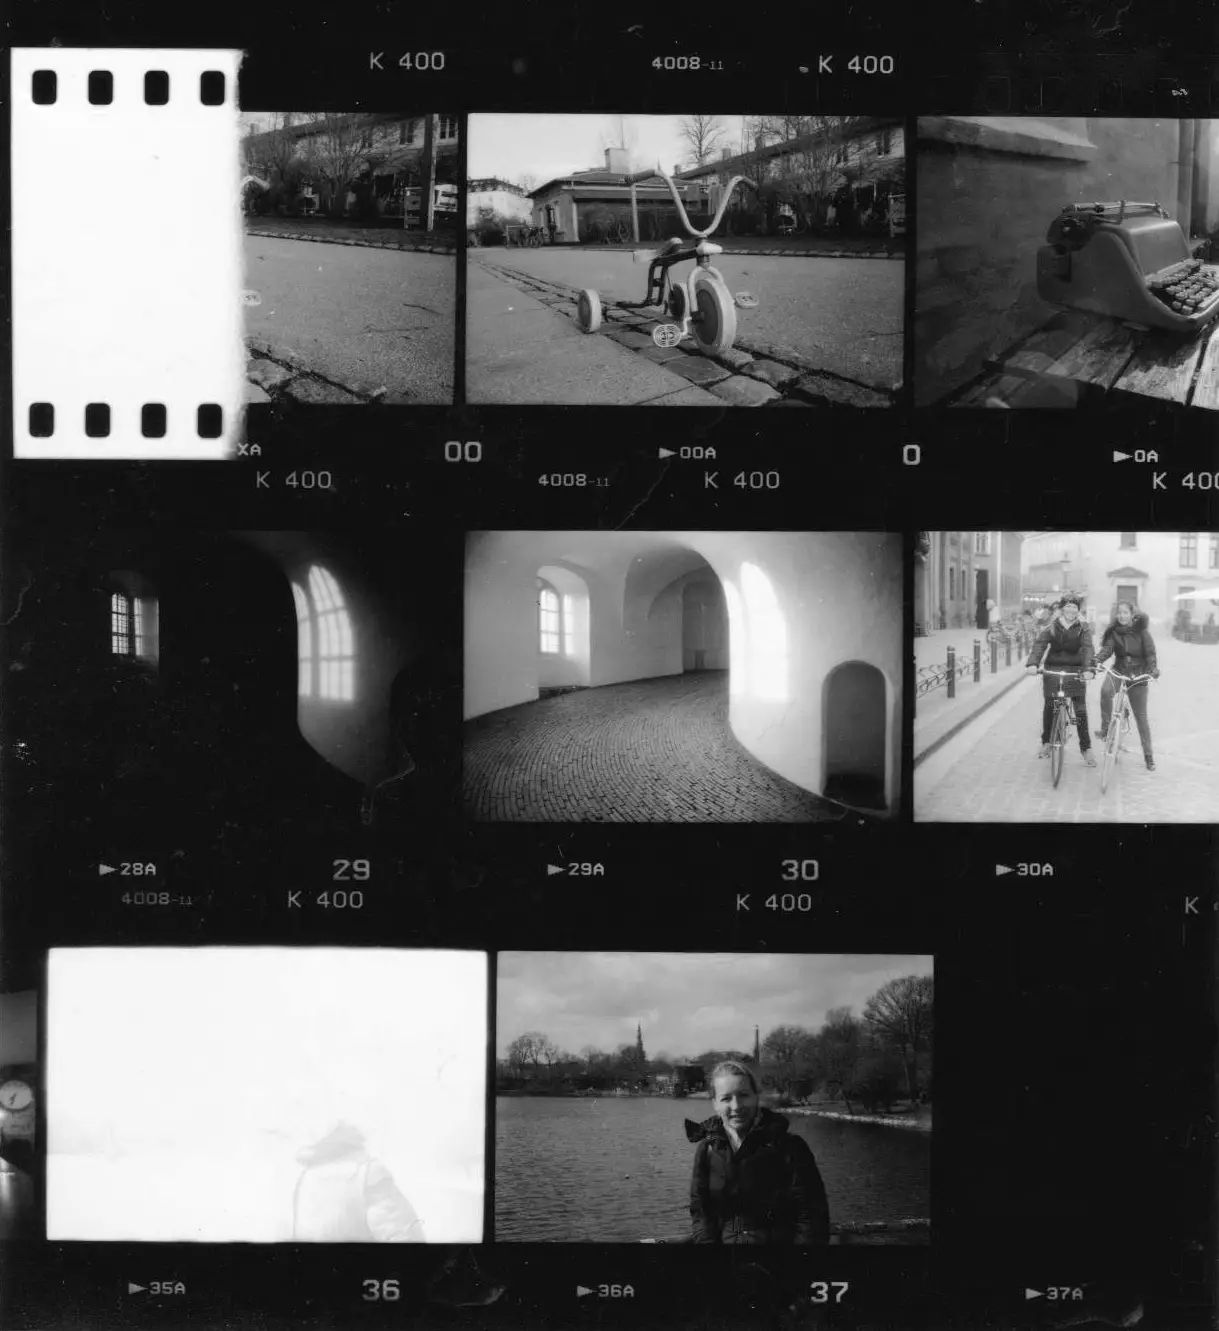
A properly made proof gives you immediate, unequivocal feedback:
- Correctly exposed and developed negatives will show good detail throughout the tonal range, from shadows to highlights. They "look right" at Grade 2.
- Underexposed negatives will appear too light and grey on the contact sheet. There will be very little density in the shadow areas of the image.
- Overexposed negatives will appear too dark and dense. The shadow areas will be blocked up, and it will be hard to see detail.
- Overdeveloped negatives (too contrasty) will show blocked-up shadows and blown-out highlights simultaneously.
- Underdeveloped negatives (too flat) will look grey and lifeless, lacking strong blacks or bright whites.
Let's see this in practice by analyzing the very contact sheet shown in the image above.
3 Ways to Make Contact Sheets and What They Can Tell Us - 35mmc
This is the most important part of the lesson. It translates the physical print into actionable information.
Please read the sections "What the proper proof tells us" and the detailed "Case study". The author masterfully deconstructs each frame, explaining how the proof reveals issues like underexposure (frame 29), overexposure (frame 36), and even over-development for the scene's contrast (frame 30). This is exactly how you can learn to judge your own negatives.
By performing this kind of analysis on your own contact sheets, you'll quickly develop an intuition for which negatives are "thin," "dense," or "normal," and which will be easy or difficult to print.
Advanced Proofing for Specific Problems
The Proper Proof is your general-purpose diagnostic tool. But what if you have a negative that looks terrible on the proper proof—a very dense, overexposed frame, or a very thin, underexposed one? You can use specialized contact proofs to investigate further.
-
Highlights Proof: If you have a very dense negative where the highlights look completely white and devoid of detail on your proper proof, you can make a "Highlights Proof." This is printed at a very low contrast (Grade 0 or 00) but at the same SPT. The drastic reduction in contrast will often reveal if there is any recoverable detail in those dense highlights.
-
Shadows Proof: Conversely, if you have a very thin negative where the shadows look like pure black mush on the proper proof, you can make a "Shadows Proof." This is also printed at low contrast (Grade 0 or 00), but with significantly less exposure (e.g., 1.5 stops less than the SPT). This lifts the entire tonal range, revealing if there is any faint detail lurking in those thin shadows.
These variations demonstrate that contact printing is a flexible diagnostic method, not a rigid, one-size-fits-all procedure.
3 Ways to Make Contact Sheets and What They Can Tell Us - 35mmc
These final sections summarize the alternative proofing methods.
Read the short sections on the Highlights proof and the Shadows proof. Finally, review the excellent Summary table, which neatly encapsulates the different methods and their purposes.
Another technique, shown in the Acromatica video, involves pre-flashing the paper—giving it a very slight, non-image-forming exposure to light before the main exposure. This can help bring detail into stubborn highlights, making the contact sheet more closely resemble a final print. This is a more advanced tool, but it serves the same purpose: to extract all possible information from the negative.
Conclusion
Today we have transformed the contact sheet from a simple proof of content into a cornerstone of an efficient, analytical darkroom workflow. By standardizing your process with the "Proper Proof" method, you create a consistent baseline that allows you to objectively evaluate your negatives.
Key Takeaways:
- An effective contact sheet is a diagnostic tool, not just a set of thumbnails. It provides crucial data on your in-camera exposure and film development.
- The "Proper Proof" (Grade 2, SPT) is a standardized method that creates a consistent and comparable record of your negatives.
- The Standard Printing Time (SPT) is found by determining the minimum exposure required to render the unexposed film base as maximum black.
- By analyzing a Proper Proof, you can identify underexposed, overexposed, and improperly developed negatives before committing time and resources to enlarging them.
- Specialized methods like Highlights and Shadows Proofs can be used to diagnose problematic negatives that show poor detail on a standard proof.
You now have the tools to make contact sheets that are a truly valuable use of your time and materials. Instead of being a chore, they are now the first step in your quality control and print planning process.
In our next module, "Negative Assessment for Printability," we will build directly on this foundation. Having used the contact sheet to identify promising frames, we will then move to the light table to perform a detailed, one-by-one analysis of those negatives, preparing us for the work of creating a refined print.