Welcome back to your darkroom printing course. In our previous lesson, we explored the limits of a single base exposure, particularly when dealing with high-key or low-key negatives. You learned that even with a precise tool like the Ilford EM10, achieving a perfect print often requires compensating for the scene's tonal distribution, because a single exposure setting frequently leads to a compromise: either your shadows are rich and detailed while your highlights are blown out, or your highlights are delicate but your shadows lack depth and turn to gray.
This lesson introduces a powerful solution to that very problem: split-grade printing. We will focus on the fundamental principle of this technique, exploring how and why it allows for independent control over the shadow and highlight regions of your print. By the end of this lesson, you will understand the mechanics behind this method, setting the stage for its practical application in our next session.
The Compromise of a Single Filter
Before diving into the solution, let's firmly establish the problem. When you make a print with a single contrast filter—say, a grade 2.5—you are locking in a fixed relationship between the tones. If you increase exposure time to deepen the blacks, you also darken the mid-tones and highlights. If you switch to a higher contrast filter to make the blacks blacker and whites whiter, you risk losing subtle detail in both extremes.
This video from photographer Lina Bessonova clearly demonstrates the trade-offs involved in single-filter printing.
Split Filter Printing: How It Works and Why It's Brilliant
In her video "Split Filter Printing: How It Works and Why It's Brilliant," Lina Bessonova walks through the frustrating process of trying to find the "perfect" single exposure.
Please watch the segment from "what's wrong with printing with one filter?". Notice how each attempt to fix one part of the tonal range (like deepening the shadows) negatively impacts another (by losing highlight detail). This illustrates the core compromise that split-grade printing aims to eliminate.
As you can see, the single-filter approach often forces you to choose the "least bad" option, which is not the goal of refined printing.
How Variable Contrast Paper Works
To understand how we can break free from this compromise, we first need to look at the physics of the paper itself. Your university-level physics and chemistry knowledge will be valuable here. A variable contrast (VC) paper, like Ilford's Multigrade series, doesn't have a single emulsion. Instead, it has multiple emulsion layers that are sensitive to different colors of light.
The following video provides a concise explanation of this mechanism.
Darkroom Printing Pt4 - Split Grade Printing 101
The video "Darkroom Printing Pt4 - Split Grade Printing 101" from the Pictorial Planet channel begins with an excellent overview of the technology inside VC paper.
Watch the first part of the video, from the explanation of how VC papers work. The key points to focus on are: The paper has different emulsions that react to blue and green light. Blue light exposure results in high contrast. Green light exposure results in low contrast. The enlarger's filters work by controlling the ratio of blue to green light reaching the paper. A magenta filter passes blue light (increasing contrast), while a yellow filter blocks blue light (reducing contrast).
This dual-sensitivity is the key. A standard grade 2 or 3 filter creates a specific mix of blue and green light. Split-grade printing uncouples this mix and treats the two sensitivities separately.
The Principle: Separate Levers for Highlights and Shadows
Instead of using one "in-between" filter, split-grade printing uses two exposures at the extreme ends of the contrast range:
- A low-contrast exposure (using a grade 00 or 0 filter, which is yellow and passes mostly green light).
- A high-contrast exposure (using a grade 5 filter, which is magenta and passes mostly blue light).
The fundamental principle is that each of these exposures primarily affects a different part of the tonal scale. The official Ilford guide on this technique explains it best.
Split grade printing - Ilford Photo
This article from Ilford, the manufacturer of Multigrade papers, provides a clear and authoritative statement on the core principle of split-grade printing.
Please read the section that begins with the simple explanation. This passage is the most important takeaway of the entire lesson. It explicitly states that the low-contrast (grade 0) exposure controls the highlights, while the high-contrast (grade 5) exposure controls the shadows and blacks.
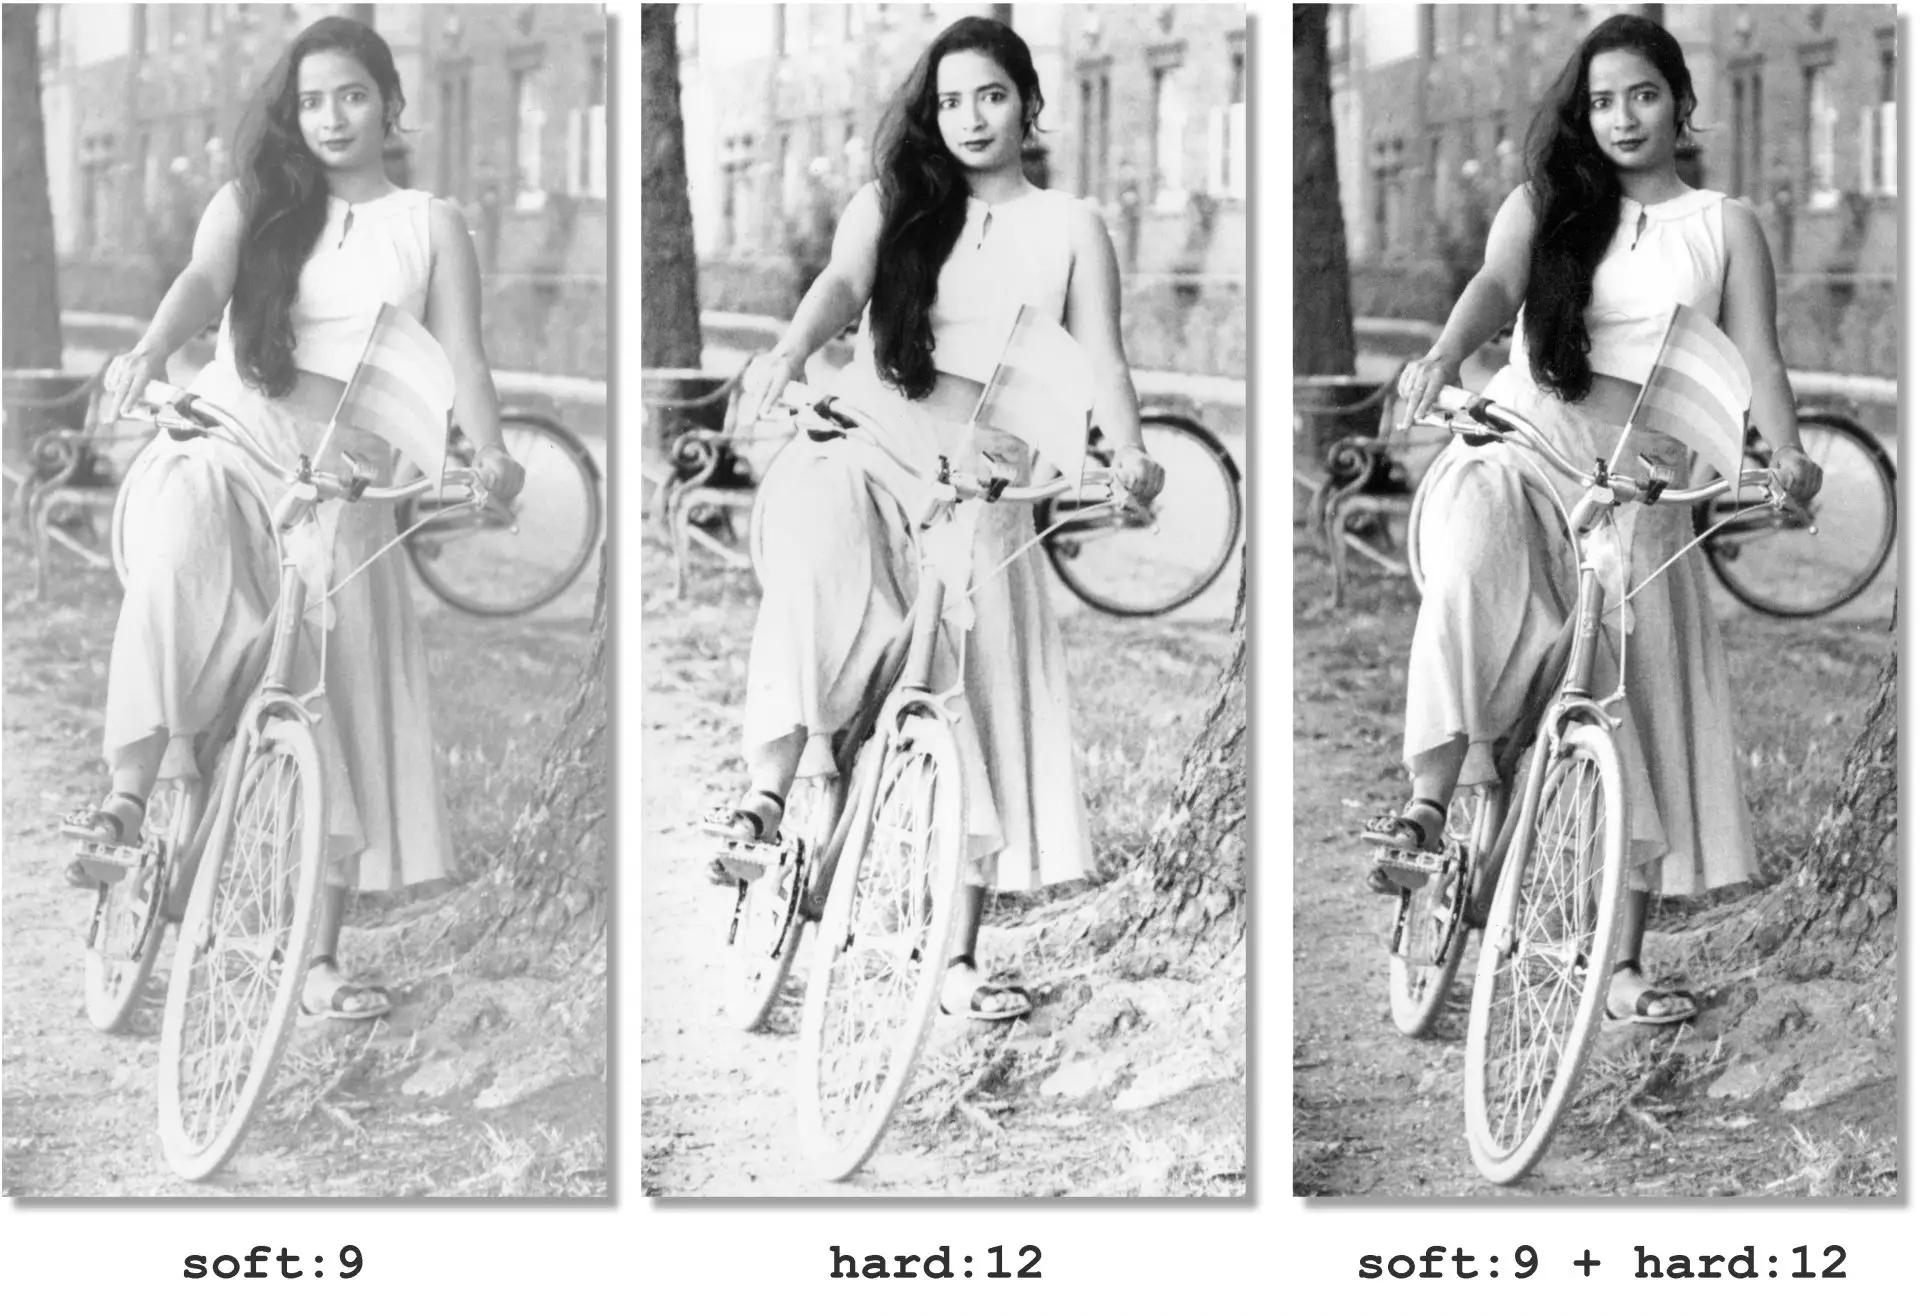
You are essentially building the print in two distinct stages. The low-contrast exposure lays down the foundation, ensuring that you have detail and texture in the brightest parts of your image. The high-contrast exposure then adds the "punch," deepening the shadows and establishing a true black point, largely without destroying the delicate highlight detail you just established.
This triptych provides a perfect visual summary of the process.
An Engineer's View: Proving the Principle
The idea that the two exposures are largely independent can be demonstrated more rigorously. Given your background in industrial engineering, you are likely familiar with using characteristic curves to describe the performance of a system. In photography, we use H-D (Hurter–Driffield) curves to plot the relationship between exposure and the resulting density of the photographic material.
The following document provides a technical analysis of split-grade printing using these curves.
[PDF] SPLIT GRADE PRINTING A MEASURED APPROACH
This paper from Darkroom Automation offers a scientific look at why split-grade printing works, which should resonate with your technical background.
Focus on the section titled "HOW SPLIT GRADE WORKS". First, examine the graphs under "HIGH CONTRAST PRINTS". The text and curves show that even as you vary the low-contrast exposure time significantly, the black point (the upper end of the curve) remains relatively stable. This is the technical proof that the high-contrast filter is the primary controller of your blacks. Next, look at the graphs under "LOW CONTRAST PRINTS". Here, the opposite is shown. As you vary the high-contrast exposure, the white point (the "toe" or lower part of the curve) is largely unaffected. This proves that the low-contrast filter is the primary controller of your highlights.
These graphs provide the data to back up the principle: you truly have two semi-independent controls, or "levers," to adjust the tonal range of your print. One lever sets the floor (the white point and highlight detail), and the other sets the ceiling (the black point and shadow density).
Conclusion
Today, we've dissected the theory behind split-grade printing. You've moved beyond seeing contrast filters as single choices on a dial and now understand them as tools to manipulate different color sensitivities within the paper's emulsion. This gives you a way to escape the compromises of single-filter printing.
Key Takeaways:
- Single-filter printing often forces a compromise between retaining highlight detail and achieving deep, rich blacks.
- Variable contrast paper works because it has separate emulsion layers sensitive to green light (for low contrast) and blue light (for high contrast).
- The core principle of split-grade printing is to use two separate exposures: a low-contrast (e.g., grade 0) exposure to control the highlights, and a high-contrast (e.g., grade 5) exposure to control the shadows.
- These two exposures are largely independent in their primary effects, providing you with separate "levers" to precisely adjust the final tonality of your print.
Next Lesson Preview:
Now that you understand why split-grade printing works, our next lesson will focus on how to do it. We will walk through the practical, step-by-step process of making two test strips—one for the highlights and one for the shadows—and then combining those exposures to create a final, refined split-grade print that far surpasses what can be achieved with a single filter.