Welcome back. In our last lesson, we established the core principle of split-grade printing: using two separate, extreme-contrast exposures to gain independent control over the highlights and shadows of your print. You learned that a low-contrast (grade 00/0) exposure primarily sets the highlight detail, while a high-contrast (grade 5) exposure sets the shadow density.
Today, we move from theory to practice. This lesson focuses on the first and most crucial practical step in the split-grade workflow: determining the base exposure using a low-contrast filter. By the end of this session, you will be able to produce and correctly interpret a low-contrast test strip, establishing the foundation upon which your final print will be built.
The First Step: The Low-Contrast Foundation
The split-grade process begins with a test strip made using a low-contrast filter, typically grade 00 or 0. As we discussed, this exposure's primary effect on the final print is to control the highlights. Because the subsequent high-contrast exposure has a relatively small impact on the brightest tones, it is logical to establish this highlight foundation first.
You may recall the characteristic curves from our previous lesson, which showed that the "toe" of the curve (representing highlights) is largely set by the low-contrast exposure. We're now going to put that into practice.
The first step is to create a test strip using only the grade 00 or 0 filter. The goal is to find the minimum amount of light needed to create a faint, detailed image.
Two excellent videos demonstrate this process clearly. They both cover the same core task, but offer slightly different perspectives on evaluating the result, which we will discuss.
Split grade printing - DARKROOM PRINTING TECHNIQUES
First, let's watch a segment from the DistPhoto channel's video, "Split grade printing - DARKROOM PRINTING TECHNIQUES". This provides a clean demonstration of setting up the enlarger and making the low-contrast test strip.
Watch from the start of the practical demonstration. Pay attention to the physical process: The enlarger is set to the lowest contrast (double zero). A card is used to create incremental exposures on a single strip of paper (2, 4, 6, 8 seconds, etc.). This is an efficient way to test a range of times.
Evaluating the Low-Contrast Test Strip
After developing the test strip, you will have a series of very soft, low-contrast images of increasing density. The critical task is to decide which of these exposures is the "correct" one for your base. There are two common and valid ways to approach this.
Method 1: The Threshold Exposure
This method is systematic and less subjective, which may appeal to your engineering mindset. The goal is to find the exposure time where an image just begins to form. You are looking for the first strip that shows meaningful detail, beyond just a faint uniform gray. Any less exposure would be blank paper; this is the threshold at which information from the negative is first rendered.
The next video demonstrates this exact approach.
Darkroom Printing Pt4 - Split Grade Printing 101
Now, let's watch "Darkroom Printing Pt4 - Split Grade Printing 101" from Pictorial Planet. The presenter's evaluation method is a perfect example of finding the threshold exposure.
Watch the segment from where the test strip is created and evaluated. Notice how the presenter specifically points to the 5-second strip and says he's looking for "where it first begins to show, it first begins to develop into an image." This is your key criterion for this method.
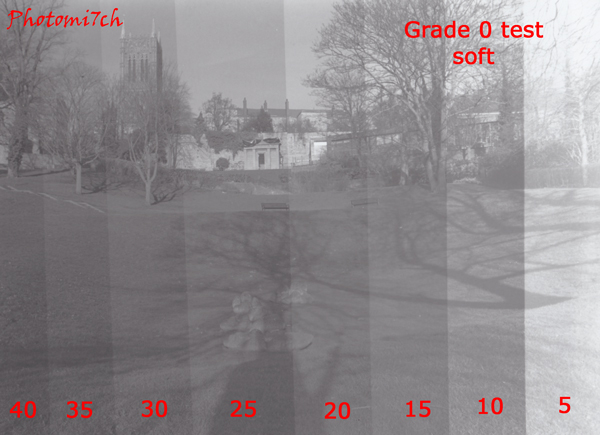
This resulting print from a low-contrast exposure will look very faint and "wrong" on its own, as you can see in the example below. Remember that this is only the first of two exposures; its sole purpose is to lay down the highlight detail.
Method 2: Judging Highlight Detail
A slightly more advanced and subjective method involves not just looking for the first sign of an image, but judging the quality of the highlight detail. This is what the presenter in the first video (DistPhoto) refers to when he says, "try and find the highlights of where you think you want to lay the highlights down and then just back it off just a little."
This approach is detailed in the following technical guide.
[PDF] Basic Split-Grade Printing - Eric Neilsen Photography
This guide from Chris Woodhouse provides a rigorous look at the process. We will focus on the section describing the practical steps for determining the highlight exposure.
Please read the section titled "Practical Considerations", starting from the paragraph that begins "In this case...". The author's advice is key: you want to find the exposure that has just enough tone to register the highlights. He recommends choosing an exposure on the lighter side, because the subsequent high-contrast exposure will inevitably add a small amount of density to the highlights. This reinforces that you are setting a floor, not the final value.
For starting out, Method 1 (The Threshold Exposure) is a reliable and repeatable process. Once you become more comfortable, you can transition to the more nuanced judgments of Method 2.
Clarifying the Terminology: "Shadow" vs. "Highlight" Exposure
You may notice that the learning outcome for this lesson refers to determining a "base shadow exposure" with the low-contrast filter. This can seem contradictory, as we've established this filter controls highlights.
This wording arises from the practical experience of evaluating the test strip. In a very soft, grade 00 print, the first parts of the image to become visible are often the darkest parts of that low-contrast scene (which correspond to the shadows in the negative). So, while you are evaluating the first appearance of shadow detail on the test strip, the effect of this exposure time on the final, combined-exposure print is to set the density of the highlights. It's a subtle but important distinction.
The science behind this is clearly shown in characteristic curves that plot the combined effect of the two exposures.
As you can see, regardless of how much high-contrast (Grade 5) exposure is added later, the starting point for the highlights remains relatively constant. Your work in this lesson sets that constant.
Conclusion
In this lesson, you have learned the first practical procedure in split-grade printing. By making and evaluating a low-contrast test strip, you establish the foundational exposure for your print's highlights.
Key Takeaways:
- The split-grade process begins with making a test strip using a grade 00 or 0 filter.
- The goal is to find the "threshold" exposure time—the minimum time required for a detailed image to just begin to appear on the paper.
- This low-contrast exposure establishes the density and detail in the highlights of the final print.
- While we often look for the first hint of shadow detail on the test strip, the function of this exposure is to control the highlights in the final print.
Next Lesson Preview:
Now that you have determined the fixed exposure time for your highlights, the next step is to find the appropriate exposure for your shadows. In the next lesson, you will learn how to make a second test strip using the grade 5 filter to dial in the contrast and establish the black point of your print.