Welcome back. In our previous lesson, we established the first critical exposure in the split-grade printing process: the base highlight exposure using a low-contrast (grade 00 or 0) filter. You learned how to make a test strip to find the "threshold" time that just begins to render detail, effectively setting the density floor for your print's highlights.
Now, with our highlight foundation in place, we will determine the second exposure. This lesson focuses on using a high-contrast (grade 5) filter to control the shadows and inject contrast into the print. By the end of this session, you will know how to create and interpret a high-contrast test strip to find the supplementary exposure that defines your print's black point and overall tonal range.
The Role of the High-Contrast Exposure
In the last lesson, the low-contrast exposure gave us a very flat, soft image. That's by design. The "magic" of split-grade printing happens when we add the second exposure using a grade 5 filter.
From your physics background, you'll recall that variable contrast (VC) paper has at least two emulsion layers. The grade 5 filter (or high magenta filtration on a color head) allows primarily blue light to pass through, which exposes the paper's high-contrast, blue-sensitive layer. This layer is less sensitive to light overall, but once it reaches its exposure threshold, it builds density very quickly.
This has two important consequences:
- Shadow Control: This exposure has its greatest effect in the shadow areas of the negative (which correspond to the clearest areas of the film), where enough light can pass through to activate the high-contrast emulsion and create deep blacks.
- Highlight Preservation: The dense, highlight areas of the negative block most of the blue light. The light that does get through is often insufficient to cross the exposure threshold of the high-contrast emulsion. As a result, the highlights you carefully established with the grade 0 exposure are largely unaffected.
This is the mechanism that provides the independent control that makes split-grade printing so powerful.
Darkroom Printing Pt4 - Split Grade Printing 101
For a quick refresher on how this works, let's revisit a short segment from the "Darkroom Printing Pt4" video by Pictorial Planet.
Watch the explanation from how VC papers work. The key concept is that blue light creates high contrast by activating all the emulsion layers, while green light creates low contrast. Your grade 5 filter is essentially a "blue light" filter.
Creating the High-Contrast Test Strip
The procedure for the high-contrast test strip is methodical and builds directly on your work from the last lesson. It is a two-part process performed on a single strip of paper.
- The Base Exposure: First, you give the entire test strip a single, uniform exposure using the time and filter you determined in the previous lesson (e.g., 5 seconds at grade 0).
- The Supplementary Exposure: Then, without moving the paper in the easel, you switch your enlarger to the grade 5 filter. You then perform a new set of incremental exposures (e.g., in 2, 3, or 5-second steps) on top of the base exposure.
This method ensures that every segment of your test strip has the same highlight foundation, allowing you to isolate and evaluate the additive effect of the high-contrast exposure.
The following article by photographer Les McLean provides an excellent, clear text-based guide to this exact procedure.
Split Grade Printing Part 1 - Les McLean Photography
This article from Les McLean Photography details a professional's approach to the two-filter method. We will focus on the section describing the creation of the high-contrast test.
Please read the section titled "THE GRADE 5 OR HARD TEST STRIP". Start from the beginning of this section, here. Pay close attention to the instructions: First, expose the entire strip for the pre-determined grade 0 time (14 seconds in his example). Then, make the incremental grade 5 exposures on top of that. Notice his analysis: the grade 5 exposure primarily darkens the low values (shadows) while the highlights remain "relatively untouched."
Evaluating the High-Contrast Test Strip
Once developed, your test strip will show a series of images where the highlights look similar across all steps, but the shadows get progressively darker. So, what are you looking for?
Your goal is to choose the exposure that produces your desired black point. This is subjective and depends on your artistic intent for the image.
- Do you want deep, featureless blacks for maximum drama?
- Or do you want to retain some subtle detail in the darkest shadows?
The test strip lays out all these options for you.
Let's see this process in action. The video below provides a complete walkthrough of making and evaluating the grade 5 test strip.
Darkroom Printing Pt4 - Split Grade Printing 101
We return to the Pictorial Planet video, as it provides a superb practical demonstration of this step.
Watch the segment from making the grade 5 test strip. The presenter makes the strip and then analyzes the results. Notice how he examines the shadow areas in the 15-second and 20-second strips, looking for the one that "catches my eye" in terms of attractive contrast and shadow detail before settling on an intermediate time.
Another useful way to think about this evaluation comes from photographer Lina Bessonova. She offers a very specific visual cue to look for.
Split Filter Printing: How It Works and Why It's Brilliant
In her video "Split Filter Printing," Lina Bessonova provides a concise description of her target for the high-contrast exposure.
Watch the brief segment from her explanation. Her goal is to find the time that produces "little clusters of dark grey very close to pure black, but not quite." This is an excellent target if you want to ensure you don't completely crush your shadow detail.
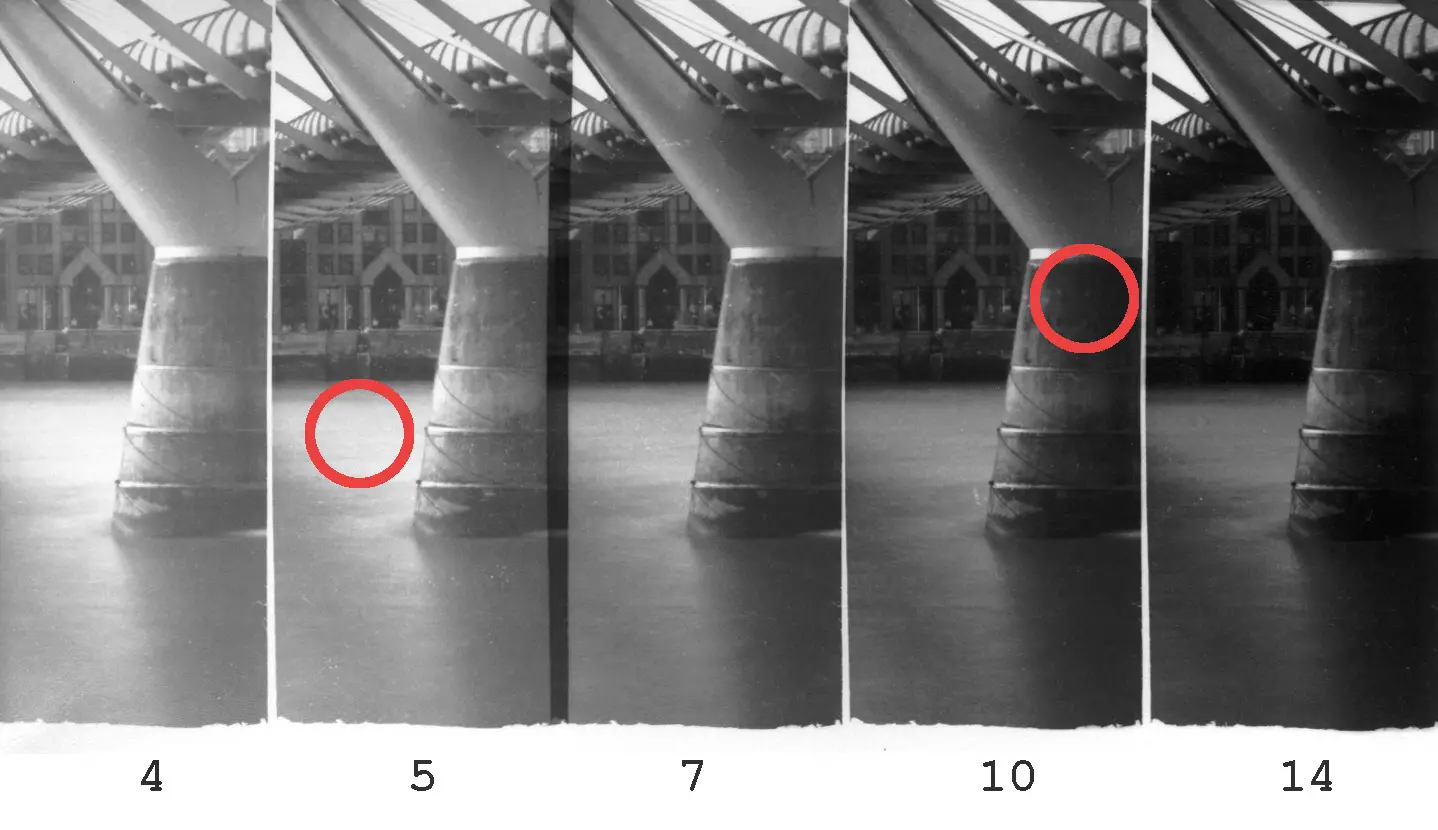
The image below illustrates the effect of increasing the high-contrast exposure. Notice how the bridge pier becomes progressively darker, adding contrast and depth, while the bright reflections on the water remain largely unchanged. Your test strip will show a similar progression.
Finally, let's connect this back to the technical guides. The Basic Split-Grade Printing PDF you studied in the last lesson contains a powerful visual (fig. 9) that shows exactly what your test strip represents. It composites several tests onto one page, showing a fixed filter 00 exposure combined with increasing filter 5 exposures. As you look from one frame to the next, you can see the shadows deepening while the highlights in the model's hair remain stable. Your physical test strip is simply a linear version of this concept.
Conclusion
You have now learned the second and final exposure calculation in the split-grade workflow. By adding incremental high-contrast exposures on top of a uniform low-contrast base, you can create a test strip that allows you to precisely dial in the shadow density and overall contrast for your final print.
Key Takeaways:
- The supplementary exposure is made with a high-contrast (grade 5) filter. Its primary function is to set the density of the shadows.
- The high-contrast test strip is made by first giving the entire paper a uniform base exposure (your result from the previous lesson) and then adding incremental high-contrast exposures on top.
- Evaluating this test strip is a matter of choosing the exposure time that produces the shadow tonality you desire, from detailed dark greys to pure, solid black.
Next Lesson Preview:
You now have the two essential components for a split-grade print: a base time for grade 0 (highlights) and a supplementary time for grade 5 (shadows). In our next lesson, we will combine these two exposures on a full sheet of paper to create the final print. We will then compare this result to a traditional single-filter print to evaluate the unique tonal separation and control that split-grade printing offers.