Welcome back. In our previous lessons, we meticulously determined the two key ingredients for a split-grade print: a base exposure time with a low-contrast filter to establish the highlights, and a supplementary exposure time with a high-contrast filter to define the shadows. You now possess the two essential parameters for this advanced printing technique.
This lesson is where the process culminates. We will now combine these two separate exposures onto a single sheet of paper to create your first complete split-grade print. The goal is to execute the final step of the split-grade workflow, synthesizing your previous work into a tangible, refined print that demonstrates a high degree of tonal control.
The Synthesis: Combining Exposures
The procedure for creating the final print is straightforward, but it requires careful handling to ensure the paper is not moved between the two exposures. The process unites the highlight detail from your soft exposure with the shadow depth from your hard exposure.
The steps are as follows:
- Place a full sheet of photographic paper in your easel under the enlarger.
- Insert your low-contrast filter (e.g., Grade 0 or 00).
- Expose the paper for the duration you determined for your highlights (
t_soft). - Crucially, without moving the easel or the paper, carefully remove the low-contrast filter and insert your high-contrast filter (e.g., Grade 5).
- Expose the paper again, this time for the duration you determined for your shadows (
t_hard). - Process the print as you normally would.
The order of these exposures—soft then hard, or hard then soft—does not affect the final result. This is a practical consequence of the behavior of the silver halide emulsions, where the total effect is cumulative regardless of the sequence.
Split grade printing - Ilford Photo
The official guide from Ilford Photo provides a concise summary of this combination process and the roles of each exposure.
Read the two bullet points starting from this section, which describes combining a Grade 0 and Grade 5 exposure. Then continue to the next two bullet points, which reinforce the purpose of each exposure: the soft exposure controls the highlights, and the hard exposure controls the blacks.
Seeing it in Action
Watching the physical process can help solidify the workflow. The following video clips show experienced printers performing these exact steps.
First, let's watch the final step from the Pictorial Planet video series we've been following. He takes the two times he determined in the previous steps and applies them to a final sheet of paper.
Darkroom Printing Pt4 - Split Grade Printing 101
This short clip from Pictorial Planet's "Split Grade Printing 101" is a perfect demonstration of the final, combined exposure process.
Watch from the setup for the final print. Notice the distinct steps: check focus, insert the grade 0 filter, expose for 5 seconds, carefully swap to the grade 5 filter, and expose for the final 17 seconds.
Lina Bessonova provides another clear demonstration, along with a helpful mental model for what is happening.
Split Filter Printing: How It Works and Why It's Brilliant
In her video "Split Filter Printing," Lina Bessonova shows her workflow for the combined exposure.
Watch the segment from the two exposures. She first exposes with her soft filter (Filter 2 for 6 seconds), then swaps to her hard filter (Filter 4.5 for 10 seconds) and exposes again. Her commentary is insightful: "what basically happened is that the shadows got printed over the highlights without affecting them at all and only deepening the dark areas."
This idea of printing the shadows "over" the highlights is a powerful, intuitive way to understand the process. The soft, low-contrast exposure lays down a full range of tones, ensuring the highlights have detail. The hard, high-contrast exposure then acts primarily on the shadow areas, which are still sensitive enough to react, pushing them to a rich black without adding significant density to the already-exposed highlights.
Deconstructing the Final Print
To fully appreciate how the two exposures build the final image, it's incredibly useful to see them in isolation and then combined. The 35mmc article by Sroyon Mukherjee provides an excellent visual deconstruction of this.
Split Grade Printing – Darkroom Technique Part 4 - 35mmc
This article provides a fantastic breakdown of the split-grade printing process with detailed examples. We'll focus on the section where the author shows the final print and then deconstructs it.
First, read the brief section titled "Final print," where the author states the exposure times used. Then, study the section titled "Split grade deconstructed" and carefully examine the accompanying image, which I've also included below.
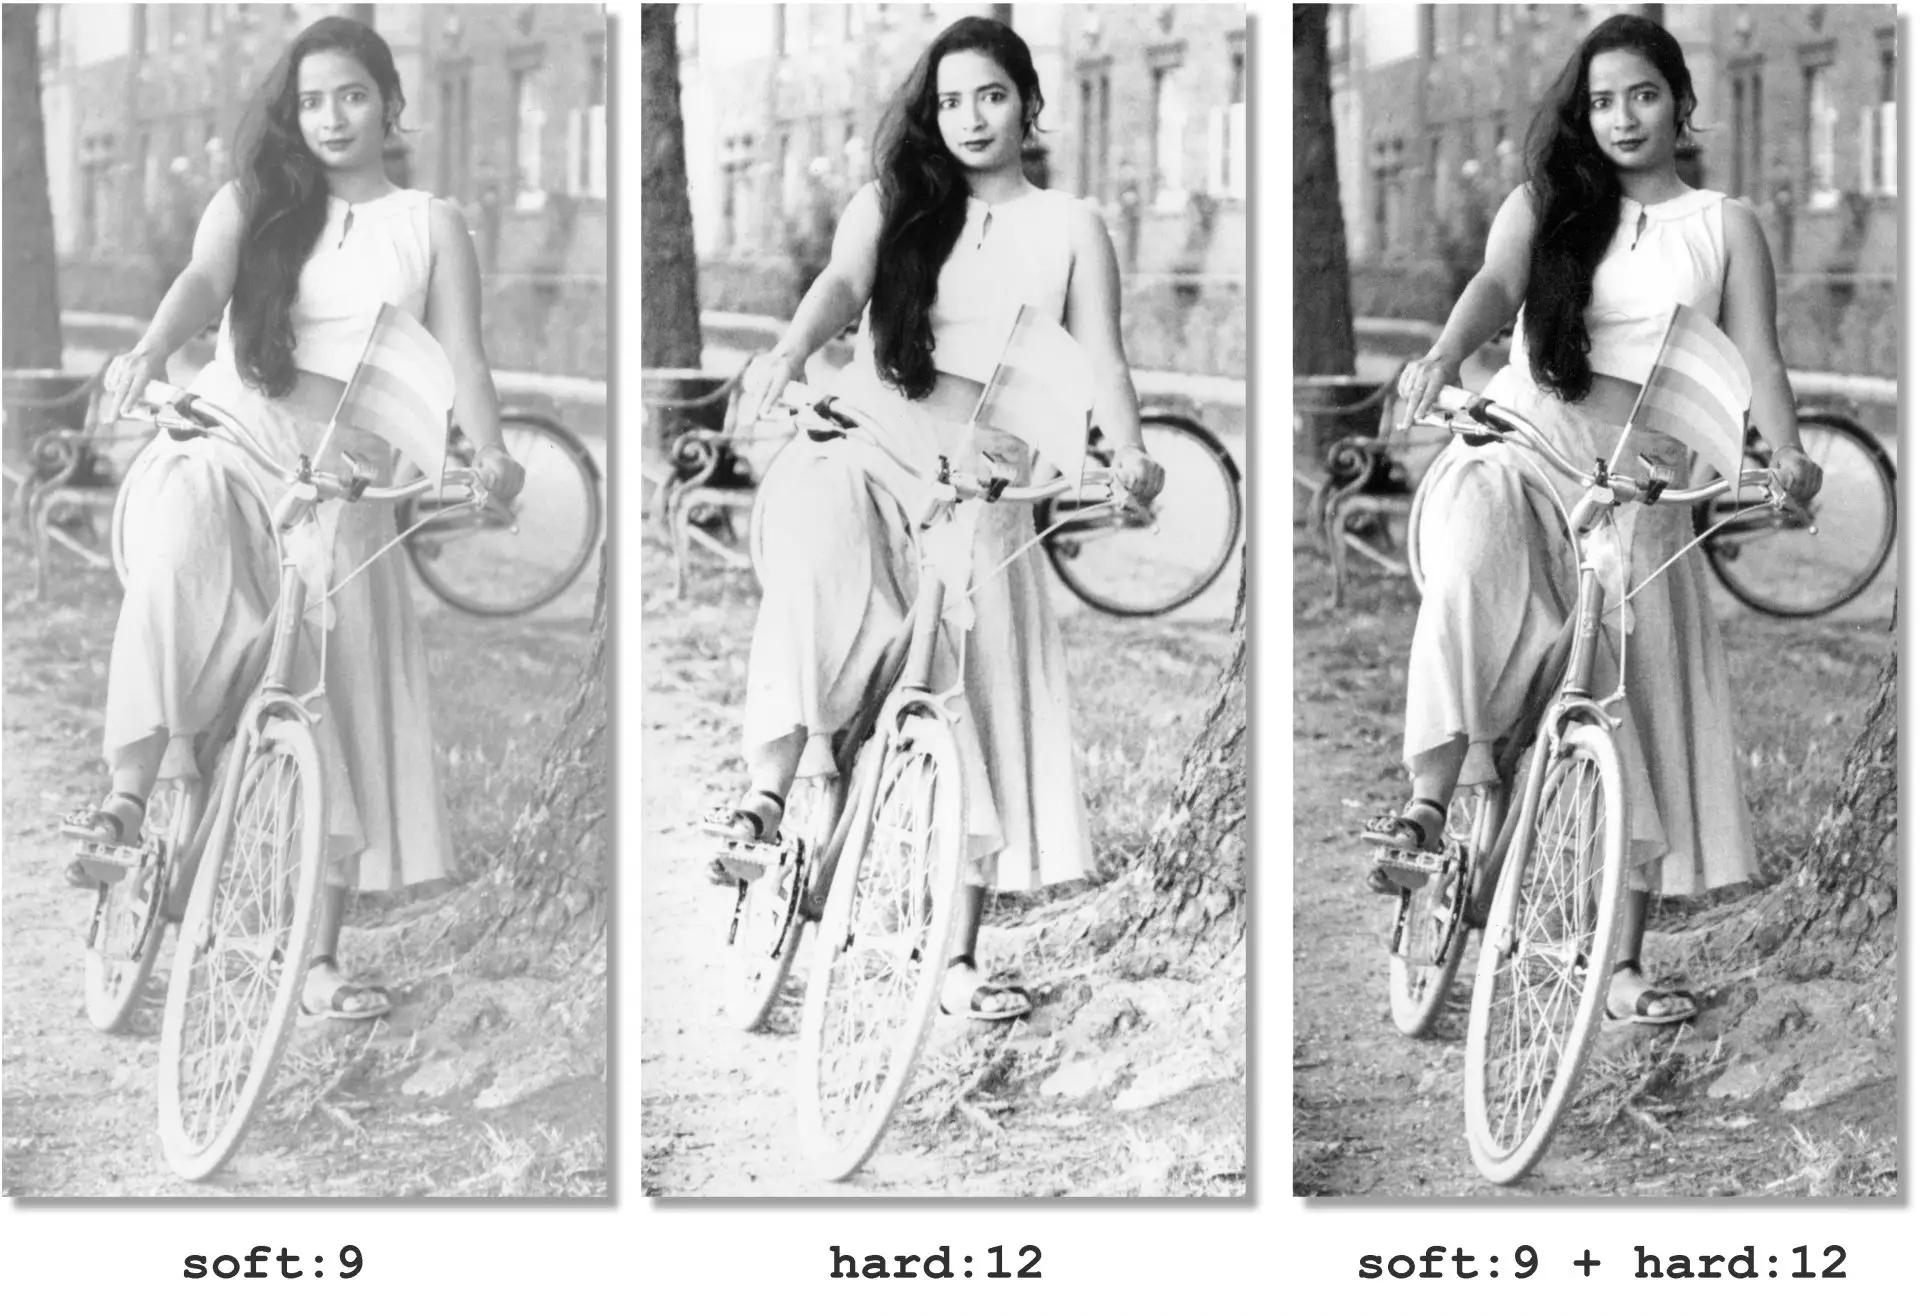
This comparison is the key to understanding the power of split-grade printing.
- The soft exposure (left) sets the detail in the brightest parts of the image (the flag, the fabric of the top) but leaves the shadows (the hair) looking weak and gray.
- The hard exposure (center) creates strong blacks in the hair but completely loses all detail in the flag and top, creating a harsh, posterized look.
- The combined print (right) is not a simple average. It successfully merges the best qualities of both exposures: the nuanced highlights from the soft exposure and the rich, deep shadows from the hard exposure, creating a print with a long, beautiful tonal scale.
Let's look at one more example from the same article to solidify the concept.
Split Grade Printing – Darkroom Technique Part 4 - 35mmc
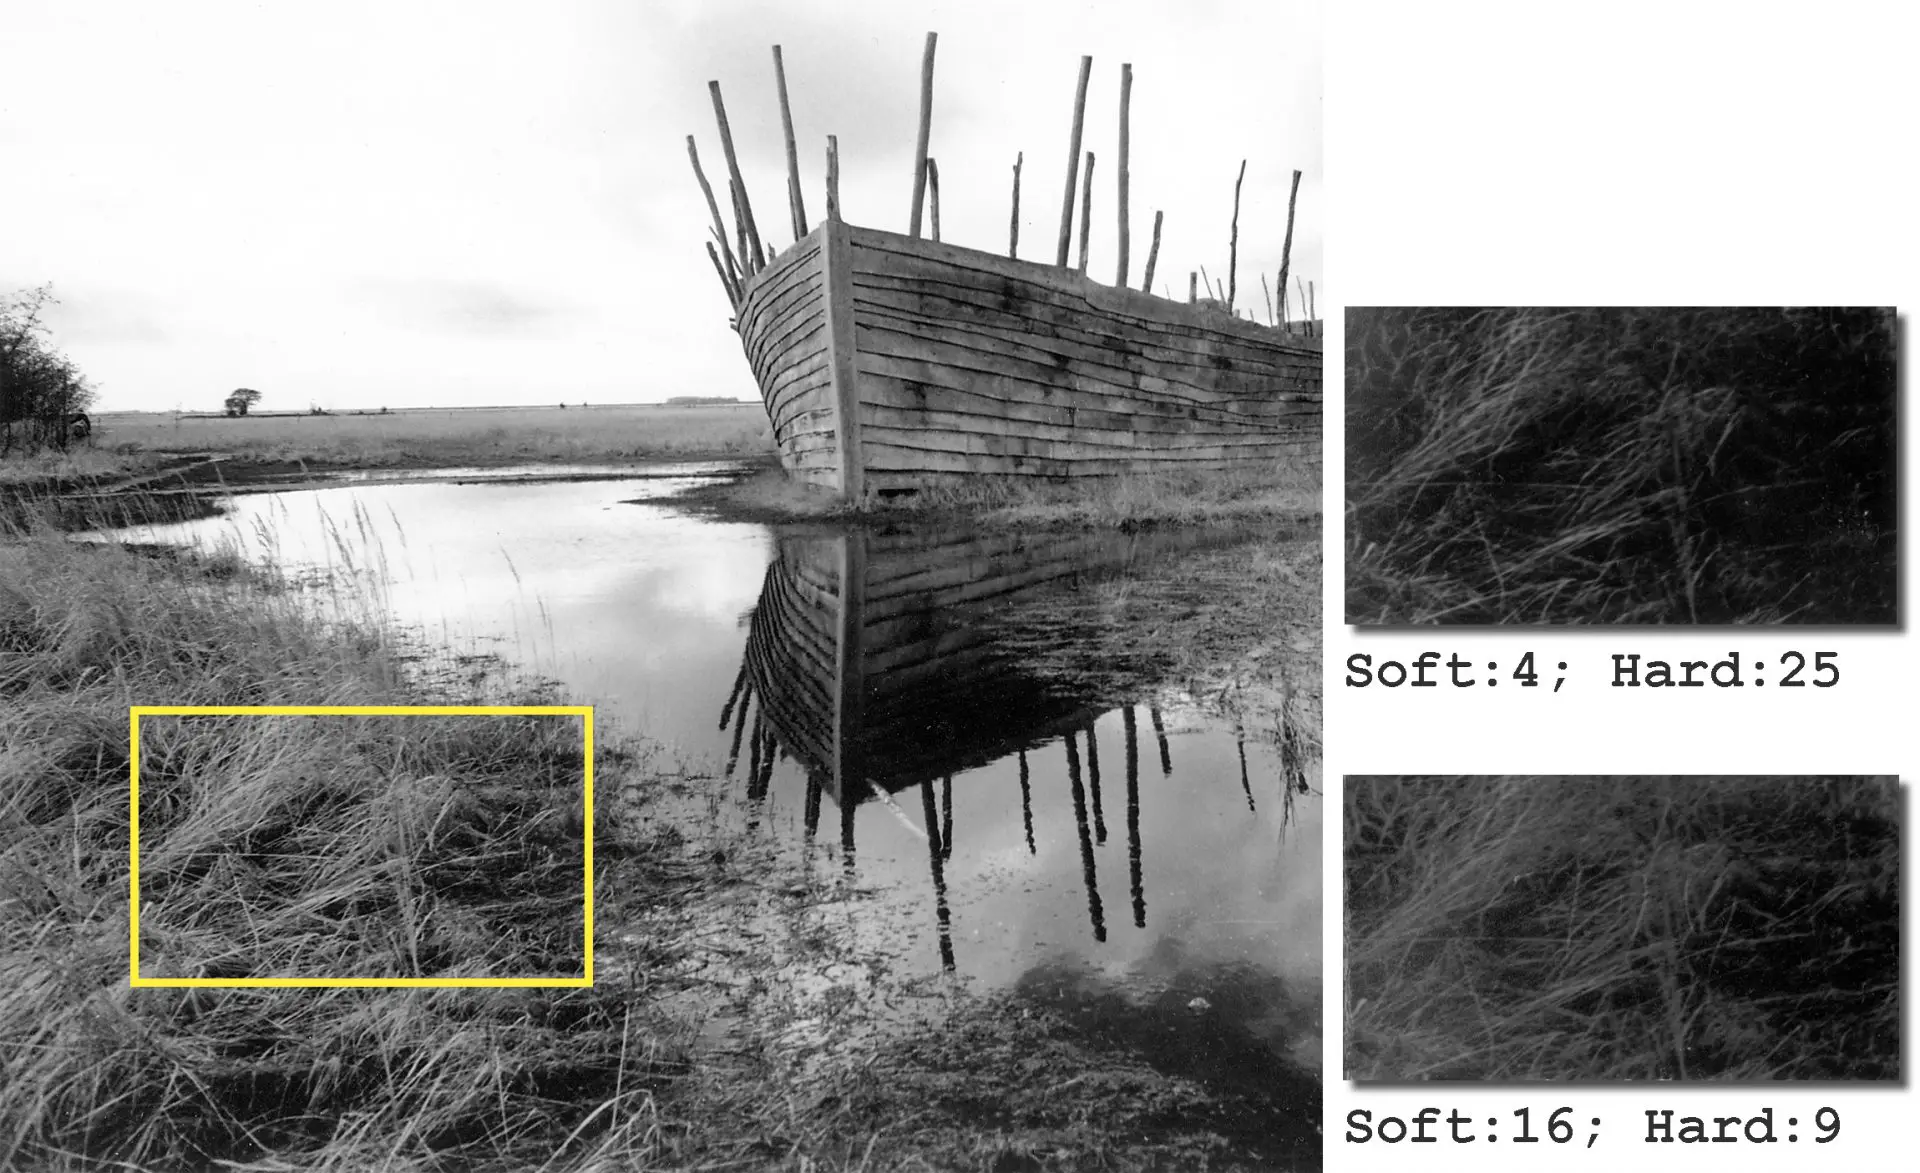
The author provides a second full example with a landscape image of a Viking ship, reinforcing the same process.
Quickly review the sections for "Print 2: Viking Ship." Read the soft exposure determination, the hard exposure determination, and finally look at the resulting print which used a 4-second soft exposure and a 9-second hard exposure.
This second example demonstrates that the same systematic process works across different subject matter, from portraiture to landscape, to achieve superior tonal control.
Conclusion
You have now completed the entire workflow for creating a split-grade print. By determining separate exposures for highlights and shadows and then combining them on a single sheet of paper, you have unlocked a method for achieving a level of tonal control that is difficult, if not impossible, with a single-filter exposure.
Key Takeaways:
- A final split-grade print is made by giving a single sheet of paper two sequential exposures: one with a low-contrast filter for highlights and one with a high-contrast filter for shadows.
- The order of the exposures does not matter, but the paper must not be moved between them.
- This technique is not a simple average of two exposures; it's an additive process that synergistically combines the highlight detail from the soft exposure with the shadow depth from the hard exposure.
Next Lesson Preview:
You have now created a print using an advanced technique. But is it objectively "better"? In our next lesson, we will focus on evaluation. You will learn how to critically compare your split-grade print to a traditional single-filter "work print" of the same negative. We will analyze the differences in tonal separation, micro-contrast, and three-dimensionality to truly understand the benefits and artistic choices that split-grade printing offers.