In our last lesson, you saw how split-grade printing provides superior control over highlights and shadows for a straight print. We concluded by observing its limitations with the "Viking Ship" example, where optimizing the sky's exposure ruined the foreground. This common dilemma—where different parts of an image require conflicting exposures—cannot be solved by applying the same exposure, no matter how sophisticated, to the entire print.
This lesson marks your first step into the true artistry of darkroom printing. We will address the limitations of straight printing by learning how to analyze a work print to identify specific areas that need local adjustments. This analytical skill is the foundation for dodging and burning, the techniques that allow you to sculpt the light within your photograph. By the end of this session, you will be able to look at your own prints and confidently decide which areas need to be lighter or darker to fulfill your artistic vision.
The Purpose of Local Adjustments
Before we dive into the "how" of analysis, let's establish the "why." Dodging (lightening an area) and burning (darkening an area) are not just corrective measures; they are creative tools used to enhance a photograph's message and impact.
Dodge, Burn and Other Heresies – Darkroom Technique ...
This article by Sroyon Mukherjee, which you may recall from our previous discussions on split-grade printing, provides an excellent rationale for why we perform these manipulations.
Please read the introductory section, "Why manipulate". As you read, notice how the author frames local adjustments not as "cheating," but as essential tools for: Revealing important details that a straight print might obscure. Suppressing distracting elements that pull attention from the main subject. Guiding the viewer's eye through the composition. Evoking a specific mood or atmosphere.
The core idea is to move beyond a literal translation of the negative and toward an intentional interpretation. We use dodging and burning to give emphasis, create separation, and build depth.

The Work Print: Your Blueprint for Action
The entire process of local adjustment begins with a high-quality "work print." This should be the best possible straight print you can make, whether using a single contrast filter (as in Module 3) or the split-grade technique (Module 5). This print serves as your objective reference, a map of the tonal landscape from which you will plan your interventions.
The following reading explains this planning phase, a critical step that happens before you even pick up a dodging tool.
Dodge, Burn and Other Heresies – Darkroom Technique ...
This section details the methodical process of analyzing a work print to plan your adjustments.
Please read the section titled "Planning". Pay special attention to Ansel Adams's advice about starting with a straight print. This section introduces the core workflow: Create a Work Print: Make a clean, straight print to serve as your baseline. Analyze: Examine the print to identify which parts are too bright or too dark. Use Test Strips: Refer back to the test strips you made for the work print. They contain valuable information. For example, if your base exposure was 12 seconds but you see the sky looks best at 20 seconds, you now know the sky needs an 8-second burn. Create a Map: Formalize your analysis by creating a "dodge/burn map" with specific instructions.
The analytical process is a dialogue with your print. Lay the work print out under good, even light and ask yourself a series of questions:
- What is my subject? Is it clearly the brightest or most prominent part of the image?
- Where are the distractions? Are there any overly bright areas, especially near the edges, that pull the eye away from the subject? These are prime candidates for burning.
- What details are lost in shadow? Are there important textures or elements in dark areas that are hard to see? These may need to be dodged.
- How does my eye travel through the frame? Does it flow naturally, or does it get "stuck" on unimportant details? You can use burning on corners and edges to create a subtle vignette, framing the subject and keeping the viewer's eye locked in.
A Practical Case Study: Analyzing a Challenging Negative
Let's watch a practical demonstration of this analytical process. The printer in this video is tackling a negative with a very high dynamic range—bright sunlight on a white car roof and deep shadows under the car.
Dodging & Burning in the Darkroom
In this video from the channel Shoot Film Like a Boss, the presenter walks through his thought process for a complex print.
First, watch from the introduction. The presenter identifies the problem areas: the roof and grass are "blown out" (too bright), while he needs to retain detail in the tire and hubcap. This is a classic example of analyzing a work print. Next, watch from his evaluation. He explains how he made different test strips for different parts of the image, arriving at separate exposure times: 2 minutes for the sky area, 40 seconds for the main body, and 15 seconds for the tire. This demonstrates how analysis leads directly to a quantitative plan.
This video perfectly illustrates the learning outcome for this lesson. The printer isn't just vaguely thinking "the roof is too bright." He is systematically analyzing the print to determine which areas need adjustment and, as a next step, how much adjustment they need.
From Analysis to Plan: Creating a Print Map
Once your analysis is complete, you should formalize it into a plan. For simple prints, a few mental notes might suffice. But for anything more complex, creating a "print map" is essential. This is typically done by writing directly on the work print or on a separate sketch.
This map translates your qualitative analysis ("darken the sky") into quantitative instructions ("burn sky: +8 seconds").
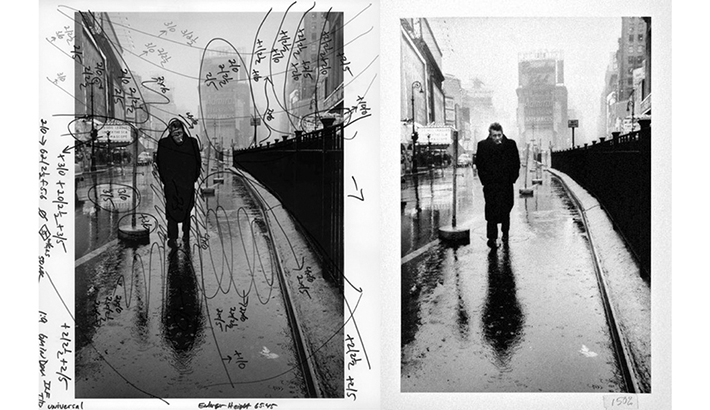
A modern master printer, Pablo Inirio of Magnum Photos, uses a similar system. While we will cover the specific notations in more detail in the next lesson, seeing his method provides a clear idea of how analysis becomes a concrete plan.
In the Darkroom with Pablo Inirio: Dodging and Burning
In this clip from Magnum Photos, Pablo Inirio explains the simple but powerful notation system he uses on his work prints.
Watch from this segment on notation. He explains that a + sign indicates burning (adding exposure) and a - sign indicates dodging (subtracting exposure). For example, +6 / 5 means "burn this area for 6 seconds using a grade 5 filter." This is the language you will use to write your printing recipes.
For someone with your engineering background, you might also appreciate a more modern, hybrid approach to planning. As Sroyon Mukherjee mentions in his article "Dodge, Burn and Other Heresies," you can use software like Photoshop or GIMP to create a digital print map. By scanning your negative and using the digital dodge and burn tools, you can experiment with different adjustments and create a visual plan before you even step into the darkroom. This can be an incredibly efficient way to pre-visualize your final print.
Conclusion
In this lesson, you have learned the critical first step in moving beyond straight printing: analyzing a work print for local adjustments. You now understand that this is a methodical process of evaluating tones, identifying problem areas, and considering your artistic goals for the image.
Key Takeaways:
- Local adjustments (dodging and burning) are creative tools used to guide the viewer's eye, enhance detail, and build mood.
- The analysis always begins with a well-made straight "work print" that serves as an objective baseline.
- The analytical process involves identifying areas that are too bright (candidates for burning) and areas that are too dark (candidates for dodging).
- This analysis is formalized into a "print map"—a set of instructions written on the work print that will guide your final print.
Next Lesson Preview:
Your analysis is complete, and you know what you want to change. But how, exactly, do you do it? In our next lesson, we will take your analysis and learn how to create a detailed print map, quantifying the adjustments in seconds. We will then dive into the hands-on techniques, exploring the tools and motions required to successfully dodge and burn your way to a perfect print.