Welcome back. In our previous lesson, we focused on the crucial skill of analyzing a work print. You learned how to examine a straight print to identify which areas were too light or too dark, and to decide what you wanted to change to better realize your artistic vision for the image. This qualitative assessment is the essential first step.
Now, we will bridge the gap between that analysis and the final, refined print. This lesson is dedicated to translating your intentions into a concrete, repeatable plan. You will learn how to create a "print map"—a systematic set of instructions that details precisely where and for how long to perform your dodging and burning. For someone with your background in industrial engineering, this methodical approach of creating a process sheet for a creative task should feel both logical and powerful.
The Print Recipe: Your Standard Operating Procedure
Before we focus on the map for local adjustments, it's useful to think of the entire printing process as a "recipe." A great print is the result of many variables, and to reproduce it, you must control and record them. A print map is one component of this larger recipe.
Making and Keeping a Print Recipe - Michael Marks Photography
This article from Michael Marks Photography introduces the concept of a complete "print recipe" and its value.
Please read the entire article. Notice how it advocates for a systematic approach, forcing you to document each step. Pay attention to the two key parts: The general information recorded at the top (paper, enlarger settings, developer, etc.). The use of the rectangles as a visual map for dodging and burning, with specific symbols for each action.
This idea of a comprehensive recipe ensures that you can perfectly duplicate a print weeks, months, or even years later. It transforms printing from a series of one-off experiments into a controlled, repeatable manufacturing process for your art.
Quantifying Your Plan: From Analysis to Time
In the last lesson, you analyzed a print and decided, "The sky needs to be darker." Now we need to answer, "How much darker?" The answer is found by making targeted test strips for the specific areas you want to adjust.
You've already seen how to make a test strip for the overall base exposure. The process for finding dodge and burn times is identical, but you isolate the test to a small, specific region of the print.
Dodging & Burning for Beginners | Darkroom Session
The video "Dodging & Burning for Beginners" provides an excellent demonstration of this data-gathering phase. The printer has already made a 7-second straight print and identified that the sky is too light and the shadows under the car are too dark. Now, he quantifies the needed adjustments.
First, watch his process for the sky from testing the sky. He makes a test strip only in the sky area and determines that a 40-second exposure looks best. Next, observe his test for the shadows from testing the shadows. He tests the area under the car and finds that a 3-second exposure brings out the detail he wants.
This is the core of your A/B testing approach. You now have three key data points:
- Main Subject (Car): 7 seconds
- Sky: 40 seconds
- Shadows (Under Car): 3 seconds
From this, we can calculate the required adjustments relative to the base exposure:
- Sky Burn: 40s (desired) - 7s (base) = +33 seconds
- Shadow Dodge: 7s (base) - 3s (desired) = -4 seconds (meaning you block the light for 4 of the 7 seconds of base exposure)
You now have the quantitative "how much" to add to your print map.
Creating the Visual Map: The "Where"
With your times determined, you need a visual guide to show where to apply these adjustments. As the resources have shown, there are two common methods:
- Annotate a Work Print: Using a pen or marker, draw directly onto a straight work print. This is the most direct method.
- Trace a Projection: Place a sheet of plain paper on the easel, trace the outlines of the projected image, and make your notes on this sketch. This preserves your work print.
Whichever method you choose, you'll use symbols and notes to mark the locations for dodging and burning.
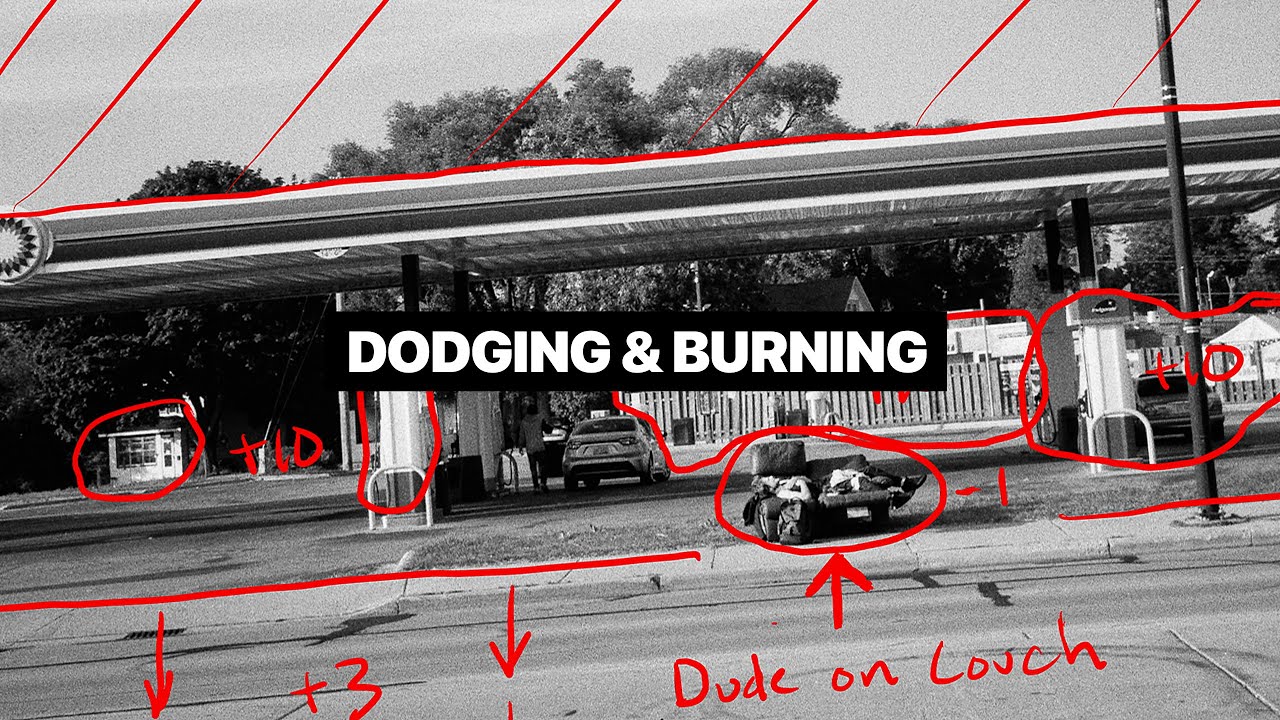
This map becomes your guide during the exposure. Sroyon Mukherjee's article on 35mmc, which we've consulted before, offers a fantastic overview of this planning stage.
Dodge, Burn and Other Heresies – Darkroom Technique ...
This section from the article provides clear examples of different types of print maps.
Please read the section titled "Dodge/burn map". Notice the two side-by-side examples: one drawn directly on a damaged work print, and one created by tracing the projection. Both are valid and effective methods.
A Note on F-Stop Timing
The 35mmc article also introduces a more advanced way to think about your exposure adjustments: f-stop timing. Rather than thinking in absolute seconds (e.g., "a 5-second burn"), you think in relative stops (e.g., "a +1 stop burn").
A +1 stop burn means you are doubling the amount of light hitting that area.
- On a 5-second base exposure, a +1 stop burn is an additional 5 seconds.
- On a 20-second base exposure, a +1 stop burn is an additional 20 seconds.
Thinking in stops provides a more intuitive feel for the effect of an adjustment, regardless of the base exposure. It's a more abstract but powerful system, akin to using standardized units in an engineering problem. You can plan your print in stops and then convert to seconds for the final map.
Assembling the Final Print Map
Your final print map should bring all this information together in a clear, concise format. Let's return to master printer Pablo Inirio's notation, which is a perfect shorthand.
In the Darkroom with Pablo Inirio: Dodging and Burning
In this short clip, Pablo Inirio from Magnum Photos explains his elegant notation system.
As a quick refresher, please re-watch the segment from his explanation of notation. A plus sign (+) means burning (adding light), and a minus sign (-) means dodging (subtracting light).
Let's combine everything for the car print from the Shoot Film Like a Boss video. A complete print map for that image might look like this on the back of a work print:
Print Recipe: 'British Ford'
- Paper: Ilford MG RC Pearl
- Developer: Ilford Multigrade 1+9 @ 20°C
- Enlarger Height: 60cm
- Lens: 50mm f/2.8
- Aperture: f/8
- Base Exposure: 7 seconds @ Grade 2.5
Manipulation Plan:
- Dodge (-4s): Area under car. Hold back light for 4 seconds during the 7-second base exposure.
- Burn (+33s): Sky area. After base exposure, give 33 additional seconds of exposure to the sky only.
- Burn (+10s): Headlight detail. A final, small burn to make the headlight pop.
(A sketch of the car would accompany this, with the areas circled and labeled with the instructions.)
For more complex prints, especially using the split-grade techniques you learned in Module 5, the map becomes even more vital. You can use different symbols or colors to distinguish between adjustments made during the soft (Grade 00) exposure and the hard (Grade 5) exposure. The 35mmc article shows excellent examples of this, with circles for soft exposures and squares for hard exposures.
Conclusion
You now understand how to move from a qualitative analysis to a quantitative and spatially-aware plan. The print map is the engineering blueprint for your photographic art. It ensures your printing sessions are efficient, your results are repeatable, and your creative decisions are captured for future reference.
Key Takeaways:
- A "print recipe" is a complete record of all variables needed to create a final print.
- The "print map" is the part of the recipe that details local adjustments.
- Dodge and burn times are determined by making targeted test strips on specific areas of the image.
- A visual map (on a work print or tracing) shows where to apply adjustments, using notation like
+for burn and-for dodge. - The map records the how much as calculated times (e.g., +33s) or relative stops (e.g., +0.5 stop).
Next Lesson Preview:
You have your blueprint. The plan is made. In the next lesson, we will get our hands dirty. You will learn about the various tools—from your own hands to specialized wands and cards—and the physical techniques required to flawlessly execute the instructions on your print map.