Welcome back. In our previous lesson, we moved from analysis to fabrication, learning how to create the physical tools needed to execute your printing plan. You now have a print map that serves as a schematic and the knowledge to build the wands and masks required for the job.
This lesson marks our transition from preparation to execution. We will focus on the first of the two major local adjustment techniques: dodging. You will learn how to perform this technique to selectively lighten parts of your print, thereby recovering detail that would otherwise be lost in shadow. We will cover the mechanics of the process, a systematic way to calculate your dodging times, and finally, how this technique integrates into the more advanced workflow of split-grade printing.
The Principle of Dodging: Controlled Subtraction
At its core, dodging is a process of controlled light subtraction. Where your work print shows an area that is too dark—where shadow details are obscured—you need to give that part of the paper less exposure than the rest of the print. You accomplish this by using a tool to cast a moving shadow over that specific area for a portion of the total exposure time.
Dodge, Burn and Other Heresies – Darkroom Technique ...
This article from 35mmc provides a concise definition and rationale for dodging and burning.
Please read the introductory paragraphs, starting from the beginning. The author clearly defines dodging as the technique of lightening areas by blocking enlarger light.
The goal, as the article mentions, is to "have the cake, and eat it"—to achieve rich detail in both the bright and dark areas of your image, something often impossible with a single, straight exposure.
From Plan to Action: Executing the Dodge
Having a plan and a tool is one thing; using them effectively is another. The process involves precise timing and deliberate motion to ensure the final adjustment is seamless. The following video from ILFORD Photo provides an excellent demonstration of the entire workflow.
Dodge & Burn - ILFORD PHOTO Darkroom Guides
This video walks through the practical steps of dodging a print to bring out detail.
First, watch the introduction from the start to see a clear example of a print that benefits from local adjustments. Next, see how a simple dodging tool is prepared and how to use it. Pay close attention to the technique described as you watch from making a mask. The presenter's advice to keep the tool moving as if "sprinkling sugar" is key to feathering the edges. Finally, watch the actual exposure from the exposure. Notice how the total exposure time is 5 seconds, and the dodge is performed for the final 1.5 seconds. This is the core of the technique in practice.
A Systematic Approach to Timing
In the video, the dodging time was predetermined. But how do you calculate it? While you can use test strips, a more systematic method, well-suited to an engineering mindset, is to think in percentages. This makes your print map more robust and adaptable.
For instance, if your print map calls for a "25% dodge" in a certain area, this instruction remains valid whether your base exposure is 12 seconds or 25 seconds.
- For a 12-second base exposure, a 25% dodge means you block the light for seconds.
- If you make a larger print and your new base exposure is 25 seconds, the same 25% dodge now corresponds to seconds.
This proportional approach maintains the relative tonal relationship you intended, regardless of changes in enlargement size or paper characteristics.
Making Dodging and Burning Tools For Your Darkroom
In this video, which you saw parts of in the last lesson, the presenter explains the logic behind using percentages for dodging and burning times.
Please watch the section from calculating times. This method provides a transferable, process-controlled way to plan and execute your adjustments.
Technique: Mastering the Motion
As you've now seen, the key to an invisible dodge is constant, gentle motion. This feathers the edge of the tool's shadow, creating a soft penumbra that blends the dodged area into its surroundings. Holding the tool perfectly still, or too close to the paper, will result in a hard, obvious line—a clear sign of the manipulation.
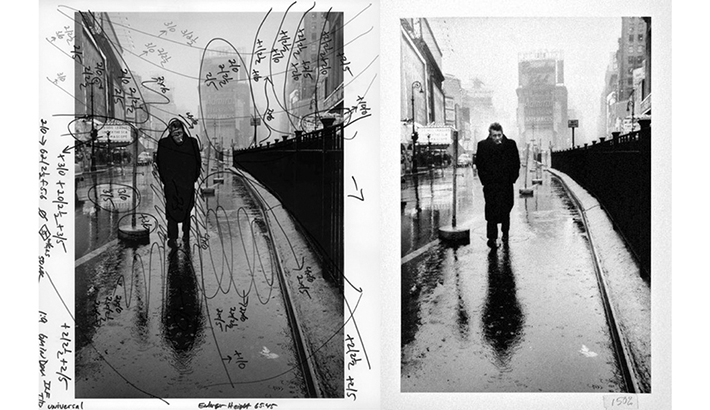
The image below, from a previous resource, perfectly illustrates the planning stage that leads to this process. The scribbled notes on the work print are the direct instructions for the dodging and burning to be performed.
Example in Practice: Opening the Shadows
Let's look at a concrete example from the 35mmc article. The author works on a print titled Forest Path. The initial straight print has a dark tree trunk where shadow detail is lost.
Dodge, Burn and Other Heresies – Darkroom Technique ...
This section provides a before-and-after example of a print improved with dodging.
Please read the section titled "Print 2: Forest Path". The author explains that during the base exposure, they "dodged the base of the tree trunk with my dodging tool for 11 secs, to open up some more of the shadow detail." Observe the A/B comparison at the end of the section to see the dramatic improvement in the tree trunk's detail.
This is a classic application of dodging: reclaiming information that exists on the negative but is lost in a straight print due to the high density of the surrounding areas.
Advanced Application: Dodging in Split-Grade Printing
Dodging becomes an even more nuanced and powerful tool when combined with split-grade printing. As you know, this technique involves two separate exposures: one with a low-contrast filter (e.g., Grade 0 or 00) to control the highlights, and one with a high-contrast filter (e.g., Grade 5) to control the shadows and blacks. The question is, during which exposure should you dodge?
The answer might seem counterintuitive. To increase detail and tonal separation in the shadows, you dodge during the low-contrast (soft) exposure.
Here is the reasoning:
- The low-contrast exposure lays down the overall density, including in the shadow areas.
- By dodging a shadow area during this soft exposure, you are holding back its base density. You are making it slightly lighter than it would otherwise be.
- When you then follow up with the high-contrast (hard) exposure, this exposure primarily adds density to the darkest parts of the image, "snapping" the blacks into place. Because you've held back the initial density in your dodged shadow area, it now has more room to breathe, revealing subtle textures instead of blocking up into a uniform black.
The ILFORD guide on split-grade printing states this principle clearly.
Split grade printing - Ilford Photo
This guide from ILFORD explains the principles of split-grade printing and how to incorporate local adjustments.
Focus on the sections titled "Next steps." Specifically, read the first bullet point under this heading: "To increase shadow detail...". It also notes that dodging during the low contrast exposure can be used to give highlights subtle detail.
This technique is demonstrated in the Viking Ship example from the 35mmc article. The image sequence shows the photographer dodging different areas during the soft exposure to control the final tonality.
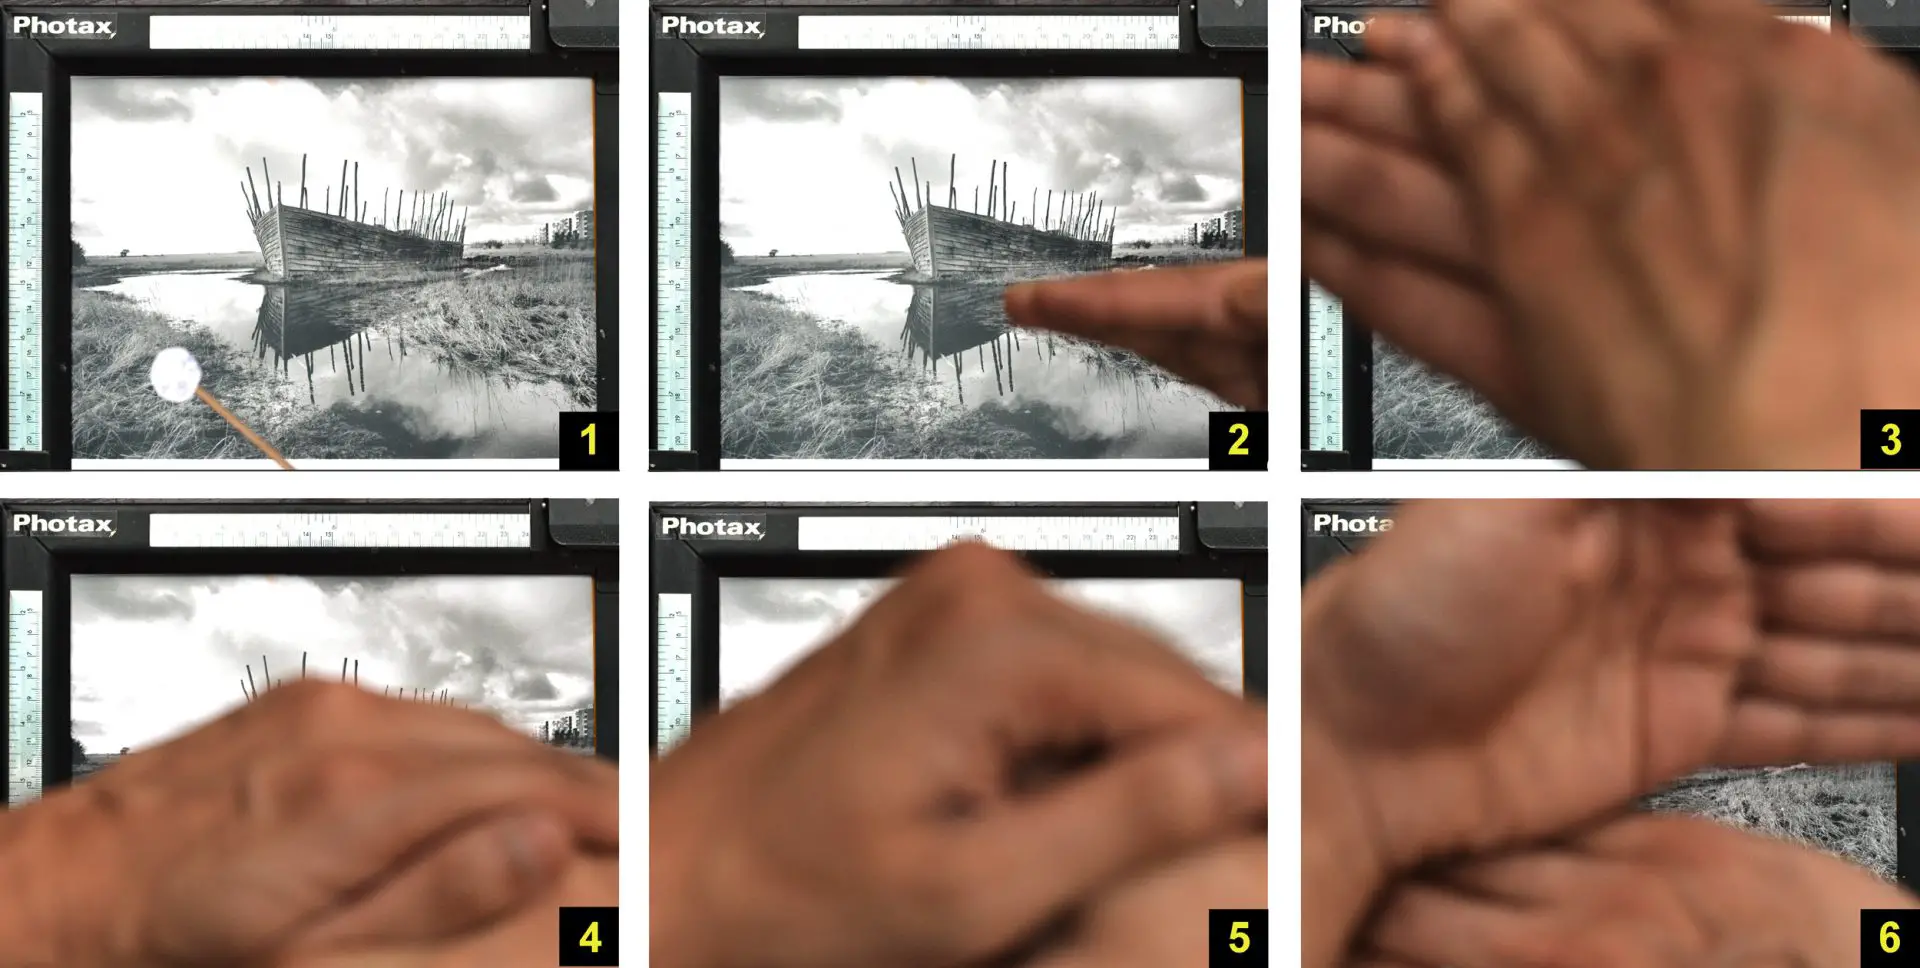
In Fig 1, the dodging tool is used on a patch of grass. In Fig 2, the photographer's hand is used to dodge the entire right bank. Both of these actions are performed during the initial soft (low-contrast) exposure to precisely manage local contrast and detail.
Conclusion
You have now learned the theory and practice of dodging. This technique is the first fundamental tool for moving beyond a "straight" print and starting to interpret the negative, guiding the viewer's eye and ensuring that no important detail is lost to darkness.
Key Takeaways:
- Dodging is the process of subtracting light from a specific area during the base exposure to make it lighter.
- A systematic approach, such as calculating dodging times as a percentage of the base exposure, leads to repeatable and scalable results.
- The physical technique is paramount: keep the tool in constant motion and use its height to create a soft, feathered edge that blends invisibly.
- In split-grade printing, dodging during the low-contrast (soft) exposure is a powerful method for enhancing shadow detail and separation.
Next Lesson Preview:
Having mastered the art of holding back light, we will next explore its opposite: adding light. In the upcoming lesson, you will learn how to perform burning-in, a technique used to darken specific areas of a print, add richness to highlights, and create dramatic emphasis.