Welcome back. In our last lesson, you mastered the art of dodging—selectively holding back light to reveal detail in the shadows. We now turn our attention to the complementary technique: burning-in. Where dodging is about subtraction, burning is about addition. It is the art of giving specific areas of your print more light to achieve the desired density and detail.
This lesson will equip you to perform burning-in. We will cover its core principles, how to calculate the correct exposure time for a burn, the physical techniques required for a seamless result, and how burning integrates into the sophisticated workflow of split-grade printing. By the end, you will be able to control the bright areas of your image with the same confidence you now have over the shadows.
The Principle of Burning-In: Controlled Addition
In your work prints, you've likely encountered areas that are too bright—a sky that is a flat white, a reflection that lacks texture, or a face that appears washed out. Burning-in is the technique used to correct this. After the main exposure for the print is complete, you selectively expose these bright areas to additional light, darkening them to reveal detail and add visual weight.
The core principle is simple and a direct consequence of how photographic paper works: more light exposure results in a darker tone after development. Burning is just a localized application of this principle.
Dodge, Burn and Other Heresies – Darkroom Technique ...
This article from 35mmc by Sroyon Mukherjee, which we consulted in our last lesson, provides an excellent introduction to burning-in.
Please read the first two sections, "Why manipulate". The author defines burning as giving print areas additional exposure and lists the many artistic reasons for doing so, from revealing detail to guiding the viewer's eye.
The fundamental reason we need to burn is that film captures a much wider range of tones, especially in the highlights, than photographic paper can reproduce in a single "straight" exposure. A dense area on the negative (like a bright sky) holds back so much light that, in the time it takes to properly expose the mid-tones, the paper underneath the sky receives almost no light, rendering it white. Burning-in allows us to give that area the extra time it needs.
This short video provides a practical look at how a negative's density relates to the final print and identifies areas that will require burning.
Dodging & Burning for Beginners | Darkroom Session
The presenter from Shoot Film Like a Boss explains how to "read" a negative to anticipate printing challenges.
Watch from this section. Notice how the presenter analyzes the negative, identifying the very dense sky and the very thin shadow areas. He correctly predicts that the dense sky will print as white and will need to be burned-in to reveal any detail.
From Plan to Action: Calculating and Executing the Burn
Just as with dodging, successful burning requires a methodical plan. The process begins with your work print and a print map, but adds a crucial step: making test strips for the specific areas you intend to burn.
Calculating Burn Times with Test Strips
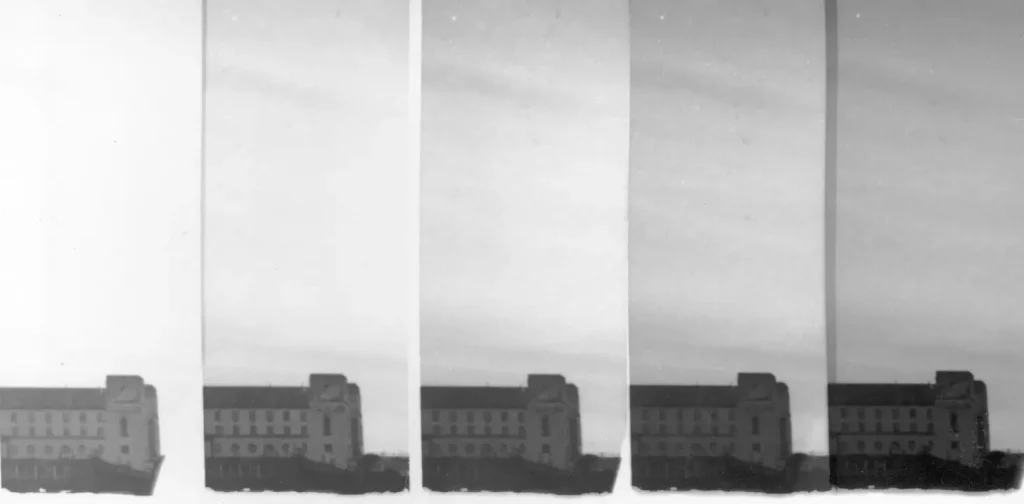
Since burning-in involves adding exposure to areas that are very bright, the required times can be substantial. The only reliable way to determine this is to make a dedicated test strip for that area.
The image below shows a series of burn tests for the sky in a landscape photo. Each strip receives a progressively longer additional exposure, allowing the printer to see exactly how much time is needed to bring out the cloud detail.
This practical video demonstrates how to create such a test strip.
Dodging & Burning for Beginners | Darkroom Session
This clip shows the process of making a test strip specifically for a dense sky.
Watch from this segment. The presenter exposes a strip in increments of 10 seconds to find the 40-second exposure that reveals the sky detail he wants. This is a perfect example of a systematic approach.
Once you determine the necessary time, you add this instruction to your print map. The map becomes your guide during the complex choreography of printing.

Tools and Technique
The tools for burning are often the inverse of dodging tools. While dodging uses a small object to block light, burning often uses a large card to block most of the light, with a hole or shaped edge allowing light to pass through to a specific area.
Common tools include:
- Your hands: Cupped, shaped, and moved, they are the most versatile burning tools you have.
- Cardboard masks: A large piece of black card can be used to shield the majority of the print while you burn in an edge, like the sky along a horizon.
- Cards with holes: For burning in smaller, internal areas of the print, a card with a small hole acts like a spotlight, directing the extra exposure exactly where it's needed.
The most critical aspect of the technique, regardless of the tool, is constant motion. To avoid sharp, unnatural edges, the tool must be kept moving and bobbing slightly. This feathers the boundary of the burned area, creating a gradual transition that is invisible to the viewer.
This next video provides an exceptional in-depth demonstration of the entire burning process, from the tools to the final execution.
Mastering Darkroom Dodging and Burning Techniques
The presenter from DistPhoto walks through a complete, multi-step burning plan for a complex image. This is a masterclass in technique.
Tools and Feathering: Watch from this section to see the tools used (mat board and a card with a hole) and the crucial explanation of how to keep them moving to feather the edges. Practice Run: From this point, the presenter does a "dry run" without paper. This is an excellent practice to adopt, especially for complex sequences. He talks through each step, including burning the sky, the foreground, and specific highlights. The Final Print: Now watch the real thing from the actual printing. Observe how he executes the plan, including changing filters for different burns. The Result: Finally, see the result from the final print and how the burning has successfully brought detail into the sky and controlled distracting highlights.
Advanced Application: Burning in Split-Grade Printing
Burning becomes an even more powerful and nuanced tool in split-grade printing. By choosing whether to add your burn during the soft (low-contrast) or hard (high-contrast) exposure, you can control not just the brightness of an area, but also its local contrast.
- Burning during the Soft Exposure (Grade 00/0): This is often called a "soft burn." Because the low-contrast filter primarily affects the highlights, a soft burn is excellent for adding detail to bright areas without significantly darkening adjacent mid-tones or shadows. It's the perfect tool for revealing delicate cloud textures or the subtle sheen on a bright surface.
- Burning during the Hard Exposure (Grade 5): This is a "hard burn." The high-contrast filter primarily adds density to the shadows. A hard burn will increase the local contrast in the area being burned, making the blacks blacker and creating more separation. It is useful for adding drama or "snap" to a specific part of the image.
The 35mmc article provides a superb example of this with the Millennium Bridge print.
Dodge, Burn and Other Heresies – Darkroom Technique ...
This section details a practical example of split-grade burning.
Please read the section titled "Print 3: Millennium Bridge". Pay close attention to the rationale for the split-grade manipulation. The author uses a Grade 4 base exposure but then switches to a Grade 1 burn for the sky. He explains this "soft burn" allows him to darken the sky and reveal cloud detail without making the dark structure of the bridge below it unnaturally black, which a Grade 4 burn would have done. This is a perfect example of using the right tool for the job.
This principle is also reinforced in the technical notes from photographer Dave Butcher.
black and white darkroom printing technical notes - Dave Butcher
These technical notes concisely explain the interaction between exposures in split-grade printing.
Read the bullet points in this section. Note the advice: "To add more detail in these highlights increase the low contrast exposure time" and "If it is difficult to put detail into the highlights using burning-in then reduce the grade used towards 0 for the basic low contrast exposure". This directly supports the technique of using a soft burn to control highlights.
Conclusion
You have now explored burning-in, the essential counterpart to dodging. By mastering the controlled addition of light, you gain command over the entire tonal range of your print. You can now ensure that bright skies have dramatic clouds, that highlights possess rich texture, and that the viewer's eye is drawn precisely where you intend it to go.
Key Takeaways:
- Burning-in is the technique of adding extra exposure to specific areas of a print to make them darker.
- It is essential for managing the dynamic range of a scene, particularly for revealing detail in highlights that would otherwise be "blown out" to pure white.
- Planning is critical: use a work print and print map, and create dedicated test strips to determine the correct burn times.
- The physical technique requires constant, gentle motion of the burning tool (hands or cards) to create a seamless, feathered blend.
- In split-grade printing, a "soft burn" (during the low-contrast exposure) is ideal for adding detail to highlights, while a "hard burn" (during the high-contrast exposure) adds local contrast and density.
Next Lesson Preview:
In our final lesson of this module, we will focus on a specific, powerful application of burning-in: edge and corner burning. You will learn how to use this technique to create a subtle vignette, which helps to frame your subject and add a sense of depth and focus to your final prints.