Welcome back. In our previous lesson, you learned the essential technique of burning-in, allowing you to add density and reveal detail in the highlights of your prints. We discussed how to plan and execute these burns, including their nuanced application in split-grade printing. Today, we will focus on a specific and highly creative use of this skill: edge and corner burning.
This lesson goes beyond simple tonal correction. You will learn how to apply burning techniques deliberately to the periphery of your image to guide the viewer's eye, create a sense of depth, and strengthen the overall composition by framing your subject. This is the final step in this module on local adjustments, transforming your print from a competent record into an intentional, expressive piece of work.
The Art of Composition: Guiding the Viewer's Eye
Why should we intentionally darken the edges of a print? The reason lies in a fundamental principle of visual perception: our eyes are naturally drawn to the brightest parts of an image. By subtly darkening the corners and edges, you create a visual container that discourages the viewer's eye from wandering out of the frame. This technique, often called creating a vignette, funnels attention towards your primary subject.
The master printer Michael Kenna describes this as using light like a sculptural tool. He approaches printing not by thinking about the subject matter, but by seeing the image as an abstract arrangement of tones.
Michael Kenna's Darkroom Diaries | Chapter 2 - Bosham Gallery
In this chapter from his darkroom diaries, Michael Kenna explains his philosophy of printmaking, which is highly relevant to our topic.
First, read the paragraph beginning "Generally, when I print". Kenna explains his goal of balancing elements to direct viewers. Note his powerful analogy: "When we darken an area in the print, we pull it forwards in space. When we lighten an area we push it back into the emulsion." This connects to the illusion of three-dimensionality. Next, read the following paragraph, starting "When printing I try to forget". He provides a direct and powerful explanation for our technique: "Dark edges move the eye to the centre of the print so corners are often subtly or more obviously darkened."
This idea isn't just about correcting an overly bright corner; it's a proactive compositional choice. By darkening the periphery, you add visual weight, frame the subject, and can dramatically alter the mood of the photograph.
Planning and Executing the Burn
The process for edge and corner burning builds directly on what you learned in the last lesson. It starts with analyzing your work print and creating a plan.
- Analyze the Work Print: With your work print in front of you, squint your eyes to blur the details and see the image as patches of tone. Do the corners or edges feel too bright? Does your eye get pulled away from the main subject?
- Create a Print Map: On your work print or a separate diagram, mark the areas you intend to burn. Unlike a spot burn on a specific object, these marks will likely be broad strokes or shaded areas along the edges. It's still crucial to determine the time needed through localized test strips.
The image below, from a video we'll watch shortly, is a perfect example of a print map that includes edge burning. The photographer has planned to burn the sky at the top and the street at the bottom, marked as +3, to focus attention on the "Dude on Couch" in the middle.
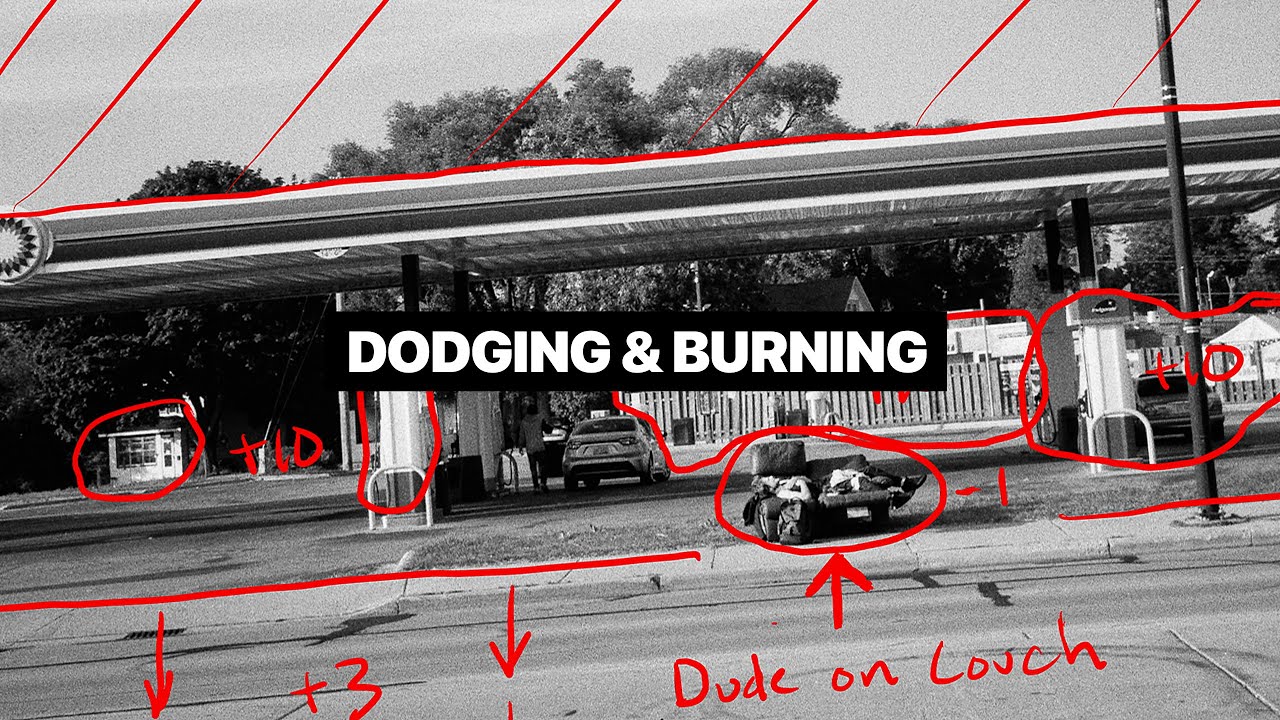
The tools are the same—your hands and cardboard masks—but the technique is adapted for broad, soft application.
- Hands: Cupping your hands to form an arc or a soft-edged slit is often the most intuitive method for burning corners and edges.
- Cardboard: A large piece of black card is perfect for burning along a straight edge, like the horizon. You can hold the card to block the main image while allowing extra light to spill onto the sky.
The key to a successful edge burn is a soft, gradual transition. This is achieved through constant motion. The card or your hands should be continuously moving, bobbing up and down, and rocking back and forth. This "feathering" motion blends the additional exposure seamlessly into the print.
Let's watch two demonstrations. The first is a very methodical application, and the second is more dramatic.
Mastering Darkroom Dodging and Burning Techniques
The presenter from DistPhoto, whose print map we just saw, demonstrates his plan. This is an excellent example of a controlled, multi-step process.
First, watch his plan from the setup. He explicitly states his intent to "burn the sky in" and "burn on the street just to dull it down and draw your eye back up". Now, watch the practice run from the demonstration. Pay close attention to how he handles burning the sky along the roofline (sky burn) and then how he "fans" the burn onto the street at the bottom (street burn). This is a masterclass in subtle framing.
For a more pronounced effect, sometimes called "vignetting," you might burn all four corners and edges to create a strong central focus.
Dodging & Burning for Beginners | Darkroom Session
In this clip from Shoot Film Like a Boss, the printer decides to add a significant edge burn to his final print to show the technique's potential.
Watch from this section. He uses a circular dodging tool (in reverse, for burning) to "vignette the out of it," darkening the top and edges to further enclose the subject. Notice the constant circular motion he uses to keep the effect smooth.
Case Studies in Compositional Burning
Seeing the effect in different contexts is the best way to understand its power. The following examples all use edge and corner burning to enhance the final composition.
Dodge, Burn and Other Heresies – Darkroom Technique ...
This article by Sroyon Mukherjee provides several outstanding before-and-after examples of prints transformed by dodging and burning. We will focus on the compositional burns.
Please review the following print examples. For each one, compare the "straight print" on the left with the final "new print" on the right, and read the author's explanation. Print 2: Forest Path: Find the section for this print. The author explicitly states, "Burning the bottom-right gently ‘leads’ the eye into the print and up the path." Print 3: Millennium Bridge: In the section for this print, the author uses a soft Grade 1 burn on the top-right corner of the sky, "drawing the eye into the frame." Print 4: Anasua by the Lakes: For this print, after several other adjustments, the author adds a final touch: "I subtly burned in the top-left corner to lead the eye into the image." Print 5: Viking Ship: In this complex print, the author adds a soft burn to the bottom left "to lead the eye in" and a "hard burn" to the top corners to add "dramatic shadow detail."
In each case, these small, intentional additions of light at the periphery have a profound impact on how we experience the final image, guiding our journey through the scene.
Conclusion
You have now completed the final lesson in our module on local adjustments. Edge and corner burning is a sophisticated technique that elevates your printing from a technical exercise to an artistic practice. By learning to control where the viewer looks, you take full command of your image's narrative and impact.
Key Takeaways:
- Edge and corner burning is a compositional tool used to frame a subject and guide the viewer's eye.
- The technique works by subtly darkening the periphery of the print, as the human eye is naturally drawn towards lighter areas.
- Planning involves analyzing a work print for distracting bright edges and marking them on a print map.
- Execution requires smooth, constant motion of your hands or a cardboard mask to feather the edges and create a seamless, natural-looking vignette.
- Even very subtle corner burns can significantly strengthen a composition by adding depth and eliminating visual escape routes for the viewer's eye.
Next Lesson Preview:
You now possess the skills to create a refined, well-exposed, and thoughtfully composed print. In our next lesson, we will begin the final module, "Finishing and Final Print Evaluation," by addressing the essential practical steps of correctly washing and drying your RC paper prints to ensure their longevity and archival stability.