Welcome back to the darkroom. In our last lesson, you mastered the art of edge and corner burning, the final creative step in manipulating light to guide the viewer's eye and perfect your composition. You've now taken a negative and shaped it into a print with carefully controlled exposure and tonality. However, the print lying in the fixer tray is not yet complete. To ensure your hard work lasts a lifetime, it must be properly finished.
This lesson marks the beginning of our final module, "Finishing and Final Print Evaluation." We will now shift our focus from the creative act of exposure to the critical procedures of processing that guarantee the physical integrity and archival stability of your photograph. You will learn the correct methods for washing and drying your Resin-Coated (RC) paper prints, a crucial stage where efficiency and precision are key to a successful outcome.
The Purpose of Washing: Ensuring Archival Permanence
After fixing, your print is saturated with chemicals, most notably sodium thiosulphate (or ammonium thiosulphate) from the fixer. While essential for making the image permanent by removing unexposed silver halides, any fixer left in the print will, over time, attack the metallic silver that forms the image, causing it to fade and discolour.
The primary purpose of washing is to remove these residual chemicals.
[PDF] WASHING PHOTOGRAPHIC FILM & PAPERS - Ilford Photo
This technical information sheet from Ilford Photo clearly explains the fundamental reason we wash our prints.
Please read the short section titled "Purpose of washing". The key takeaway here is that residual thiosulphate leads to "long-term image degradation." This is the scientific basis for the entire washing process.
The Anatomy of an RC Print
To understand how to wash RC paper correctly, it's essential to understand its structure. Your choice to focus on RC paper is particularly relevant here, as its construction is engineered for speed and ease of use, drastically changing the washing requirements compared to traditional fiber-based papers.
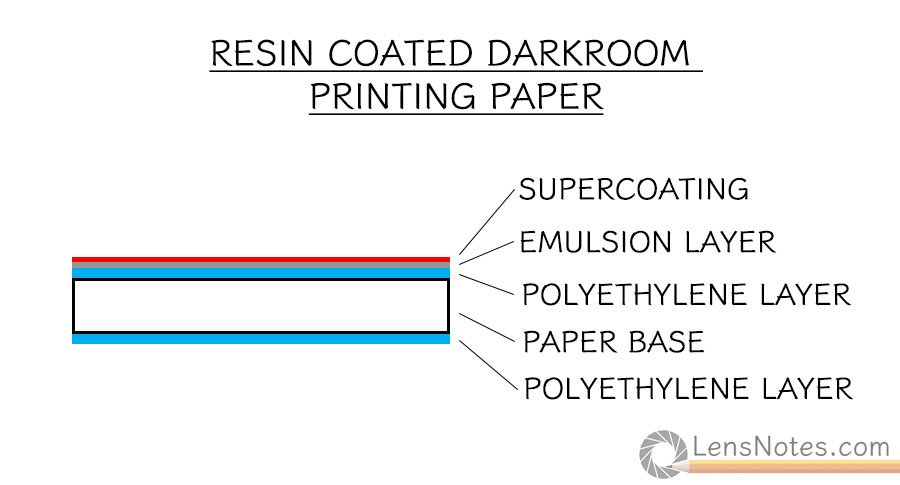
As the diagram shows, the paper base is encapsulated between two polyethylene (resin) layers. The light-sensitive emulsion is coated on top of this structure. These resin layers are waterproof, preventing chemicals from soaking into the paper fibers. This is why RC paper can be processed so quickly.
However, this design has a crucial vulnerability: the edges. The paper base is exposed at the very edge of the sheet. As the official Ilford guidance warns, this is a critical point to remember.
[PDF] PROCESSING B&W PAPER - Ilford Photo
This document provides the official manufacturer specifications for processing Ilford's RC papers.
Focus on the note within the "Washing" section. Read the sentence beginning "Prolonged immersion". This highlights the primary risk associated with RC paper: water seeping into the edges can cause the paper to swell and the layers to separate.
This is the central trade-off of RC paper: speed and convenience in exchange for a vulnerability to over-soaking.
RC Paper Washing Procedures
Proper washing is about achieving a balance: sufficient water flow to remove the fixer, but not so long that you risk damaging the print. Effective washing relies on a continuous supply of fresh water across the entire surface of the print.
Ilford provides two primary methods for tray processing:
- Running Water Wash: A wash of two minutes in fresh, running water (above 5ºC/41ºF) is sufficient. For maximum speed, a vigorous wash for just 30 seconds can be effective, provided the water is circulating very well.
- Three-Tray Sequence: This is a water-saving method. Place the print in three consecutive trays of still water, agitating for at least 15 seconds in each. The water in the trays should be replaced after each printing session.
A common failure point is simply leaving prints in a tray with a hose running into it. The prints can stick together, preventing water from reaching the emulsion and rendering the wash ineffective. A dedicated print washer solves this by using jets or dividers to keep prints separated and ensure constant circulation. While commercial washers exist, understanding their function is key.
In this video, The Naked Photographer explains why a dedicated RC print washer is superior to simpler methods. While the video details a full DIY build, his introduction clearly outlines the engineering problem you're trying to solve.
Watch the first part of the video from the explanation. The creator expresses a lack of confidence in a simple tray siphon for thorough washing and notes that large vertical washers for fiber prints are inefficient for RC paper. This highlights the need for a solution specifically designed for the rapid and efficient washing of single RC prints.
Accelerating the Process: Hypo Clearing Agent
To increase the efficiency of washing and add a further layer of security, you can use a hypo clearing agent (also called a washing aid). This is not a "cleaner" in the traditional sense. It is a salt solution (typically containing sodium sulphite) that works through ion exchange. The sulphite ions have a stronger affinity for the thiosulphate ions attached to the print than water does, causing them to be displaced and released from the emulsion far more effectively. This dramatically reduces the required wash time.
While commercial products like Ilford's Washaid exist, you can make a highly effective hypo clear with a common household chemical.
Want to half your print wash time? Let's make hypoclear!
This video from Pictorial Planet demonstrates how to make and use a simple, inexpensive hypo clearing agent.
First, watch how to prepare the solution using just sodium bicarbonate (baking soda) and water. Next, watch the washing sequence. The process is: A brief initial rinse in water (1 minute) to remove gross fixer. Agitate in the hypo clear bath (2 minutes). A final wash, for which the time can be halved. For an RC print, a final wash of just five minutes is ample.
Using a hypo clear step is excellent practice. It ensures a more thorough removal of fixer and provides a significant margin of safety, all while saving water and time.
Drying Your RC Prints
Correct drying is the final step to achieving a flat, professional-looking print.
The Golden Rule: As stated in the Ilford documentation, never use a heated drum or flatbed glazer/ferrotype dryer designed for fiber paper. The heat will melt the polyethylene coating, permanently bonding your print to the machine's surface.
There are two recommended methods for drying RC prints:
-
Air Drying: This is the simplest and most accessible method.
- After the final wash, it's good practice to give the print a final rinse in a tray containing a wetting agent (like Ilford Ilfotol) diluted according to instructions. This helps water sheet off the surface evenly and prevents drying spots.
- Remove excess water from the print surface using a high-quality, clean squeegee or a lint-free photo sponge.
- You can then hang the prints from a line using clips on the corners or lay them face-up on a clean, mesh drying rack.
- At room temperature, prints should be dry in about 10-20 minutes.
-
Dedicated RC Dryers:
For faster, more consistent results, dedicated RC paper dryers are available. These machines use a combination of rollers and warm air to dry prints quickly and ensure they remain perfectly flat.

While an investment, these dryers are invaluable if you plan to produce a large volume of prints and need them dried quickly without taking up space on drying racks.
Conclusion
You now have a complete workflow for the final wet-side processing of your prints. By understanding the unique structure of RC paper, you can perform an efficient and archivally sound wash, avoiding the pitfalls of under-washing or over-soaking. Correct drying then ensures the physical quality of the final object.
Key Takeaways:
- Washing is essential to remove residual fixer (thiosulphate), which would otherwise degrade the silver image over time.
- RC paper's polyethylene coating makes it wash quickly but leaves its edges vulnerable to water damage if soaked for too long (e.g., more than 15 minutes).
- Effective washing requires constant water circulation. A two-minute running water wash or a three-tray sequence are standard methods.
- A hypo clearing agent uses a salt solution to displace fixer more efficiently than water alone, shortening wash times and improving archival permanence.
- RC prints can be air-dried on lines or racks. Never use a hot glazer or ferrotype dryer, as the resin will melt.
Next Lesson Preview:
Your print is now developed, washed, and dried. It is a complete photograph. However, even with the most careful technique, small white specks from dust on the negative or paper are almost inevitable. In our next lesson, you will learn how to perform the final finishing touch: using spotting dyes to retouch these minor blemishes and create a flawless final print.