Introduction
Hello! In our last lesson, we learned how to represent a graph in Python using an adjacency list. This was a crucial first step, giving us a practical way to store the connections within a network.
Now that we can store a graph, we need a way to explore it. How do we systematically visit every vertex and edge? This process is called graph traversal, and it's a cornerstone of many powerful algorithms. Today, you will learn and implement one of the most fundamental traversal algorithms: Breadth-First Search (BFS).
BFS explores a graph layer by layer, starting from a given vertex. It's like dropping a pebble in a pond: first, you see the ripples closest to the center, then the next layer of ripples, and so on. By the end of this lesson, you will be able to implement the BFS algorithm using a queue to traverse a graph represented by an adjacency list. This is a very common algorithm that frequently appears in technical interviews.
What is Breadth-First Search?
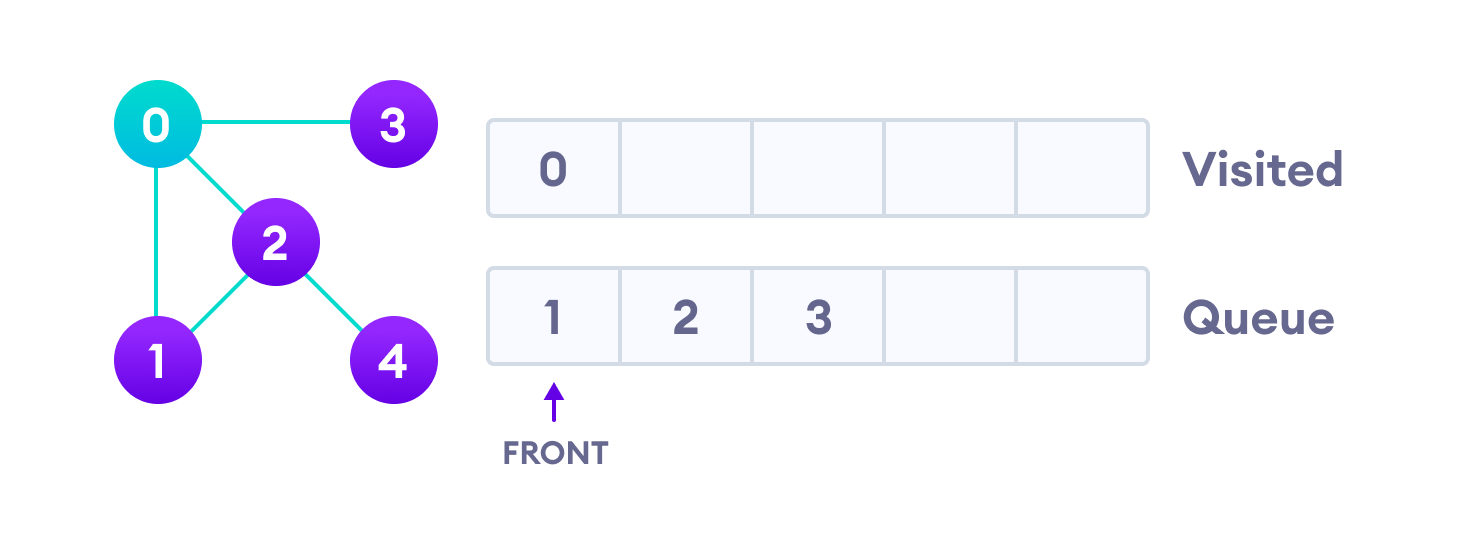
Breadth-First Search (BFS) is an algorithm for traversing a graph. It starts at a chosen "source" vertex and explores all of its immediate neighbors. Then, for each of those neighbors, it explores their unvisited neighbors, and so on, until all reachable vertices have been visited.
This level-by-level exploration has an important property: in an unweighted graph, the first time BFS reaches a vertex, it has found the shortest path (in terms of the number of edges) from the source to that vertex.
To visualize how BFS works, we'll watch a short, animated explanation. Pay close attention to the two key data structures it uses: a queue to manage which node to visit next, and a visited set to keep track of nodes we've already seen.
Breadth First Search Visually Explained | BFS | Graphs
This video from ByteQuest provides an excellent visual walkthrough of the BFS algorithm. It clearly shows how nodes are added to and removed from the queue, and how the 'visited' set prevents the algorithm from getting stuck in loops.
Watch the video from the beginning until 03:35. Focus on understanding the role of the queue (First-In, First-Out) in ensuring the level-by-level traversal.
As you saw, the algorithm relies on three components:
- The Graph: Represented as an adjacency list, just as we learned in the previous lesson.
- A Queue: To store the vertices that are waiting to be explored. The FIFO (First-In, First-Out) nature of the queue is what ensures we explore level by level.
- A Visited Set: To keep track of the vertices we have already visited. This is essential to avoid processing the same vertex multiple times and to prevent getting caught in an infinite loop if the graph contains cycles.
The BFS Algorithm Step-by-Step
Let's formalize the process you saw in the video into a clear, step-by-step algorithm.
Imagine we have a graph and a starting vertex.
-
Initialization:
- Create a
queueand add the starting vertex to it. - Create a
visitedset to store vertices we've already seen. Add the starting vertex to this set.
- Create a
-
Exploration Loop:
- While the
queueis not empty, do the following:
a. Dequeue: Remove the vertex from the front of the queue. Let's call itcurrent_vertex.
b. Process: Do something withcurrent_vertex(e.g., print its value).
c. Enqueue Neighbors: Look at the neighbors ofcurrent_vertexfrom our adjacency list. For eachneighbor:
i. If theneighboris not in thevisitedset:
- Add theneighborto thevisitedset.
- Add theneighborto the back of thequeue.
- While the
-
End:
- Once the queue is empty, it means we have visited every vertex reachable from the starting vertex. The algorithm terminates.
Implementing BFS in Python
Now, let's translate this algorithm into Python code. This is where your knowledge from previous lessons on functions, loops, and data structures comes together.
We will use the adjacency list representation from our last lesson. For the queue, we'll use collections.deque, which is a highly efficient double-ended queue. While you can use a Python list, removing items from the front with list.pop(0) is slow. deque.popleft() is much faster, a detail that's important in a technical interview context.
Breadth-First Search in Python: A Guide with Examples
The article from DataCamp provides a good explanation of why using a proper queue implementation like deque is important. It also offers a clean, well-commented code example.
Read the sections 'Implementing the Breadth-First Search in Python' and 'Potential Issues'. Focus on the code implementation and the explanation about 'incorrect queue usage'.
Let's look at a complete implementation. The following code defines a graph and then implements the BFS function exactly as described.
# First, we need to import deque from the collections module
from collections import deque


# We'll use the graph representation from the Educative.io article
graph = {
  'A' : ['B','C'],
  'B' : ['D', 'E'],
  'C' : ['F'],
  'D' : [],
  'E' : ['F'],
  'F' : []
}

def bfs(graph, start_node):
    """
    Performs a Breadth-First Search on a graph.

    Args:
        graph (dict): The graph represented as an adjacency list.
        start_node (str): The node to start the traversal from.
    """


    # 1. Initialization
    visited = set()       # A set to keep track of visited nodes.
    queue = deque([start_node]) # A queue for nodes to visit, starting with the start_node.
    visited.add(start_node)


    # 2. Exploration Loop
    while queue:


        # a. Dequeue a vertex from the front of the queue
        current_node = queue.popleft()
        print(current_node, end=" ") # b. Process the node (in this case, print it)


        # c. Enqueue all unvisited neighbors
        for neighbor in graph[current_node]:
            if neighbor not in visited:
                visited.add(neighbor)   # Mark neighbor as visited
                queue.append(neighbor)  # Add neighbor to the queue


# Let's run the BFS starting from node 'A'
print("BFS traversal starting from node A:")
bfs(graph, 'A')
When you run this code, the output will be:BFS traversal starting from node A:A B C D E F
This order perfectly reflects the level-by-level traversal:
- Level 0:
A - Level 1:
B,C - Level 2:
D,E,F

Practice Tracing
To solidify your understanding, try to trace the BFS algorithm yourself on a piece of paper.
Given the following graph and starting at node 0:
graph = {
    0: [1, 2],
    1: [2],
    2: [0, 3],
    3: [3]
}
Track the following:
- The
queueat the beginning of each loop iteration. - The
visitedset as it grows. - The final output (the order nodes are printed).
Click here for the solution
- Initial State:
queue = deque([0]),visited = {0} - Loop 1:
popleft()->0. Print "0".- Neighbors of 0 are 1, 2.
- 1 is not visited: add 1 to
visited, add 1 toqueue. - 2 is not visited: add 2 to
visited, add 2 toqueue. - State:
queue = deque([1, 2]),visited = {0, 1, 2}
- Loop 2:
popleft()->1. Print "1".- Neighbor of 1 is 2.
- 2 is already visited. Do nothing.
- State:
queue = deque([2]),visited = {0, 1, 2}
- Loop 3:
popleft()->2. Print "2".- Neighbors of 2 are 0, 3.
- 0 is already visited.
- 3 is not visited: add 3 to
visited, add 3 toqueue. - State:
queue = deque([3]),visited = {0, 1, 2, 3}
- Loop 4:
popleft()->3. Print "3".- Neighbor of 3 is 3.
- 3 is already visited.
- State:
queue = deque([]),visited = {0, 1, 2, 3}
- End: Queue is empty.
Final Output: 0 1 2 3
Conclusion
Congratulations! You have now learned and implemented your first graph traversal algorithm. BFS is a powerful tool with many applications, from finding shortest paths in games and networks to web crawlers indexing the internet.
Key Takeaways:
- Breadth-First Search (BFS) explores a graph level by level.
- It relies on a queue to maintain a First-In, First-Out order of exploration.
- A visited set is crucial to avoid redundant work and infinite loops in graphs with cycles.
- The most efficient way to implement the queue in Python is with
collections.deque. - The BFS algorithm is a direct application of the data structures we've learned, using an adjacency list as input.
Preview of the Next Lesson:
BFS is not the only way to traverse a graph. What if instead of exploring widely, we wanted to explore as deeply as possible along one path before backtracking? This alternative strategy is called Depth-First Search (DFS). In the next lesson, we will implement DFS using recursion and compare its behavior and use cases to BFS.