Hello! Welcome to the final lesson in our module on Secure Remote Access with SSH.
In our last lesson, we focused on the server side, hardening your Fedora system's SSH daemon by editing /etc/ssh/sshd_config. We disabled root login and enforced key-only authentication, which are critical steps for securing any machine exposed to a network.
Today, we shift our focus back to the client side. While security is paramount, efficiency is a close second. As a developer, you will frequently connect to multiple servers: a development machine, a testing or staging server, and a live production server. Typing ssh deploy_user@192.168.1.105 -p 2222 -i ~/.ssh/staging_key every time is tedious and error-prone. This lesson will teach you how to create simple, memorable aliases for all your connections.
Our learning outcome is to: Manage multiple remote hosts efficiently using an SSH configuration file (~/.ssh/config). By the end of this lesson, you'll be able to connect to any of your servers by typing a simple command like ssh production.
1. The Problem: Too Many Details to Remember
As you've seen, a single SSH command can have many parts: a username, a hostname or IP address, a non-standard port, and a specific identity file (SSH key). When you manage several servers, each with its own set of credentials, it becomes a challenge to remember them all.
This video from Learn Linux TV does an excellent job of demonstrating this exact problem and introducing the elegant solution.
The OpenSSH Client Config File: Simplify your SSH Connections
Watch this video to see why managing multiple SSH connections manually is difficult and how the OpenSSH client config file solves this problem.
Watch the video from the beginning to 07:31. The first part (until 02:03) sets the stage, and the second part demonstrates connecting to three different servers with unique parameters, highlighting the complexity we aim to solve.
As you saw, juggling different users, ports, and hostnames quickly becomes unmanageable. This is where the client-side configuration file, ~/.ssh/config, comes in.
2. Creating Your SSH Config File
The SSH client configuration file lives in your home directory, inside the .ssh folder. It's a plain text file named config. If it doesn't exist, you need to create it and set the correct permissions.
- Create the file:
touch ~/.ssh/config - Set permissions: For security, this file should only be readable and writable by you.
chmod 600 ~/.ssh/config
The file is composed of sections, or "stanzas," each starting with a Host keyword. This Host is the alias you will use. Following the Host line, you provide the connection details, indented for readability.
The basic directives are:
Host: The nickname you'll type (e.g.,server1,prod).HostName: The actual IP address or fully qualified domain name (e.g.,192.168.1.50orserver1.example.com).User: The username to log in as.Port: The port number if it's not the default of 22.
The video you just started continues by showing exactly how to create these entries.
The OpenSSH Client Config File: Simplify your SSH Connections
Now, let's see how to add entries for those servers to the config file to simplify the connection commands.
Continue watching from 07:31 to 16:13. This part will walk you through: Creating the config file. Adding a basic host with a nickname and HostName. Specifying a User for a host. Specifying a non-standard Port for a host.
3. Associating Keys with Hosts using IdentityFile
In our previous lessons, you created an SSH key pair. It's a common and recommended practice to use different keys for different services (e.g., one for your work projects, one for personal projects). The ~/.ssh/config file makes managing this easy with the IdentityFile directive.
This directive tells SSH which private key to use for a specific host, so you don't have to specify it with the -i flag every time.
How to use Multiple SSH Keys | Managing Different SSH Keys on your System
This video from Akamai Developer demonstrates how to manage different SSH keys and, most importantly for us, how to configure the ~/.ssh/config file to automatically use the correct key for each host.
Watch the segment from 16:36 to 20:41. Focus on how the IdentityFile directive is added to each host's entry in the ~/.ssh/config file. This automatically links the host alias to its specific key, completing our efficient setup.
By adding IdentityFile ~/.ssh/your_key_name to a host stanza, the ssh command automatically knows which key to present when you run ssh your_alias.
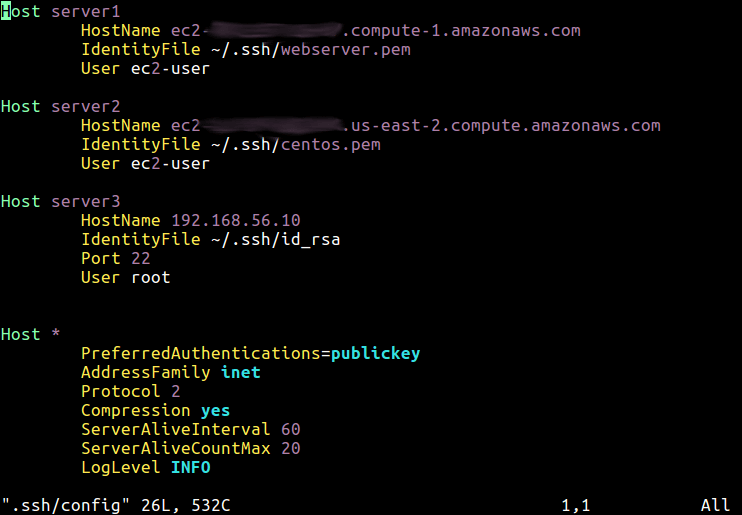
4. Do-It-Yourself: Build Your Developer Config
Time to put this into practice and create a configuration file that simulates a typical developer setup.
Scenario: You're a web developer managing three environments for your Django project.
- dev: Your local Fedora machine, where you write code.
- staging: A remote server for testing, with a unique user (
deploy) and port (2222). - prod: The live production server, which requires a specific SSH key for the
adminuser.
Let's build the ~/.ssh/config file for this workflow.
Step 1: Create the Config File (if you haven't already)
Open your terminal.
touch ~/.ssh/config
chmod 600 ~/.ssh/config
Step 2: Create a Dedicated "Production" Key
Let's create a new key specifically for our "production" server. This is good practice.
# -t specifies the type, ed25519 is modern and secure
# -f specifies the output filename
# -C adds a comment
ssh-keygen -t ed25519 -f ~/.ssh/prod_key -C "production server key"
When prompted for a passphrase, press Enter twice to leave it empty for this exercise.
Step 3: Edit Your Config File
Open the file in your preferred text editor.
nano ~/.ssh/config
Now, add the following stanzas to the file. Replace your_fedora_username with your actual username on your Fedora machine.
# Development environment (local machine)
Host dev
    HostName localhost
    User your_fedora_username


# Staging server for testing
Host staging
    HostName staging.yourproject.com
    User deploy
    Port 2222


# Production server
Host prod
    HostName prod.yourproject.com
    User admin
    IdentityFile ~/.ssh/prod_key


# Default settings for all hosts
Host *


    # Keep connections alive by sending a packet every 60 seconds
    ServerAliveInterval 60
Press Ctrl+X, then Y, then Enter to save and exit nano.
Step 4: Verify Your Configuration
The staging and prod servers don't actually exist, but we can still verify that your SSH client is reading the configuration correctly by using the -v (verbose) flag.
-
Test the
devconnection: This should work since it connects to your local machine.ssh dev # It should connect successfully. Type 'exit' to return. -
Test the
stagingconfiguration:ssh -v stagingThe connection will fail, but look at the debug output. You should see lines indicating that it's trying to connect to
staging.yourproject.comon port2222as userdeploy. This proves it read your config!... debug1: Reading configuration data /home/your_user/.ssh/config ... debug1: Executing proxy command: exec ssh -W 'staging.yourproject.com:2222' ... ... -
Test the
prodconfiguration:ssh -v prodAgain, the connection will fail. But in the output, you should see that it's attempting to use the correct identity file:
~/.ssh/prod_key.... debug1: Reading configuration data /home/your_user/.ssh/config ... debug1: Offering public key: /home/your_user/.ssh/prod_key ED25519 SHA256:... ...
If your tests show this behavior, your configuration is working perfectly.
For a comprehensive text-based reference on the SSH config file, including more advanced patterns, the following article is an excellent resource.
The article 'Using the SSH Config File' from Linuxize provides a detailed, text-based explanation of the file structure, patterns, and option precedence.
Read the sections 'SSH Config File Location', 'SSH Config File Structure and Patterns', and 'Basic Example'. This will reinforce what you've learned and provide a solid reference for the future.
Conclusion
Congratulations! You have now mastered a technique that will save you countless hours and keystrokes throughout your career as a developer and system administrator. You can now define simple, memorable aliases for all your remote connections, no matter how complex the underlying details are.
Key Takeaways:
- The
~/.ssh/configfile allows you to create aliases for remote servers. - Each server is defined in a
Hoststanza. - Key directives include
HostName(the real address),User,Port, andIdentityFile(for the SSH key). - Using
Host *at the end of the file lets you set default options for all connections. - This file makes managing connections for development, staging, and production environments incredibly efficient.
You have now completed the module on Secure Remote Access. You can connect securely using keys, harden the server against attacks, transfer files with scp and rsync, and now manage all your connections with ease.
In our next module, Deploying with Nginx and Gunicorn, you will put these skills to immediate use. You'll set up a server and use the ssh aliases you've learned to configure to deploy your first Django application.