Welcome to the first lesson in our module on deploying web applications!
In the last module, we mastered secure remote access with SSH, setting up keys, hardening the server, and creating efficient connection aliases. Those skills are the foundation for managing the servers where your projects will live. Now, we begin the exciting process of setting up one of those servers to host a real web application.
This module, Deploying with Nginx and Gunicorn, is where your journey as a full-stack developer truly begins to take shape. We'll start with the public-facing component of a typical web stack: the web server.
Our learning outcome for today is to: Install and start Nginx on Fedora and verify it is serving the default page. This is the first essential step in building a production-ready environment for your Django projects.
What is Nginx?
Before we start typing commands, let's briefly discuss what Nginx (pronounced "engine-ex") is and why it's so important for web developers.
Nginx is a high-performance, open-source web server. While it can serve static files (like HTML, CSS, and images) directly to users, its power in modern web development comes from its ability to act as a reverse proxy.
In your Django development setup, you use a simple server (runserver). This is great for development but not suitable for production. In a production environment, you'll have a more robust application server (like Gunicorn, which we'll cover later) running your Django code. Nginx will sit in front of it, receiving requests from the internet and forwarding them to Gunicorn. It will also handle serving static files directly, taking that load off your Python application.
For today, we'll start simple by installing Nginx and getting it to serve its default static page.
Hands-On: Installing and Running Nginx
Let's get our hands dirty. Follow these steps in your Fedora terminal to get your web server up and running.
The following guide will be our primary reference for the command-line steps. It's a clear, concise walkthrough for installing Nginx on Fedora.
How to Install Nginx on Fedora
This guide from LinuxCapable provides all the necessary commands for today's task. We will walk through the steps together, but you can refer to this for a complete overview.
Skim through the article from the beginning down to the heading 'Accessing the Default NGINX Page'. This will give you a preview of the steps we are about to take: updating the system, installing the package, configuring the firewall, and starting the service.
Step 1: Update Your System
It's always good practice to ensure your system's package list is up to date before installing new software. This helps prevent potential conflicts.
sudo dnf upgrade --refresh
Step 2: Install the Nginx Package
Fedora includes Nginx in its default repositories, making installation straightforward with the dnf package manager.
sudo dnf install nginx
After the installation finishes, you can verify that it was installed correctly by checking its version.
nginx -v
You should see output like nginx version: 1.24.0.
Step 3: Configure the Firewall
On Fedora, the firewalld service is running by default and blocks most incoming traffic. Installing Nginx doesn't automatically open the ports it needs. We must explicitly tell the firewall to allow web traffic.
Web traffic uses standard ports:
- Port 80 for HTTP (unencrypted)
- Port 443 for HTTPS (encrypted)
We'll open both, though we will only use HTTP for now.
# Allow HTTP traffic permanently
sudo firewall-cmd --permanent --add-service=http


# Allow HTTPS traffic permanently
sudo firewall-cmd --permanent --add-service=https


# Reload the firewall to apply the new rules
sudo firewall-cmd --reload
The --permanent flag ensures the rules persist after a reboot.
Step 4: Start and Enable the Nginx Service
Now that Nginx is installed and the firewall is configured, we need to start the Nginx service and enable it to launch automatically every time you boot your system. We can do this with a single systemctl command.
sudo systemctl enable nginx --now
enableensures the service starts on boot.--nowstarts the service immediately.
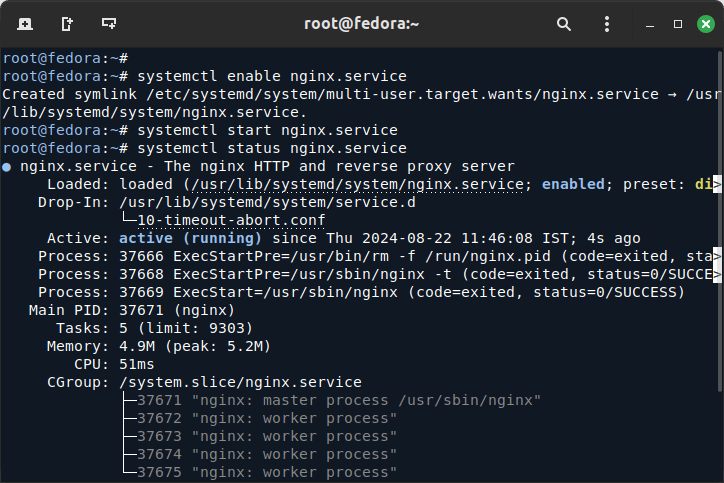
You can check its status to make sure everything is working.
systemctl status nginx
You should see Active: active (running) in the output, which confirms the server is operational.
Step 5: Verify in Your Browser
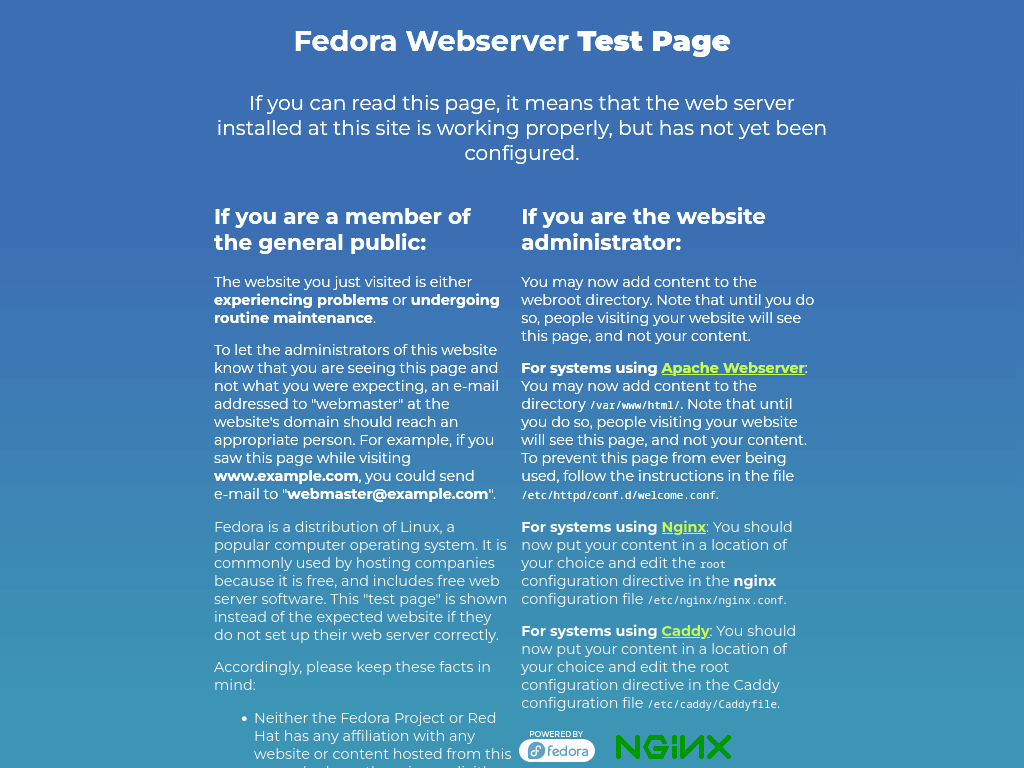
The final test! Nginx should now be serving its default welcome page. Since you are running this on your local machine, you can access it by navigating to localhost.
Open your web browser and go to this address: http://localhost
You should be greeted with the Fedora Nginx test page.
Under the Hood: How It Works
You've successfully started a web server! But what did Nginx actually do? How did it know what page to show?
As a developer, understanding the configuration behind the magic is crucial. This short video gives a great tour of the default Nginx setup.
NGINX Linux Server | Common Configurations
This video from Akamai Developer explores the default Nginx configuration, explaining where the welcome page comes from and how to manage the service.
Watch the following three segments: 01:23 - 01:58: This recaps the verification step you just did, checking the service status and viewing the default page. 07:27 - 09:24: This is the key part. It shows you the default.conf file and explains how it tells Nginx to serve the index.html file from the /usr/share/nginx/html/ directory. 14:57 - 16:45: This demonstrates the systemctl commands (restart, reload, stop, start) for managing the service, which will be useful for you in the future.
The key takeaway from the video is that Nginx's behavior is controlled by configuration files, typically located in /etc/nginx/. On Fedora, the default site is defined in /etc/nginx/conf.d/default.conf, which points to the web root at /usr/share/nginx/html.
Conclusion
Excellent work! You have successfully installed and started a production-grade web server on your Fedora system. This is a fundamental skill for any web developer and the first major step in deploying your applications.
Key Takeaways:
- Nginx is a web server that will act as the entry point for your future Django applications.
- Installation on Fedora is done using
sudo dnf install nginx. - You must configure the system firewall (
firewalld) to allowhttpandhttpstraffic. - The
systemctlcommand is used to manage services like Nginx (enableto start on boot,--nowto start immediately). - The default Nginx configuration serves files from
/usr/share/nginx/html.
In our next lesson, we will dive deeper into the Nginx configuration files. You will learn to explore and identify key Nginx configuration blocks (http, server, location). This knowledge will allow you to move beyond the default page and start configuring Nginx to serve your own content.