Hello! Welcome back to the module on Secure Remote Access.
In the last lesson, you mastered the professional standard for server access: setting up SSH key pairs for secure, passwordless authentication. This is a crucial foundation, and today we'll build directly on it. Now that you have a secure tunnel to a server, how do you move files through it?
This lesson covers scp (Secure Copy Protocol), a command-line utility for transferring files and directories over an SSH connection. Our goal is to transfer files and directories between local and remote systems using scp. This is a fundamental skill for any web developer, as you'll constantly need to copy your project files (like your Django application code) to a production or staging server.
1. Understanding scp
The scp command works very much like the standard cp (copy) command, but with the added ability to specify a remote source or destination. It leverages the SSH connection you've already configured, meaning all data transfers are encrypted and secure.
The basic syntax is:
scp [options] <source> <destination>
The key is how you format the source and destination paths:
- Local path: A standard path on your machine, like
my_project/or/home/user/file.txt. - Remote path: This requires the username, the host, a colon (
:), and the path on the remote server:username@host:/path/to/destination.
Because scp uses SSH, it will automatically use your SSH key for authentication, making the process seamless.
To see a quick introduction, watch the first part of the following video.
Transferring files with the scp Command (Linux Crash Course Series)
This video from Learn Linux TV introduces the scp command and explains its purpose for one-off file transfers.
Watch from the beginning to 02:46. This will give you a high-level overview of what scp is and confirm that it relies on SSH.
2. Do-It-Yourself: Transferring Files and Directories
Let's get hands-on. As in the previous lesson, we'll use your own machine (localhost) as the "remote server" to practice. Make sure you are in your home directory (cd ~) before you start.
Step 1: Create a Test File and Directory
First, let's create something to transfer.
# Create a simple text file
echo "This is a test file for scp." > test_file.txt


# Create a sample project directory with a couple of files
mkdir my_django_project
touch my_django_project/manage.py
touch my_django_project/settings.py
Step 2: Copy a File TO the Remote Server
This is the most common scp operation: pushing files from your local machine to a server. We'll copy test_file.txt to a new directory on our "server".
- Create a destination directory on the server:
# We can do this through an SSH command! ssh localhost 'mkdir -p ~/deployment_target' - Use
scpto copy the file. Replaceyour_usernamewith your actual Fedora username.scp test_file.txt your_username@localhost:~/deployment_target/ - Verify the transfer. Connect via SSH and list the files in the target directory.
You should seessh localhost 'ls -l ~/deployment_target'test_file.txtlisted in the output.
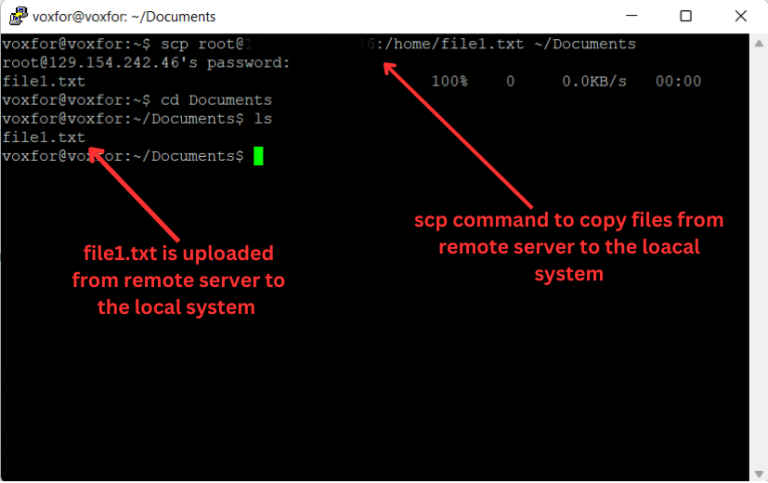
Step 3: Copy a File FROM the Remote Server
Sometimes you need to pull files (like log files or database backups) from a server. Let's copy test_file.txt back from the "server" to your local machine, but with a new name.
- First, remove the local copy so we know the transfer worked.
rm test_file.txt - Use
scpto copy the file back. The remote path is now the source. The.at the end means "the current local directory".scp your_username@localhost:~/deployment_target/test_file.txt . - Verify the transfer:
You should seels -ltest_file.txthas reappeared in your local directory.
Step 4: Copy a Directory TO the Remote Server
You almost never deploy a single file. More often, you'll deploy an entire project directory. To copy a directory, scp requires the -r (recursive) option.
- Use
scp -rto copy yourmy_django_projectdirectory.scp -r my_django_project your_username@localhost:~/deployment_target/ - Verify the transfer. List the contents of the target directory recursively.
You should now seessh localhost 'ls -R ~/deployment_target'my_django_projectlisted, along with themanage.pyandsettings.pyfiles inside it.
3. Guided Walkthrough and Important Options
You've now performed the three most common scp tasks. The following video provides a great visual recap of these steps and also introduces some useful options.
Transferring files with the scp Command (Linux Crash Course Series)
This video walks through practical examples of copying a file to a server, copying it back, and recursively copying a directory.
Watch the following segments to see these concepts in action and learn about some important flags: Copying to remote (05:11 - 07:23): This matches what you did in Step 2. Copying from remote (08:09 - 09:14): This matches Step 3. Copying a directory with -r (14:13 - 16:29): This covers Step 4. Preserving attributes with -p (16:29 - 17:59): This explains how to keep file timestamps the same. Specifying a port with -P (17:59 - 19:18): Useful for when SSH runs on a non-standard port.
As the video mentions, there are several command-line options (flags) that modify how scp behaves. Here are the most important ones to remember:
-r: Recursive. Necessary for copying directories.-P port: Port (uppercase P). Use this if the remote SSH server is not on the default port 22. This is a common security practice.-p: Preserve. Preserves modification times, access times, and file permissions. This is very useful to ensure file attributes don't change during deployment.-C: Compress. Compresses the data during transfer, which can speed things up significantly on slow network connections.
For a comprehensive list of all options, you can refer to the following article. It serves as an excellent reference guide.
SCP Command in Linux {13 Examples}
This phoenixNAP article provides a handy table of scp command options. You don't need to memorize them all, but it's good to know where to find them.
Review the table under the "SCP Command Options" section. Pay special attention to the options we discussed: -r, -P, -p, and -C.
Conclusion
You have now added scp to your system administration toolkit. You can securely and efficiently transfer files and directories between your development machine and a server—an essential skill for deploying and managing your web projects.
Key Takeaways:
scpuses SSH to securely transfer files.- The syntax is
scp [options] source destination. - Remote paths are specified as
user@host:/path/to/file. - The
-rflag is required to copy entire directories. - Flags like
-P(port),-p(preserve attributes), and-C(compress) give you finer control over the transfer.
While scp is perfect for simple copy tasks, what if you only want to update the files that have changed in your project? Copying the entire directory every time is inefficient. In our next lesson, we will explore rsync, a more advanced tool designed specifically for efficiently synchronizing files and directories.