Introduction
Welcome to the next lesson in our journey through Fedora's package management. In our last session, you learned how to list and manage the software repositories that are configured on your system by default. We saw that you can enable or disable these "software warehouses" to control what dnf has access to.
This raises an important question: What do you do when the software you need isn't in any of Fedora's official repositories? This is a common scenario, especially for web developers and users who need multimedia codecs or proprietary drivers. Fedora's commitment to only shipping free and open-source software means some very common applications are left out due to licensing or patent restrictions.
Today, you will learn how to solve this by adding a trusted third-party repository. Specifically, we will focus on adding the RPM Fusion repository and installing packages from it. This is one of the most common and essential "first steps" for any new Fedora user and a critical skill for a system administrator.
Why Do We Need Third-Party Repositories?
Fedora maintains a strict policy about the software it includes in its official repositories. If a piece of software is proprietary (closed-source) or is encumbered by software patents (like many common audio and video codecs), it cannot be included.
This is where third-party repositories come in. They are maintained by community members or other organizations and provide packages that aren't available in the official Fedora repos. RPM Fusion is the most well-known and trusted third-party repository for Fedora users.
RPM Fusion itself is split into two parts:
- Free: Contains open-source software that Fedora, for various legal or policy reasons (primarily patent concerns in the US), does not ship.
- Non-Free: Contains proprietary but redistributable software, such as graphics card drivers or certain applications like Steam.
The following article gives a great overview of what RPM Fusion is and why it's necessary.
To understand the role of RPM Fusion, please read the introductory part of this article from It's FOSS.
Read from the beginning down to the start of 'Part 1: Enabling RPM Fusion Repositories in Fedora'. Focus on the explanation of why some software isn't available by default and the description of the 'free' and 'non-free' RPM Fusion repositories.
Adding the RPM Fusion Repository
Now for the practical part. How do we add these new repositories to our system? You might think it's a complicated process, but it's surprisingly simple. We'll use dnf to install a special .rpm package directly from the RPM Fusion website. This package doesn't contain a program; instead, it contains the repository configuration files (.repo files) and the GPG keys needed to securely verify packages from that repo.
The Fedora 43 Post-Install Guide provides a single, efficient command to enable both the free and non-free repositories at once.
Fedora 43 Post-Install Guide: 10 Essential Things to Do After Installing
This guide provides a clean, one-line command for setting up RPM Fusion. It's a perfect example of an efficient administrative command.
Focus only on the command under the heading '2. Enable RPM Fusion Repositories'. We will be running this command in the next step.
Let's break down the command before you run it:
sudo dnf install \
https://mirrors.rpmfusion.org/free/fedora/rpmfusion-free-release-$(rpm -E %fedora).noarch.rpm \
https://mirrors.rpmfusion.org/nonfree/fedora/rpmfusion-nonfree-release-$(rpm -E %fedora).noarch.rpm
sudo dnf install ...: We are simply using thednf installcommand you're already familiar with.https://...: Instead of a package name, we're providing direct URLs to the.rpmpackages we want to install.$(rpm -E %fedora): This is a clever bit of shell scripting. This expression is evaluated by your terminal beforednfruns. It automatically inserts your current Fedora version number (e.g., '40' or '41'). This makes the command portable across different Fedora releases without needing to be edited.
Your Turn: Add and Verify RPM Fusion
It's time to expand your system's software library.
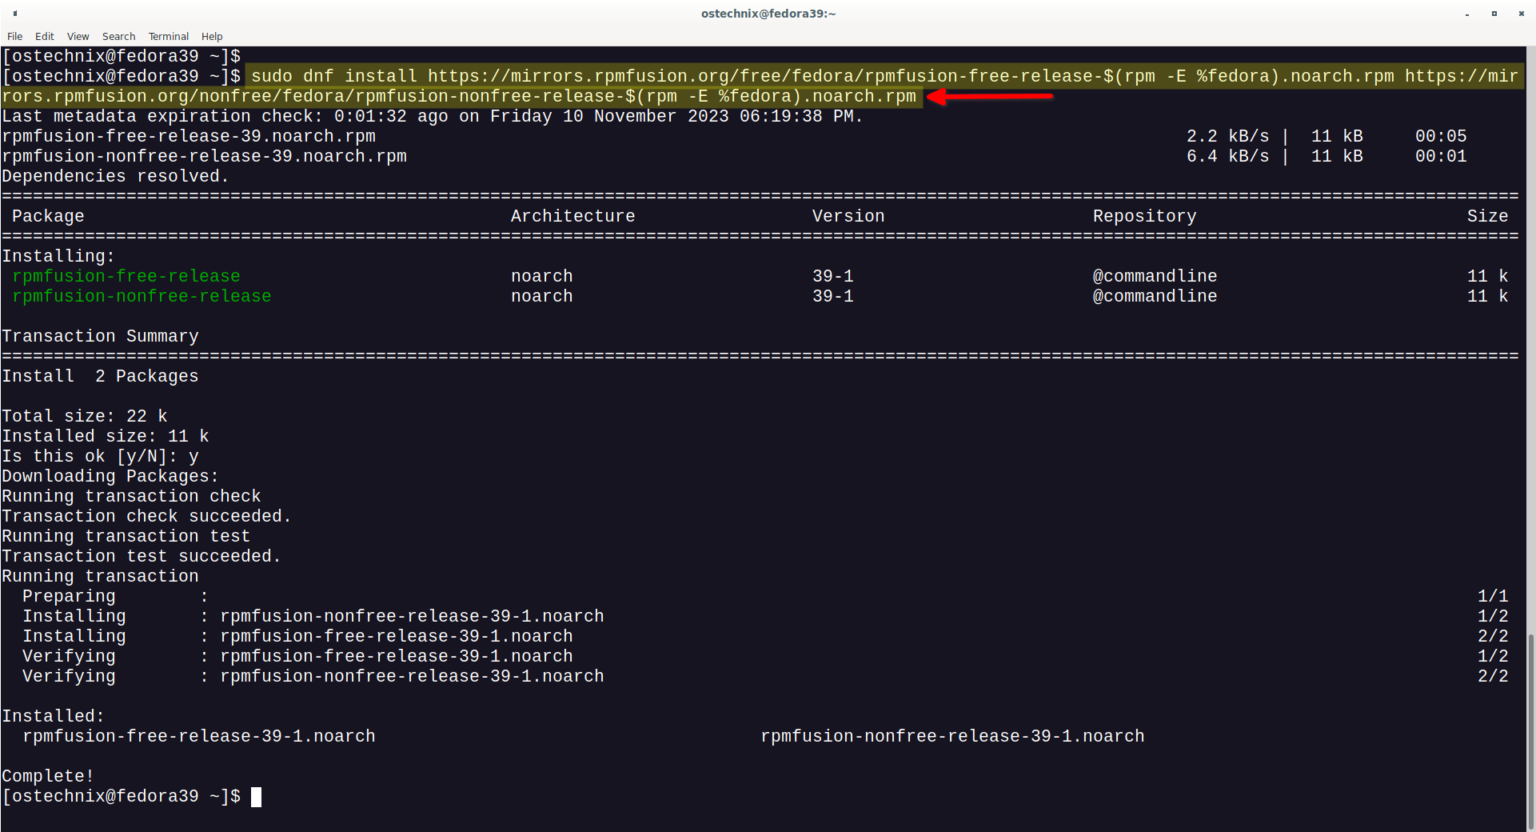
- Open your terminal and run the command above to install the RPM Fusion repository configuration packages. You will be prompted for your password.
dnfwill show you what it's about to install and ask for confirmation. PressyandEnter.
- Verify the installation. In the last lesson, you used
dnf repolist. Run it now.
In the output, you should now see new entries for RPM Fusion, such asdnf repolistrpmfusion-free,rpmfusion-free-updates,rpmfusion-nonfree, andrpmfusion-nonfree-updates. This confirms thatdnfis now aware of these new software sources.
Installing Packages from RPM Fusion
Now that you've added the repositories, you can install packages from them just like you would from the official Fedora repos. dnf automatically searches all enabled repositories.
A very common use case for RPM Fusion is to install multimedia software. Let's install the popular VLC media player, which isn't in the Fedora repos due to patent issues with the codecs it supports.
-
Search for VLC (optional but good practice):
dnf search vlcYou will see the
vlcpackage in the search results. -
Install VLC:
sudo dnf install vlcNotice that you didn't have to specify where to get it from.
dnffinds it in the newly added RPM Fusion repository and handles all the dependencies for you.
Swapping Packages for Better Functionality
Sometimes, a third-party repository provides a more complete version of a package that is already included in Fedora's official repos. A prime example is ffmpeg, a core multimedia framework. Fedora ships a version called ffmpeg-free that has patented codecs removed. RPM Fusion provides the full ffmpeg package.
To get the full version, we need to swap the limited one with the complete one. The video below shows this process in detail.
Fedora 41 how to install video codecs - RPM Fusion tutorial - November 2024 - 62ee0c6b
This video clip from nmariusp demonstrates exactly why and how to replace Fedora's limited ffmpeg-free with the full version from RPM Fusion. Pay close attention to the use of the --allowerasing flag.
Watch the segment from 12:12 to 15:30. The presenter explains the package conflict and uses dnf install --allowerasing to resolve it by swapping the packages.
As you saw in the video, dnf is protective and won't remove an installed package to resolve a conflict unless you explicitly permit it.
Your Turn: The Multimedia Upgrade
Let's perform this common system upgrade task.
-
Swap
ffmpeg-freefor the fullffmpeg: Run the following command. The--allowerasingflag tellsdnfthat it's okay to remove the conflictingffmpeg-freepackage to complete this installation.sudo dnf swap ffmpeg-free ffmpeg --allowerasingThis command is a more modern alias for what was shown in the video.
dnf swapis the officially recommended way to perform this kind of replacement. -
Install the full multimedia group: To ensure all video players and applications can use the new codecs, it's a good idea to install the related codec groups from RPM Fusion.
sudo dnf group upgrade --with-optional multimediaThis single command installs a curated set of packages for sound and video playback, pulling them from the RPM Fusion repos you just added.
By completing these steps, you've not only learned how to add a repository but also solved a very practical problem on a fresh Fedora installation.
A Note on Other Repositories
RPM Fusion is the main third-party repository, but it's not the only one. For example, some individual developers or projects use Copr (Cool Other Package Repositories) to distribute their software. While the process of adding them is similar (sudo dnf copr enable ...), it's important to be more cautious. Copr repos are not officially vetted by Fedora and may not have the same level of stability or security as the official repos or RPM Fusion. As a system administrator, always consider the source of your software.

Conclusion
Great job! You have significantly expanded the capabilities of your Fedora system. You now have the skills to tap into the vast ecosystem of software that exists beyond the official repositories.
Key Takeaways:
- Fedora's official repositories are limited to free and open-source software, excluding proprietary or patent-encumbered packages.
- RPM Fusion is the primary, trusted third-party repository for Fedora, providing access to this wider range of software.
- You add a repository by installing a special
.rpmpackage that contains its configuration files. - The command
sudo dnf install <URL-to-repo.rpm>is the standard way to add a repository like RPM Fusion. - Once a repository is enabled,
dnfautomatically uses it for searching and installing packages. - You can use
dnf swapwith the--allowerasingflag to replace a default package with a more feature-complete version from a third-party repo.
You've now performed several important package management operations: installing, removing, updating, and now adding a new source. What happens if one of these operations causes a problem? In our next lesson, we will dive into dnf's transaction history. You'll learn how to review every change you've made and, crucially, how to undo or roll back a transaction if needed.