Introduction
Welcome back! In our last lesson, you mastered filesystem navigation using absolute and relative paths. You now know how to specify where a command should operate. Today, we'll focus on the what and how. The Linux command line is packed with thousands of commands, each with dozens of options. No one memorizes them all. The key to becoming a proficient user—and a self-sufficient developer—is knowing how to ask your system for help.
This lesson is dedicated to learning how to learn. You will discover how to use Linux's built-in documentation to understand any command you encounter. By the end of this session, you will be able to:
- Read and interpret manual pages using the
mancommand. - Get quick command summaries using the
--helpflag.
Mastering these two tools is arguably one of the most important steps in your journey. They will empower you to explore your Fedora system and solve problems independently, a critical skill for both system administration and web development.
The Two Pillars of Command-Line Help
Linux provides two primary ways to get help directly in your terminal:
man(manual pages): This is the traditional, comprehensive documentation system. Amanpage for a command is like its official instruction manual, containing a detailed description, all possible options, usage examples, and more.--help: Most commands have a--helpoption (or flag) that prints a short, concise summary of their usage and most common options directly to your terminal. It's perfect for a quick reminder when you forget a specific option.
Think of it this way: man is the detailed textbook, and --help is the quick-reference cheat sheet.
Diving Deep with man Pages
The man command is your gateway to in-depth knowledge. Let's start by learning how to navigate and search within these manual pages.
Mastering Linux Man Pages - A Definitive Guide
This video, "Mastering Linux Man Pages" from the Linux Training Academy, is an excellent and thorough guide. We'll start with the fundamentals: opening a man page, navigating its content, and searching for keywords.
Please watch from the beginning until 08:17. The video covers a lot, so focus on these key actions: [00:00 - 01:58] Opening and Quitting: How to open a man page (e.g., man man) and, most importantly, how to exit using the q key. [01:58 - 06:11] Navigation: Pay attention to the key bindings for moving around. You can use your arrow keys, but learning j (down), k (up), Ctrl+F (page down), g (go to start), and G (go to end) will make you much faster. These same keys are used in the vim text editor, which we'll cover in a future module. [06:11 - 08:17] Searching: Learn how to use / to search forward for a term and n to jump to the next match. This is incredibly useful for finding a specific option in a long manual page.
How to Read a man Page: Decoding the Syntax
Just opening a man page isn't enough; you need to understand its language. Manual pages follow a standard structure and use special formatting to convey meaning.

The SYNOPSIS section tells you how to construct the command. It uses a specific set of conventions to describe the command's arguments and options. Understanding these is the most critical part of reading a man page.
The next segment of the video breaks down these conventions and then applies them to the ls command we've used before.
Mastering Linux Man Pages - A Definitive Guide
Let's continue with the same video. This next part is crucial as it deciphers the syntax used in man pages.
Watch from 08:17 to 17:15. [08:17 - 10:26] The Conventions: Focus on what each formatting style means. This is the key to interpretation! [10:26 - 17:15] Practical Example with ls: The video walks through the ls man page, showing how to apply the conventions to understand its options. Pay close attention to the difference between short (-a) and long (--all) options, and how options that require a value (like --block-size=SIZE) are presented.
Here is a summary of the most important conventions you just learned:
| Convention | Meaning | Example from ls man page |
|---|---|---|
| bold text | Type this literally, exactly as shown. | ls |
| underline text | Replace this with an appropriate value. | ls --block-size=SIZE (replace SIZE with a value) |
[ ] |
Anything inside square brackets is optional. | ls [OPTION]... (you don't have to provide an option) |
| ` | ` | A vertical bar separates choices; you can only use one. |
... (ellipsis) |
The preceding item can be repeated. | [FILE]... (you can list zero, one, or many files) |
Quick Reminders with --help
Sometimes, you don't need the full textbook. You just need a quick reminder of a command's options. That's where the --help flag comes in. Most commands will print a brief usage summary if you run them with this flag.
Try it now in your terminal:
ls --help
You'll get an output that is much shorter and more direct than the man page.
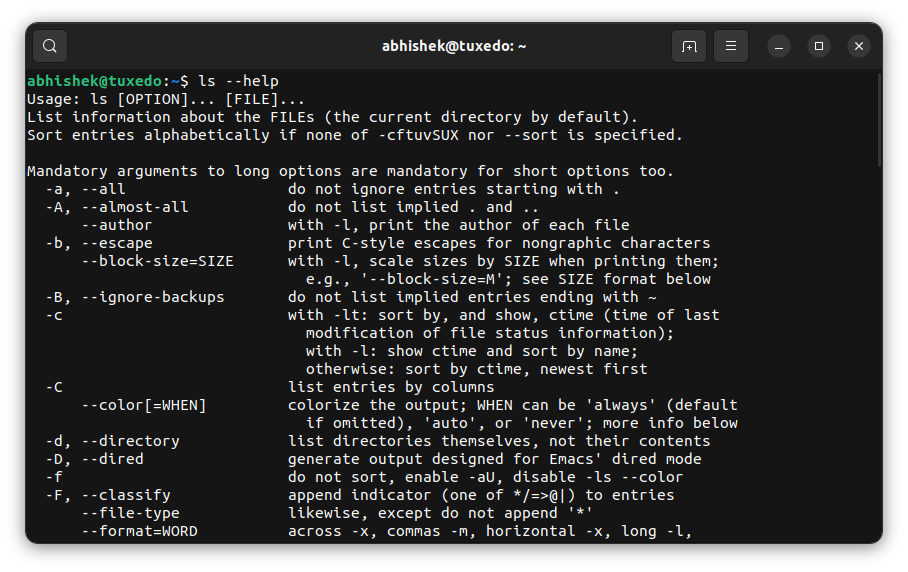
The general rule is:
- Use
manwhen you are learning a command for the first time or need to understand a complex option in detail. - Use
--helpwhen you already know the command but just need to jog your memory about a specific flag.
A Special Case: Shell Built-in Commands
You might have noticed that some very common commands don't have their own man pages. For example, try running man cd. You won't find a dedicated page for it.
This is because cd is a shell built-in. It's part of the bash shell itself, not a separate program. To get information on built-ins, you have two main tools:
type: This command tells you what kind of command you're dealing with.type ls # Output: ls is aliased to 'ls --color=auto' (or similar) type cd # Output: cd is a shell builtinhelp: This is themanequivalent for built-in commands.help cd
The final video segment explains this concept clearly.
Mastering Linux Man Pages - A Definitive Guide
To round out your knowledge, let's watch the part of the video that explains how to handle commands without man pages and introduces the --help option.
Watch from 30:24 to 34:30. This section covers: Why commands like cd don't have man pages. Using type to identify built-in commands. Using the help command to get documentation for built-ins. A final look at the --help flag for quick summaries.
Do It Yourself: Become a Command-Line Detective
Now it's time to put your 80/20 preference into action. Your task is to use the help tools to figure out how to perform specific tasks. Open your terminal and try to solve the following challenges.
Setup: First, create a small workspace.
cd ~
mkdir -p help_practice/dir1
touch help_practice/file1.txt help_practice/file2.txt
Challenge 1: Recursive Copy
- Goal: Copy the entire
help_practicedirectory (and its contents) to a new directory calledhelp_practice_backup. - Hint: The standard
cpcommand only copies single files. You need an option to make it work on directories "recursively". - Your Task: Use
man cpto find the correct option. Once you find it, run the command.
Verify with# Your copy command here. After finding the option, it will look like this: # cp -r help_practice help_practice_backupls. You should see both directories.
Challenge 2: Long Listing Format, Human-Readable Sizes
- Goal: List the contents of your home directory (
~) showing detailed information (long format) and with file sizes displayed in a human-friendly way (e.g.,4.0Kinstead of4096). - Your Task: Use
man lsto find the options for "long listing format" and "human-readable" sizes. Combine them into a single command.# Your ls command here. You're looking for the -l and -h options. # ls -lh ~
Challenge 3: Creating Nested Directories
- Goal: Create the directory structure
a/b/cinside yourhelp_practicedirectory with a singlemkdircommand. - Hint: If you just run
mkdir a/b/c, it will fail because the parent directories (aanda/b) don't exist. - Your Task: Use
mkdir --helpto find the option that creates "parent directories as needed".
Verify with# Your mkdir command here, inside the help_practice directory. # cd help_practice # mkdir -p a/b/cls -R a. (-Ris another recursive flag!)
Challenge 4: Identify and Get Help for a Built-in
- Goal: Confirm that
pwdis a shell built-in and view its help documentation. - Your Task: Use the
typecommand onpwd. Then, use the correct command to see its documentation.# Your two commands here. # type pwd # help pwd
Cleanup:
When you're done, you can remove the practice directories.
cd ~
rm -r help_practice help_practice_backup
Conclusion
Congratulations! You've just acquired a superpower. The ability to use man and --help means you are no longer dependent on tutorials or web searches for every little thing. You can now explore your system's capabilities directly.
Key Takeaways:
man <command>: Your primary tool for in-depth documentation. Use it to learn new commands.--help: Your tool for quick reminders of a command's options.- Key
manPage Conventions:[]means optional, bold means literal, underline means replace, and...means repeatable. - Built-in Commands: Use
typeto identify them andhelpto get documentation.
In our next lesson, we will continue exploring essential commands. Now that you know how to learn about commands, we'll focus on a powerful tool for locating files and directories: the find command.