Introduction
Welcome back! In our last lesson, you learned how to use man pages and the --help flag to find documentation for any command. This is a crucial skill for becoming self-sufficient on the command line. Now that you know how to find out what a command does, let's focus on how to use it faster.
Typing out long commands and file paths repeatedly is slow and prone to errors. Professional developers and system administrators rely on shell features to work efficiently. Today, we'll cover two of the most important efficiency boosters: tab completion and command history.
By the end of this 60-minute lesson, you will be able to:
- Use tab completion to automatically finish commands, filenames, and directory paths.
- Use command history to recall, search, and reuse commands you've already typed.
Mastering these skills will dramatically increase your speed and accuracy in the terminal, a huge benefit whether you're managing a server or deploying your Django projects.
The Art of Less Typing: Tab Completion
Tab completion is one of the most beloved features of the command line. It allows the shell to automatically fill in the rest of a command or filename for you after you've typed the first few letters. This not only saves typing but also helps prevent typos.
There are two main scenarios for tab completion:
- Unique Completion: If what you've typed has only one possible completion, pressing the
Tabkey once will fill in the rest of the name instantly. - Multiple Options: If what you've typed could be completed in multiple ways, pressing
Tabonce might do nothing. Pressing it a second time will show you all the possible completions. You can then type another letter or two to make your choice unique and pressTabagain.
This video provides a great introduction to the concept.
Beginner's Guide to the Bash Terminal
Let's watch this segment from the "Beginner's Guide to the Bash Terminal" by Joe Collins. It provides a clear, beginner-friendly demonstration of how tab completion works for navigating directories.
Watch from 08:57 to 10:23. Pay attention to the difference between pressing Tab once for a unique match and pressing it twice to see a list of possible options.
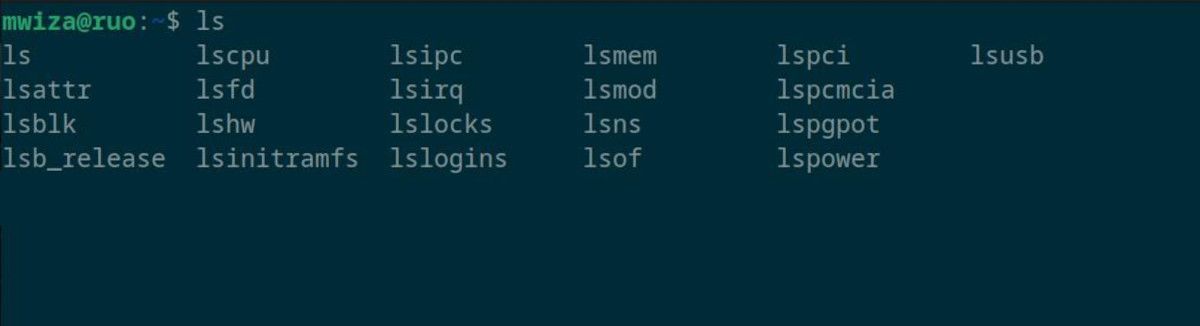
Tab completion doesn't just work for file and directory names; it also works for commands themselves. If you're not sure of the exact command name, you can type the first few letters and press Tab twice to see all available commands that start with that prefix.
Do It Yourself: Practice Tab Completion
Let's put this into practice. Open your terminal and follow along.
- Complete a Path: Type
cd /var/loand pressTab. It should immediately complete tocd /var/log/. PressEnter. - See Multiple Options: Now that you are in
/var/log, typels aand pressTabtwice. Your system will show you all files and directories in/var/logthat start with 'a' (likeaudit/andanaconda/). - Narrow It Down: Type
u(so your line readsls au) and pressTabagain. It should complete tols audit/. - Complete a Command: Type
dnf cheand pressTab. It will complete todnf check-. This command has multiple endings (check,check-update), so it stops there. Typeuand pressTabagain. It will complete todnf check-update. (PressCtrl+Cto cancel the command without running it).
Don't Repeat Yourself: Using Command History
Your shell keeps a record of the commands you execute. This "history" is a powerful tool for reusing complex commands without retyping them.
The Basics: history and Arrow Keys
The simplest way to access your history is with the up and down arrow keys.
- Up Arrow (
↑): Recalls the previous command. Press it again to go further back in time. - Down Arrow (
↓): Moves forward through the history, towards your most recent commands.
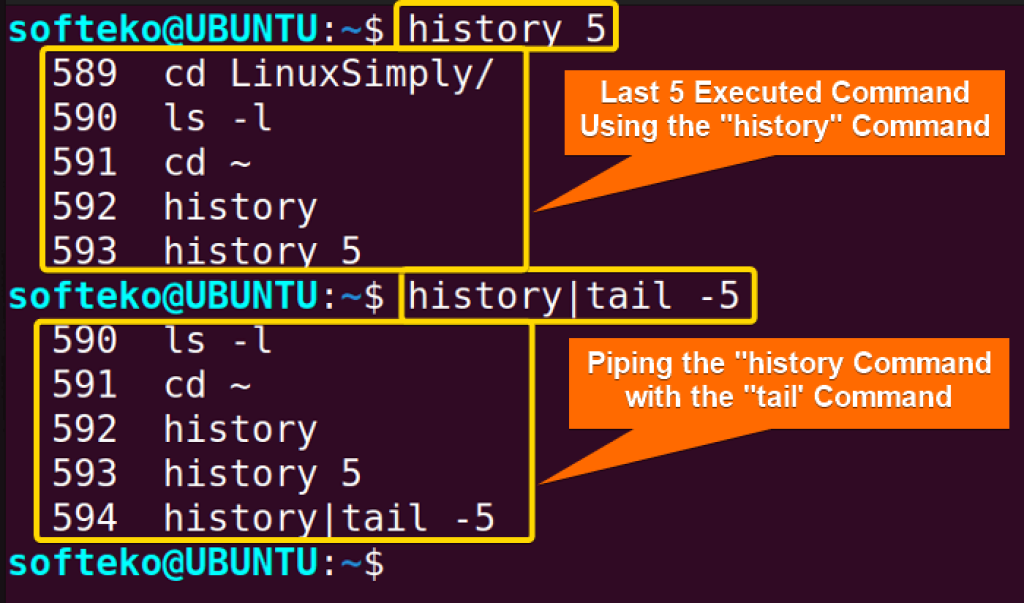
To see a numbered list of your recent commands, you can use the history command.
Beginner's Guide to the Bash Terminal
Let's return to the "Beginner's Guide" video, where Joe Collins explains how to use the up arrow and the history command.
Watch from 19:55 to 21:19. This will show you how to cycle through commands and view the history list.
Searching and Re-Executing with Shortcuts
Scrolling through your history with the arrow keys is fine for recent commands, but what about a command you ran yesterday? This is where more powerful history features come in.
Reverse Search (Ctrl+R)
This is arguably the most useful history shortcut. It allows you to search backward through your history.
8 Bash Shortcuts Every Linux User Should Know
The video "8 Bash Shortcuts Every Linux User Should Know" has an excellent, quick demonstration of reverse searching.
Watch from 06:59 to 08:27. Focus on how to start the search with Ctrl+R, type a fragment of the command you remember, and press Enter to execute it or Ctrl+R again to cycle through matches.
History Expansion (!)
Bash also provides a powerful syntax called "history expansion" using the exclamation mark (!) to quickly re-run commands. This is best explained with a text resource that you can refer back to.
The Definitive Guide to Bash Command Line History
The article "The Definitive Guide to Bash Command Line History" from catonmat.net is a comprehensive resource. We will focus on the most practical parts about executing commands from your history.
Please read the section titled Event Designators. It's about a third of the way down the page. Focus on understanding these four key shortcuts: !!: Executes the previous command. !N: Executes the Nth command from the history list. !string: Executes the most recent command that starts with string. ^string1^string2^: Takes the last command, replaces the first occurrence of string1 with string2, and executes it.
Line Editing Shortcuts
Once you've recalled a command from your history, you often need to edit it. Instead of using the arrow keys to move one character at a time, you can use keyboard shortcuts to jump around the line.
An Illustrated Guide to Shell Magic: Typing Less & Doing More
Adafruit's "An Illustrated Guide to Shell Magic" has a very handy table of these shortcuts. Learning these will make editing commands much faster.
Find the section titled Line Editing and review the table of shortcuts. Try to memorize Ctrl+A (start of line), Ctrl+E (end of line), and Ctrl+K (delete to end of line).
Do It Yourself: Become a History Pro
Time to combine these skills. This is where your 80% practical preference comes into play. Open your terminal and try these tasks.
-
Run a Few Commands: Execute the following commands, including the typo.
date ls -l /etc/dnf/dnf.conf ehco "I love Fedora" whoami -
Fix a Typo: Your
ehcocommand failed. Instead of retyping it, use the substitution shortcut to fix it and run it again.^ehco^echo^ -
Search and Execute: Now, let's find that long
lscommand without scrolling.- Press
Ctrl+R. - Start typing
dnf.conf. The commandls -l /etc/dnf/dnf.confshould appear. - Press
Enterto execute it.
- Press
-
Use History Numbers:
- Type
history. You will see a numbered list. Find the number next to thewhoamicommand you ran. Let's say it's1024. - Execute it again by its number:
(Use the actual number from your history output).!1024
- Type
-
The
sudo !!Trick: This is a classic time-saver. Try to list the contents of the/rootdirectory, which is protected.ls /rootYou'll get a "Permission denied" error. You forgot to use
sudo. Instead of retyping, just run:sudo !!The
!!is replaced by your last command (ls /root), so the shell executessudo ls /root. Enter your password when prompted. -
Practice Line Editing:
- Press the up arrow until you get back to
ls -l /etc/dnf/dnf.conf. - Press
Ctrl+Ato jump to the beginning of the line. - Press
Ctrl+Eto jump to the end of the line. - Press
Ctrl+Aagain. Use the right arrow to move to thelscommand and add thedflag to see directory info:ls -ld /etc/dnf/dnf.conf. PressEnter.
- Press the up arrow until you get back to
Conclusion
Excellent work! You've just learned the core techniques that separate beginners from proficient command-line users. By making these shortcuts a habit, you'll work faster, make fewer mistakes, and feel much more comfortable in the terminal.
Key Takeaways:
- Tab Completion: Your best friend for avoiding typos and discovering commands. Use a single
Tabfor unique completions and a doubleTabto see all options. - Command History: Don't retype, reuse!
↑and↓arrows are for recent commands.Ctrl+Ris for searching your entire history.!!re-runs the last command (perfect forsudo !!).!Nre-runs a specific command by its number from thehistorylist.^old^new^is the fastest way to fix a typo in your last command.Ctrl+AandCtrl+Elet you jump to the start and end of a line for quick editing.
In our next lesson, we'll tackle another fundamental skill: searching for files. You'll learn how to use the find command to locate files and directories based on their name, type, size, and modification time—an indispensable skill for managing projects and system configurations.