Introduction
Hello! In our last two lessons, you learned how to create and manage individual user accounts and then how to organize them efficiently into groups. These skills are the bedrock of multi-user system administration.
Now, we'll build on that foundation by focusing on security. Simply creating a user isn't enough; we need to ensure their account is secure over its entire lifecycle. This is especially critical on a server that will host your web applications, as a compromised user account can be a gateway for attackers.
In this lesson, you will learn to configure password policies and expiration using the passwd and chage commands. This will allow you to enforce security rules, such as forcing users to change their passwords periodically and setting accounts to expire automatically, a common requirement for temporary contractors or project-based roles.
1. Understanding Password and Account Aging
Before we use any commands, let's define the key policies you can enforce. An organization's security policy often dictates these settings, and as a system administrator, your job is to implement them.
Password aging policy Explained with chage command
The article "Password aging policy Explained with chage command" from computernetworkingnotes.com provides an excellent breakdown of the seven core settings that make up a password aging policy. This will give you the theoretical framework for what we're about to do.
Read the first part of the article, from the beginning down to (but not including) the section "The default password aging policy". Focus on understanding the definition of these seven settings: Last password change date Password expiry date Password inactive date Account expiry date Minimum number of days between password changes Maximum number of days between password changes Number of days of warning before password expires
These settings give you granular control. For instance, setting a "Minimum number of days" prevents a user from cycling through passwords just to reuse their old favorite one, which subverts password history policies. Setting an "Account expiry date" is perfect for managing access for temporary team members without needing a manual reminder to disable their account.
2. The chage Command: The Main Tool for Policy Management
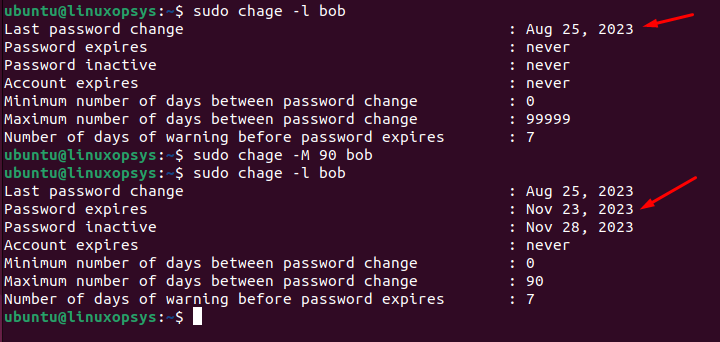
The primary command for managing all these aging settings is chage (which stands for change age). It allows you to view and modify password and account expiration information for any user.
Let's see it in action.
Linux Crash Course - User Account & Password Expiration
The video "Linux Crash Course - User Account & Password Expiration" by Learn Linux TV provides a clear, practical demonstration of the most common chage operations.
Watch the following clips to see how chage is used: Listing User Policies (-l) (04:39 - 05:15): See how to view all current aging settings for a user. Setting Account Expiration (-E) (03:00 - 04:00): Learn how to set a hard expiration date for an entire account. Setting Max Password Age (-M) (06:26 - 07:05): Learn how to force a password to expire after a certain number of days. Setting Min Password Age (-m) (07:27 - 09:10): Understand why you might want to prevent users from changing their password too frequently.
Here is a summary of the key chage flags:
| Flag | Long Option | Description |
|---|---|---|
-l |
--list |
Lists the current aging settings for a user. |
-M |
--maxdays |
Sets the maximum number of days a password is valid. |
-m |
--mindays |
Sets the minimum number of days before a password can be changed. |
-W |
--warndays |
Sets the number of days a warning is given before expiration. |
-E |
--expiredate |
Sets a specific date (YYYY-MM-DD) when the account will be disabled. |
-d 0 |
--lastday 0 |
Sets the last password change date to the 'epoch', which effectively expires the password and forces a change on the next login. |
3. Using passwd for Quick Policy Checks and Changes
While chage is the comprehensive tool, the passwd command also has a few useful flags for viewing password status and forcing expiration. Since you already use passwd to set initial passwords, these flags can be convenient.
Linux Crash Course Series - Using the passwd Command
Let's revisit the passwd command with another video from Learn Linux TV. This will show you how to use it for more than just changing a password.
Watch these clips to learn about the extended capabilities of passwd: Viewing Password Status (-S) (03:21 - 05:28): Learn what the output of passwd -S means, including status like 'PS' (Password Set), 'NP' (No Password), or 'L' (Locked). Understanding the Status Fields (05:36 - 07:18): This part explains the meaning of the seven fields in the status output, which correspond to the aging policies we've discussed. Forcing Expiration (-x, -e) (12:14 - 13:53): See how to set an expiration in days (-x) or expire a password immediately (-e).
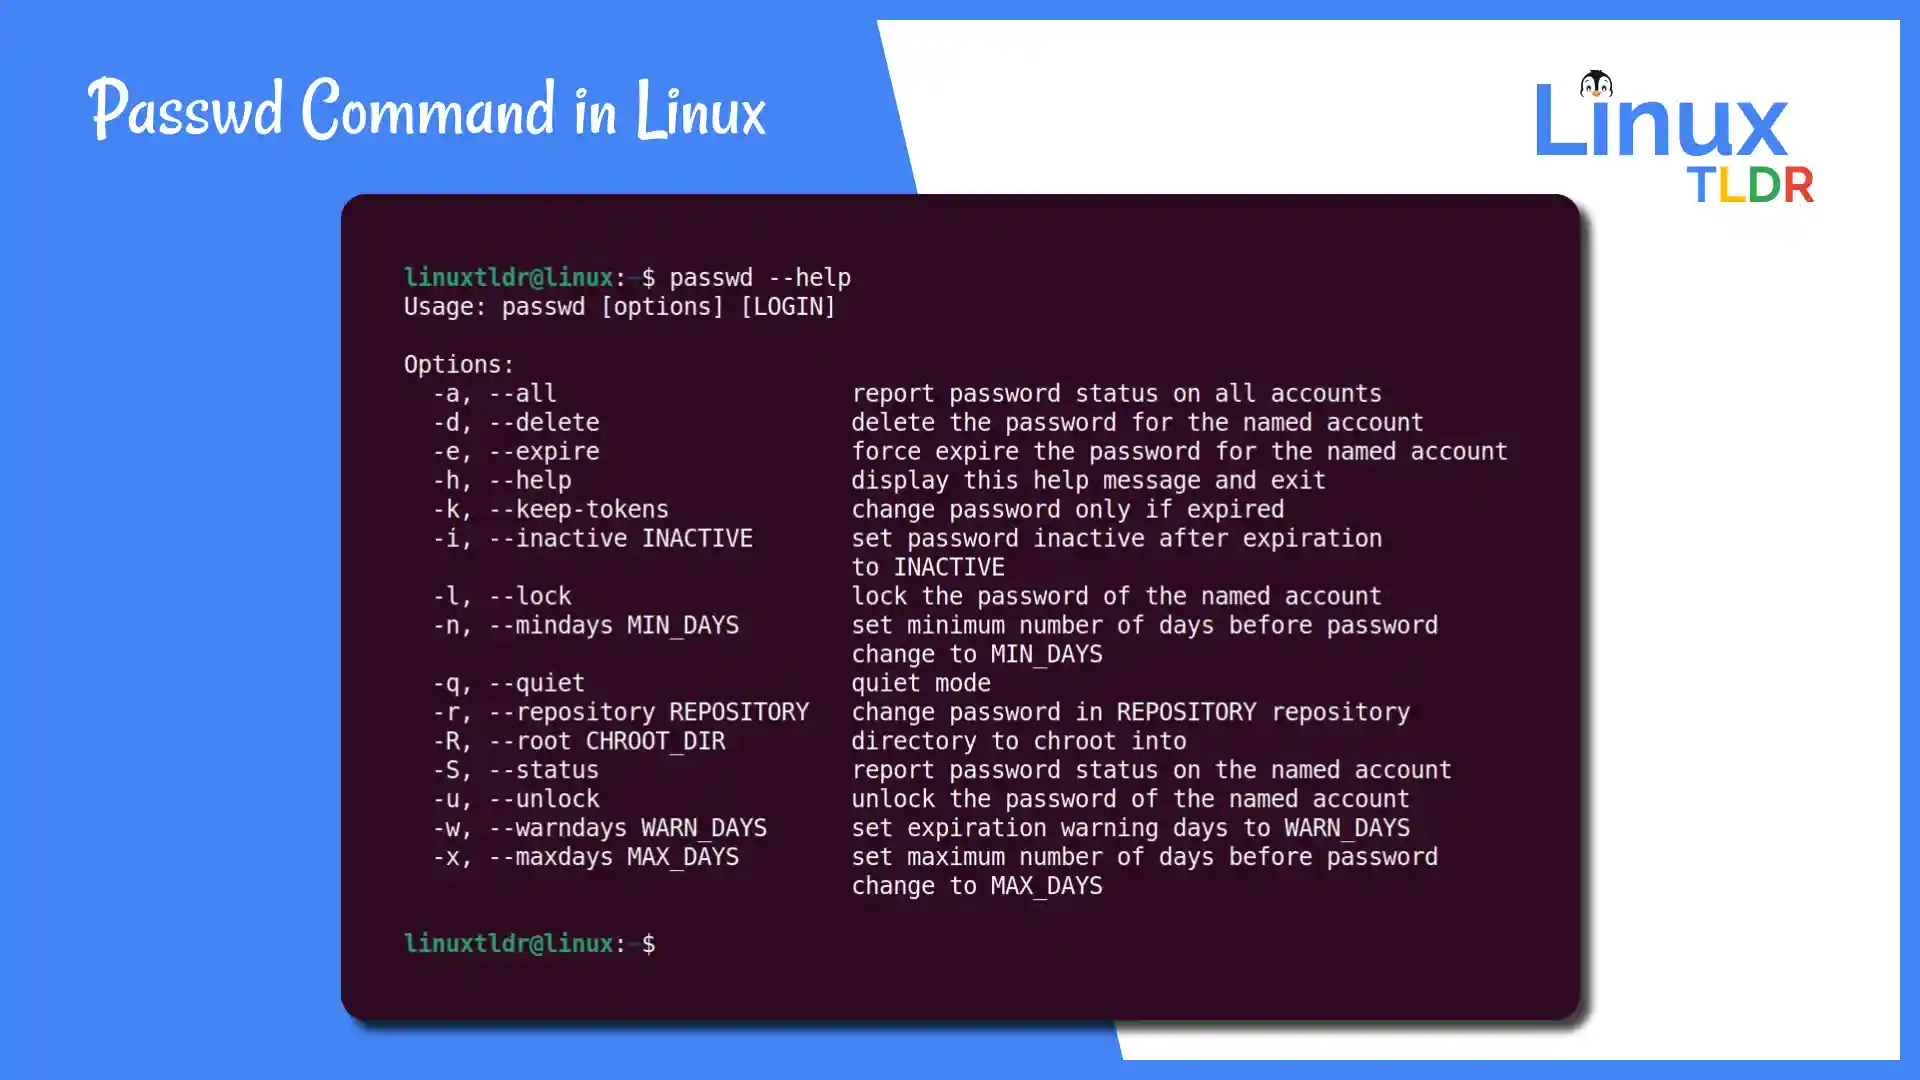
While passwd can modify some aging settings, chage is generally preferred for its clarity and comprehensive options. Think of chage as the dedicated policy manager.
4. Setting System-Wide Defaults
Applying policies to users one by one is fine for a few accounts, but what about setting a baseline for all new users on your system? This is handled by the /etc/login.defs file.
This file contains default configuration values for user-creation tools. When you run useradd, it looks at /etc/login.defs to determine the default password aging policies for the new account.
Password aging policy Explained with chage command
Let's return to the "Password aging policy Explained" article. The next section explains how /etc/login.defs works and which directives control the default aging policies.
Read the sections titled "The default password aging policy" and "The /etc/login.defs file". Pay close attention to the variables PASS_MAX_DAYS, PASS_MIN_DAYS, and PASS_WARN_AGE. The article also explains that changes to this file only affect newly created accounts, not existing ones.
Modifying /etc/login.defs ensures your security baseline is applied automatically as your team grows. For any existing users, you must still use chage to update their policies individually.
5. Do-It-Yourself: Implementing Security Policies
Now it's time to put this all into practice. Imagine you are the system administrator for a project. You need to onboard a new full-time developer and a short-term contractor, and also handle a security request for an existing user.
Open your terminal and follow these steps.
-
Create New User Accounts:
First, create the two new users. We will set their initial passwords right away.sudo useradd -m dev_perm sudo useradd -m dev_temp # Set initial passwords (you will be prompted) sudo passwd dev_perm sudo passwd dev_temp -
Apply Policy for the Permanent Developer:
Your company policy requires permanent staff to change their password every 90 days. They should get a warning 7 days beforehand, and they cannot change their password more than once per day.# Apply the policy to dev_perm sudo chage -M 90 -W 7 -m 1 dev_perm # Verify the changes sudo chage -l dev_permLook at the output and confirm that "Maximum number of days between password change" is 90, "Minimum" is 1, and "Number of days of warning" is 7.
-
Apply Policy for the Temporary Contractor:
The contractor's project is scheduled to end in 30 days. Set their account to automatically expire on that date.
Hint: You can use thedatecommand to calculate the date for you!# Set the account to expire in 30 days sudo chage -E $(date -d +30days +%Y-%m-%d) dev_temp # Verify the change sudo chage -l dev_tempCheck the "Account expires" field. It should now show a date 30 days from today.
-
Force an Immediate Password Change:
You've been notified of a potential security issue with thealiceaccount (created in a previous lesson). You must force her to change her password the next time she logs in.# Expire the password for user alice sudo passwd -e alice # Verify the change. Note the "Password expires" date. sudo chage -l aliceThe "Last password change" field will be set to
Password must be changed, indicating success. -
(Optional) Update System-Wide Defaults:
Management has decided on a new company-wide policy: all new accounts should have a password lifetime of 180 days. Update the default configuration.# First, it's always wise to back up a config file before editing sudo cp /etc/login.defs /etc/login.defs.backup # Use a text editor like 'vim' or 'nano' to change the value. # Find the line 'PASS_MAX_DAYS' and change 99999 to 180. sudo nano /etc/login.defs # Now, create a new test user sudo useradd test_policy_user # Check the new user's aging settings. It should reflect the new default. sudo chage -l test_policy_userYou will see that
test_policy_userhas a maximum password age of 180 days, while older users likedev_permretain their custom settings.
Conclusion
Great work! You have now added a crucial layer of automated security to your user management skills. By enforcing password and account lifecycle policies, you reduce risk and improve your server's security posture.
Key Takeaways:
- Password and account aging policies are a fundamental part of system security.
- The
chagecommand is the primary tool for viewing (-l) and modifying (-M,-m,-W,-E) these policies for existing users. - The
passwdcommand can be used for quick status checks (-S) and to force immediate password expiration (-e). - System-wide default policies for new users are configured in the
/etc/login.defsfile.
In the previous lessons, you've created standard, unprivileged users. In our next lesson, we will address a common administrative need: granting a user administrative privileges. You'll learn how to add a user to the wheel group to give them sudo access, the standard and secure way to perform administrative tasks on Fedora.