Hello! Welcome back to the course.
In our last lesson, we mastered curl, a tool for interacting directly with web services. We saw how it can confirm that a web server is running and serving content correctly. However, curl example.com only works if your system can first translate example.com into an IP address. If that translation fails, the most sophisticated curl command is useless. This translation process is handled by the Domain Name System (DNS), the internet's global address book.
As a Full Stack Developer, DNS issues are not just a sysadmin problem; they are your problem. A misconfigured DNS record can prevent users from reaching your newly deployed Django application, stop your contact forms from sending emails, or make your API endpoints unreachable. Understanding how to query and troubleshoot DNS is a critical skill that separates a developer from a professional web architect.
Today, you will learn to resolve domain names and troubleshoot DNS using dig, the primary command-line tool for this task. You'll learn how to query different types of DNS records and diagnose common problems you'll encounter when deploying and managing web applications.
1. Getting Started with dig
dig (Domain Information Groper) is the professional's tool for DNS lookups. It provides detailed information that is essential for diagnostics.
Installation on Fedora
First, let's make sure dig is installed on your Fedora system. It's part of the bind-utils package. Open your terminal and run:
sudo dnf install bind-utils
You can verify it's installed by checking its version: dig -v.
Your First Lookup and Understanding the Output
Let's start with a basic query. We'll ask for the IP address of fedoraproject.org:
dig fedoraproject.org
You'll see a detailed, multi-section output that can seem intimidating at first. Let's watch a video that breaks it down clearly.
This video, "dig: A Practical Guide" from Navek, provides an excellent introduction to the basic dig command and how to read its default verbose output.
Watch from the beginning to 00:24, and then from 00:41 to 01:28. Focus on how the output is divided into sections, especially the QUESTION and ANSWER sections.
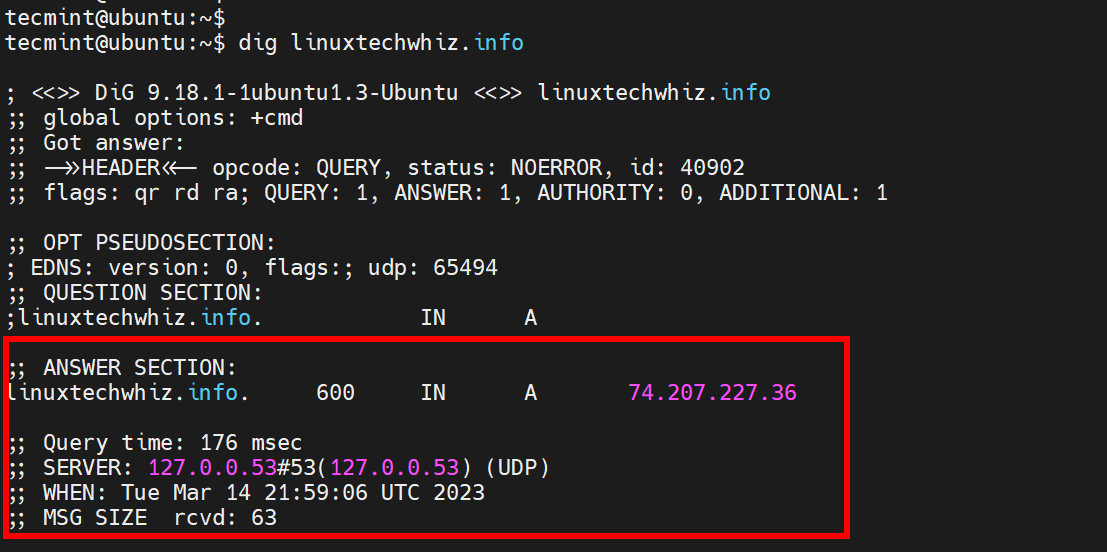
As the video showed, the two most important sections are:
;; QUESTION SECTION:: This confirms what you asked for. By default,digasks for theArecord (the IPv4 address).;; ANSWER SECTION:: This is the answer from the DNS server. It contains the domain, the Time To Live (TTL), the record class (INfor internet), the record type (A), and the value (the IP address).
Simplifying the Output
While the detailed output is great for troubleshooting, you often just want the answer. dig has options for that.
Let's return to the same video to see how to get more concise output, which is especially useful for quick checks or in scripts.
Watch from 02:51 to 04:00. Pay attention to the difference between +short and the combination of +noall +answer.
To summarize:
dig example.com +short: Gives you only the answer (e.g.,93.184.216.34).dig example.com +noall +answer: Gives you the full answer line, including the domain, TTL, and record type. This is often more useful than+shortbecause it provides more context.
2. Querying Key DNS Record Types
A domain's DNS configuration is made up of many different types of records, each serving a specific purpose. As a developer, you need to be familiar with several of them.
Dig Command in Linux (DNS Lookup)
The article "Dig Command in Linux (DNS Lookup)" from Linuxize provides a clear, command-by-command guide to querying the most common record types.
Read the section titled 'Query Record Types'. This will show you the syntax for querying A, AAAA, CNAME, TXT, MX, and NS records. We will discuss what each of these means for you as a developer.
Here's why these records matter in web development:
A(Address) &AAAA(Quad-A): These map your domain to an IPv4 or IPv6 address, respectively. This is the most fundamental record, pointing users to your web server. When you deploy a site, you'll usedigto verify this record points to your new host's IP.dig example.com A +noall +answer dig example.com AAAA +noall +answerCNAME(Canonical Name): An alias for another domain. A common use is pointing thewwwsubdomain to your main domain (e.g.,www.example.comis an alias forexample.com).dig www.fedoraproject.org +noall +answerMX(Mail Exchange): Tells mail servers where to deliver email for your domain. If your Django app's contact form emails aren't arriving, the first thing to check is if theMXrecords are correct for your email provider (like Google Workspace or SendGrid).dig google.com MX +shortTXT(Text): A free-form text record used for various verification purposes. You'll use this to prove you own a domain for Google Search Console, to set up SPF (Sender Policy Framework) records to prevent email spoofing, and for some SSL certificate validation methods.dig fedoraproject.org TXT +noall +answerNS(Name Server): Specifies the authoritative name servers for your domain. If you're not sure where a client's DNS is managed (e.g., at the registrar like GoDaddy or a third-party like Cloudflare), querying theNSrecord will tell you.dig fedoraproject.org NS +short
3. DNS Troubleshooting Techniques
Now for the most important part: using dig to diagnose problems.
Problem 1: "Is the change live, or is my computer just seeing an old, cached result?"
When you change a DNS record, it can take time for it to "propagate" across the internet. Your local machine or ISP might have the old record cached. To bypass this, you can tell dig to ask a specific public DNS server directly.
A Web Creator's Guide to the dig Command
The article "A Web Creator's Guide to the dig Command" explains perfectly why this is a crucial troubleshooting step when launching a website.
Read 'Recipe 8: Querying a Specific DNS Server (Checking Propagation)'. It shows how to use the @ symbol to query servers like Cloudflare's 1.1.1.1 or Google's 8.8.8.8.
The syntax is dig <domain> @<dns-server-ip>. If dig example.com shows the old IP but dig example.com @1.1.1.1 shows the new one, you've confirmed your change is live and you just need to wait for local caches to expire.
Problem 2: "Why is a domain not resolving at all?"
Sometimes, a lookup just fails. The +trace option is your ultimate diagnostic tool. It shows you the entire resolution path, step-by-step, starting from the internet's root DNS servers.
Let's return to the "dig: A Practical Guide" video to see a demonstration of +trace.
Watch from 04:36 to 05:18. Observe how the command queries the root servers, then the Top-Level Domain (TLD) servers (like for .org), and finally the domain's authoritative name server to get the answer.

This is invaluable for spotting where in the chain a failure is occurring.
Problem 3: "What hostname does this IP address belong to?"
A reverse DNS lookup does the opposite of a normal query: it finds the hostname associated with an IP address. This is useful for checking server configurations or identifying the source of traffic in logs.
dig -x 8.8.8.8 +short
This should return dns.google..
Interpreting Error Statuses
In the HEADER section of the verbose dig output, the status field is critical.
Dig Command in Linux (DNS Lookup)
The Linuxize article has an excellent section on what common error statuses mean and how to react to them.
Read the sections 'Troubleshooting' and 'FAQ'. Focus on the meanings of status: NOERROR, status: NXDOMAIN, and status: SERVFAIL.
NOERROR: The query was successful and an answer was found (even if the answer section is empty).NXDOMAIN: "Non-Existent Domain". The name you queried does not exist. This is usually a typo.SERVFAIL: The server failed to process your request. This could be an issue with the authoritative name server for the domain or a network problem. This is when you would use+traceor query other public resolvers to investigate further.
4. Do-It-Yourself: DNS Detective Work
Time to apply your new skills. Open your terminal and perform these investigations.
Task 1: Basic Lookups
- Find the IPv4 address for
github.com. First, do a full lookup, then get just the answer section, and finally get only the IP address with+short. - Find the IPv6 address (the
AAAArecord) forgoogle.com.
Task 2: Web Infrastructure Investigation
- As a Django developer, you'll work with PostgreSQL. Find out who handles email for
postgresql.orgby querying itsMXrecords. - Find the
NS(Name Server) records forpython.org. This tells you who manages their DNS infrastructure.
Task 3: Propagation and Troubleshooting
- Check the
Arecord forelementor.comusing your default resolver (dig elementor.com +short). - Now, check it again using Cloudflare's public DNS:
dig elementor.com @1.1.1.1 +short. - And again using Google's public DNS:
dig elementor.com @8.8.8.8 +short. - Are the answers the same? This is exactly how you would check if a DNS change has propagated globally.
Task 4: Trace the Path
- Run a full DNS trace for
djangoproject.comto see the complete resolution path.dig djangoproject.com +trace
Task 5: Reverse Lookup
- Cloudflare runs a public DNS resolver at the IP
1.1.1.1. Perform a reverse lookup to find its hostname.dig -x 1.1.1.1 +noall +answer
Conclusion
Excellent work. You've now unlocked one of the most powerful diagnostic tools for any system administrator or web developer. You're no longer in the dark when a domain fails to load; you have the tool to methodically find out why.
Key Takeaways:
digis the standard tool for querying the Domain Name System from the command line.- The most important DNS records for a web developer are
A/AAAA(IP),CNAME(alias),MX(mail),TXT(verification), andNS(authoritative server). - Troubleshooting DNS involves three key techniques:
- Interpreting the status (
NOERROR,NXDOMAIN,SERVFAIL). - Bypassing local caches by querying public resolvers directly (e.g.,
dig example.com @8.8.8.8). - Following the entire resolution path from the root servers down (
dig example.com +trace).
- Interpreting the status (
You've now confirmed a server is reachable (ping), mapped the path to it (traceroute), verified the web service is running (curl), and can now troubleshoot the address book that ties it all together (dig).
In our next lesson, we will look at the local side of the connection. Once you know a remote server is up and listening, how can you tell what services are listening for connections on your own system? We'll explore the ss command to identify listening ports and active network connections.