Introduction
Welcome back! In our last lesson, you learned how to read and interpret the file permission strings (rwx) and their three-digit octal equivalents (755, 644, etc.). This is like learning to read a map. Now, you're going to learn how to change the landscape itself.
Today's lesson focuses on putting that knowledge into action. You'll master the chmod (change mode) command, the tool you'll use to modify file and directory permissions. As a future web developer, this is a skill you'll use constantly—from making your Python scripts executable to securing your Django project's configuration files on a live server.
Your goal for this lesson is to learn how to:
- Modify file permissions using
chmodwith both symbolic and numeric modes.
We'll break down both methods and give you plenty of hands-on practice so you can confidently control who can read, write, and execute your files.
The chmod Command: Your Permission-Changing Tool
The chmod command is your primary tool for managing permissions. It can operate in two distinct modes:
- Symbolic Mode: Uses letters and symbols (
u+x,g-w) to add or remove permissions relative to their current state. It's great for making specific, targeted changes. - Numeric (or Octal) Mode: Uses the three-digit numbers you learned about (e.g.,
755,644) to set the entire permission set absolutely, regardless of its previous state. It's perfect for enforcing a specific security policy.
Let's dive into the practical application of both, starting with symbolic mode.
Modifying Permissions with Symbolic Mode
Symbolic mode is intuitive. You're essentially telling chmod who to affect, what to do, and which permission to change.
- Who:
u(user/owner)g(group)o(others)a(all: user, group, and others)
- Action:
+(add a permission)-(remove a permission)=(set the permissions exactly as specified)
- Permission:
r(read)w(write)x(execute)
For example, chmod u+x myfile.sh means: "For the user, add the execute permission to myfile.sh."
The following video provides a clear, step-by-step demonstration of using chmod with symbolic notation.
Linux Crash Course - Understanding File & Directory Permissions
This segment from the 'Linux Crash Course' video by Learn Linux TV will walk you through using symbolic mode to add and remove permissions.
Watch from 14:57 to 21:29. Pay close attention to how the u, g, and o characters are used to target specific users, and how + and - modify the permissions. Notice you can also combine operations with a comma.
Do It Yourself: Symbolic Mode Practice
Time for your first hands-on exercise. Open your terminal and follow these steps.
-
Create a practice file and check its default permissions:
touch practice_file.txt
ls -l practice_file.txt
You'll likely see something like
-rw-r--r--. This means the owner can read/write, and the group and others can only read. -
Let's make this file executable for yourself (the owner), but no one else.
chmod u+x practice_file.txt
ls -l practice_file.txt
You should now see
-rwx-r--r--. Notice thexin the owner's permission block. -
Now, imagine this file contains sensitive information. You decide the group shouldn't be able to read it. Remove the read permission for the group:
chmod g-r practice_file.txt
ls -l practice_file.txt
The permissions should now be
-rwx--ir--. -
Finally, let's perform a combined operation. Let's remove write permission from the owner but add write permission to the group.
chmod u-w,g+w practice_file.txt
ls -l practice_file.txt
What do you see now? You should have
-r-x-w-r--. -
Clean up the practice file when you're done:
rm practice_file.txt
This kind of targeted adjustment is where symbolic mode excels.
Modifying Permissions with Numeric (Octal) Mode
Numeric mode is faster when you know the exact final state you want for your permissions. Instead of adding or removing a single permission, you set all nine bits (owner, group, and other) at once.
You'll use the octal values we covered in the last lesson:
r(read) = 4w(write) = 2x(execute) = 1
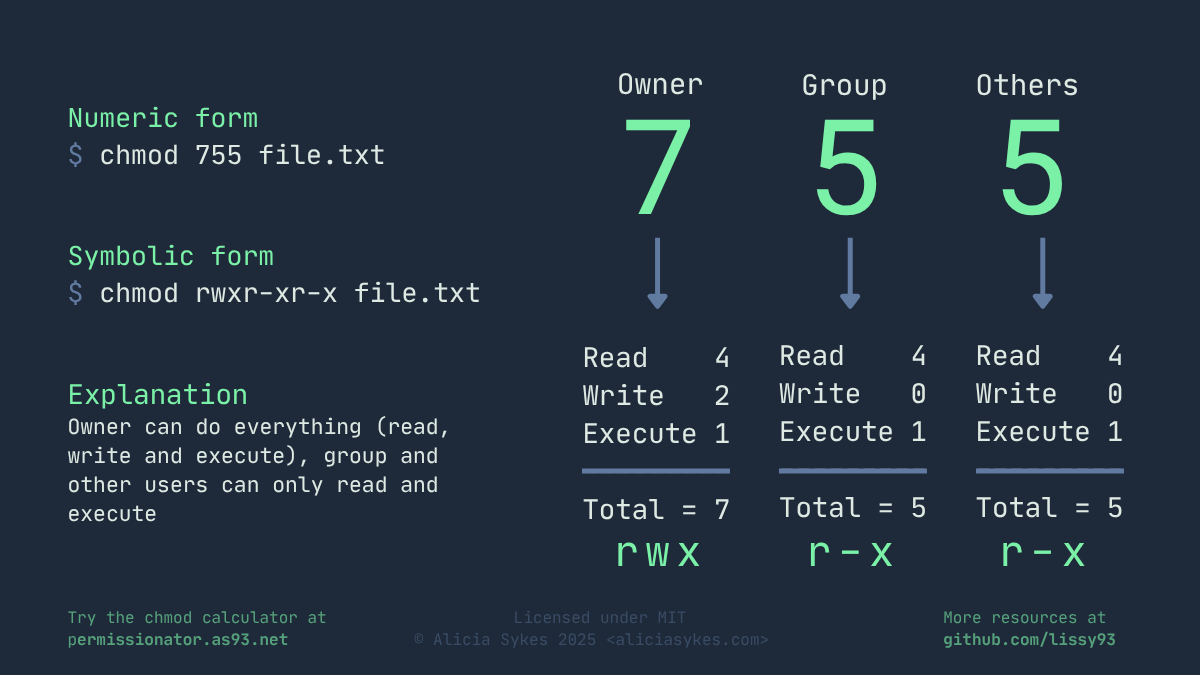
A command like chmod 755 my_directory sets the permissions to rwxr-xr-x directly.
Let's continue with the same video, which now explains the numeric method.
Linux Crash Course - Understanding File & Directory Permissions
Now, let's watch the next part of the video, where the instructor explains how to use the numeric (octal) method with chmod.
Watch from 21:29 to 27:24. Focus on how the three-digit number corresponds to the permissions for user, group, and other, and how adding the values (4+2+1) creates the desired permission set.
For a text-based alternative or supplement, the following guide from DigitalOcean is an excellent quick reference.
How to Set Permissions in Linux: A Guide to chmod and chown
This article provides concise examples for using chmod in both numeric and symbolic modes. It's a great page to bookmark for future reference.
Read the sections "The chmod Command: Symbolic and Numeric Modes", "Numeric Mode", and "Symbolic Mode". These provide clear, side-by-side command examples for both methods.
Do It Yourself: Numeric Mode Practice
Let's practice setting some common permission configurations.
-
Create a new directory and a file inside it:
mkdir my_app touch my_app/config.ini ls -ld my_app # The -d flag shows the directory's permissions, not its contents ls -l my_app/config.ini -
Directories are typically set to
755(rwxr-xr-x) to allow everyone to enter them and list contents, but only the owner to modify the contents (add/delete files). Let's enforce this on ourmy_appdirectory:chmod 755 my_app ls -ld my_appConfirm the permission string now reads
drwxr-xr-x. -
Regular files that are not executable (like configuration files or HTML files) are often set to
644(rw-r--r--). This allows the owner to read/write, while everyone else can only read.chmod 644 my_app/config.ini ls -l my_app/config.iniConfirm the string is now
-rw-r--r--. -
Now, let's create a shell script. Shell scripts need to be executable to run.
echo "#!/bin/bash" > my_app/run.sh
echo "echo 'Hello from my script!'" >> my_app/run.sh
ls -l my_app/run.sh
Notice its default permissions are likely
644, which means it's not executable. -
To make it executable for the owner, group, and others (a common setting for scripts), we use
755:chmod 755 my_app/run.sh ls -l my_app/run.shYou will see the
xbits appear, and your terminal might even change the file's color. Now you can run it:./my_app/run.sh. -
Clean up your practice files and directory:
rm -r my_app
Which Mode Should You Use?
So, when do you use symbolic versus numeric?
- Use symbolic mode when you want to make a small, relative change and don't want to affect other existing permissions. For example,
chmod +x script.shis a very common command to simply make a script executable without touching its read/write permissions. - Use numeric mode when you want to enforce an exact permission state. This is common in deployment scripts or for security hardening, where you want to be absolutely sure a file has permissions of
644or600, no matter what they were before.
The LPI learning material has a good section summarizing this.
For a final theoretical point, review this short explanation of when to use symbolic versus numeric mode.
In this resource from the Linux Professional Institute, find and read the short section titled "Which syntax to use?". It directly compares the two modes and gives practical advice on their use cases.
Conclusion
Fantastic work. You are no longer just a passive observer of file permissions; you are now empowered to change them. This is a fundamental skill that separates a casual user from a system administrator or a developer who can manage their own deployments.
Key Takeaways:
- The
chmodcommand is used to change file and directory permissions. - Symbolic mode (
u+x,go-w) is for making relative changes and is great for specific tweaks like making a script executable. - Numeric mode (
755,644) is for setting absolute permissions and is ideal for ensuring a file or directory matches a specific security policy. - A common permission for directories and scripts is
755(rwxr-xr-x). - A common permission for non-executable files is
644(rw-r--r--).
In our next lesson, we will address the other half of the permission equation: ownership. You've learned to control what can be done to a file, and next, you'll learn to control who is the owner and which group it belongs to using the chown and chgrp commands.