Welcome to the next lesson in our journey through Spring Data JPA. In our last session, you mastered derived query methods, a powerful feature for creating clean, readable data access logic for many common scenarios. However, as we hinted, derived methods have their limits. When queries become too complex, involve intricate joins, or require database-specific features, their long method names can become unwieldy and impractical.
This lesson addresses that limitation head-on. We will explore the @Query annotation, which gives you complete control to write your own custom queries. You will learn how to define queries using both the object-oriented Java Persistence Query Language (JPQL) and raw, native SQL. This will unlock the full power of your database, enabling you to tackle any data retrieval challenge your backend applications might face.
When Derived Queries Aren't Enough
Before diving in, it's important to understand why you'd choose @Query over a derived method. While derived queries are excellent for their simplicity and readability, you'll need a more explicit approach for:
- Complex Joins: Queries that join multiple tables in non-trivial ways.
- Projections: Queries that return custom data structures (DTOs) rather than full entities.
- Database-Specific Features: Using functions or syntax unique to your database (e.g., PostgreSQL's JSON functions, Oracle's analytical functions).
- Bulk Updates/Deletes: Performing efficient batch operations on your data.
- Clarity: When a derived method name would be excessively long and hard to understand.
The following video provides an excellent overview of why and when you would use the @Query annotation.
Spring Data JPA: Ultimate Guide to Custom Queries with @Query Annotation
Thorben Janssen provides a clear rationale for using custom queries.
Watch the introductory segment from the beginning to understand the transition from derived queries to the more flexible @Query annotation.
Writing Custom Queries with JPQL
The default and most common way to use @Query is with Java Persistence Query Language (JPQL). JPQL is syntactically similar to SQL, but it operates on your Java entities and their fields, not on database tables and columns. This abstraction is powerful because it makes your queries database-agnostic; the JPA provider (like Hibernate) translates your JPQL into the correct SQL dialect for your configured database.
Let's look at the basic syntax. To define a JPQL query, you simply add the @Query annotation to a repository method and provide the query string as its value.
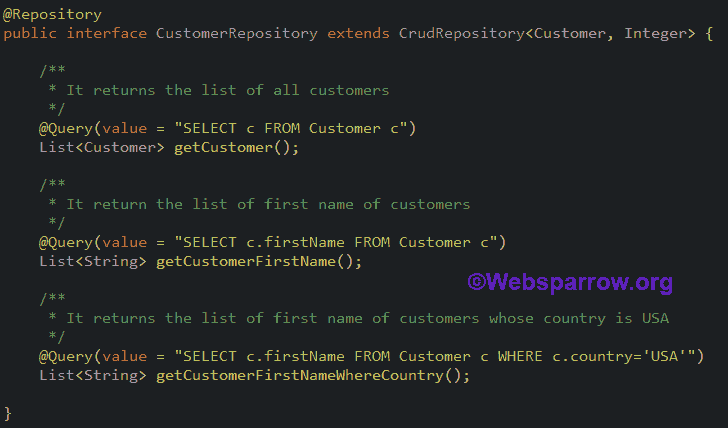
The Baeldung article, "Spring Data JPA @Query", is an excellent reference for this entire topic. We'll be referring to it throughout the lesson.
This section from Baeldung introduces the basic usage of @Query for both JPQL and native SQL.
Read section 2. Select Query. Pay close attention to subsection 2.1. JPQL, which shows the default usage.
Joins and Projections in JPQL
A key reason to use @Query is to handle more complex relationships. You can explicitly define JOIN clauses to link entities.
A particularly powerful feature is creating projections. Instead of fetching a whole entity (or entities), you can construct a custom object—a Data Transfer Object (DTO)—directly from your query results. This is highly efficient as it only transfers the data you actually need. Since Java 14, records are a perfect, concise way to define these DTOs.
The video below gives a fantastic deep-dive into writing joins and using DTOs for projections in JPQL.
JPA/Hibernate Fundamentals 2023 - Lesson 10 - Joins and Inner Queries
Laur Spilca demonstrates how to write JPQL joins and use records as DTOs for clean, type-safe projections.
First, watch the demonstration on how to write a simple inner join in JPQL. Next, skip ahead and see how different join syntaxes achieve the same result. The section from this point shows that JOIN is equivalent to INNER JOIN and that joins can also be expressed implicitly. Finally, and most importantly, watch the section on using DTOs for projections. This demonstrates creating a Java record to hold query results, which is a much cleaner approach than using Object[].
Dropping Down to Native SQL
Sometimes, JPQL isn't enough. If you need to use a database-specific SQL function or syntax that JPQL doesn't support, you can write a native SQL query.
To do this, you provide the raw SQL statement in the @Query annotation and set the nativeQuery attribute to true. This tells Spring Data JPA to pass the query directly to the database driver without interpretation. This gives you maximum power but sacrifices database portability.
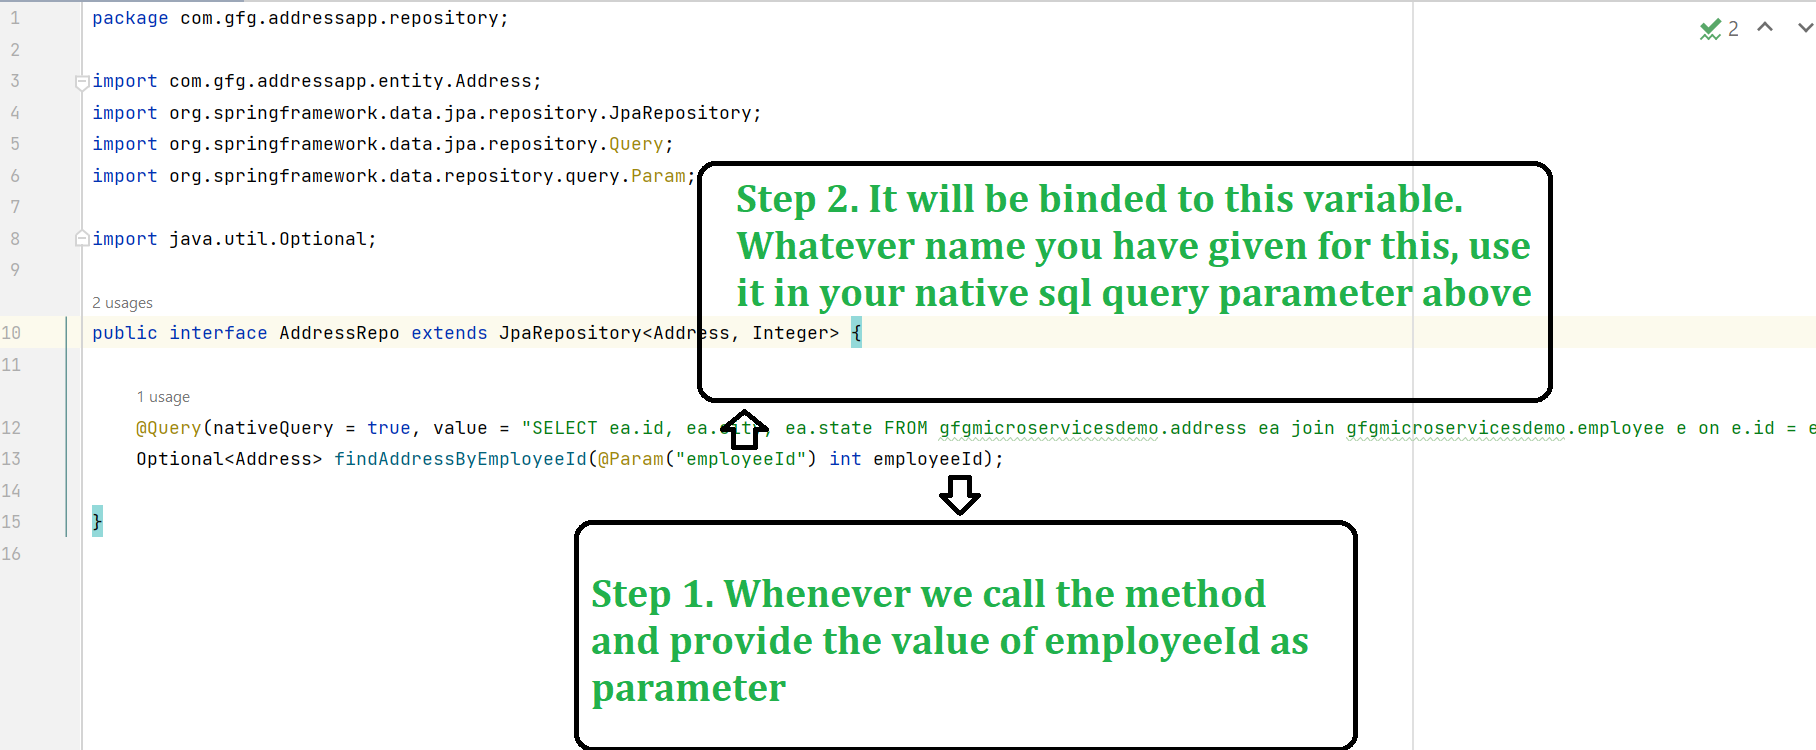
The GeeksforGeeks article provides a complete, practical walkthrough of implementing a native query in a Spring Boot project, which will be very relevant for our hands-on section.
Spring Data JPA @Query Annotation with Example
This article provides a step-by-step guide to using a native SQL query with a join.
Read the introduction which contrasts JPQL and native queries. Then, jump to Step 5, which shows the core implementation of a native query using @Query(nativeQuery = true, ...) and a named parameter.
Binding Parameters Securely
Hardcoding values into query strings is a major security risk (leading to SQL injection) and hurts database performance. The correct approach is to use bind parameters. @Query supports two styles:
- Indexed Parameters (
?1,?2, ...): Parameters are bound by their position in the method signature. The first method argument maps to?1, the second to?2, and so on. This is concise but can be error-prone if you reorder method parameters. - Named Parameters (
:paramName): Parameters in the query are given a name, and you use the@Param("paramName")annotation on the corresponding method argument. This is the recommended approach as it's more readable and robust against refactoring.
Let's return to the Baeldung article to see how both are implemented.
This reading covers the two methods for binding parameters to your custom queries.
Read section 6 on indexed parameters, and then section 7 on the preferred named parameters approach. Notice how named parameters make the query's intent much clearer.
Modifying Data with @Modifying
The @Query annotation isn't limited to SELECT statements. You can also use it to perform bulk UPDATE or DELETE operations. Since these queries modify the state of the database, you must add another annotation: @Modifying.
This annotation tells Spring Data JPA to execute the query as a modifying operation. The repository method should typically return an int to indicate the number of rows affected, or void.
Spring Data JPA: Ultimate Guide to Custom Queries with @Query Annotation
This short clip explains how to use the @Modifying annotation for update and delete queries.
Watch the segment from this point to see how to define a query that modifies data.
Hands-On: Implementing Custom Queries
It's time to apply these concepts in our group-manager project. We'll add several custom queries to our repositories.
-
Open your project in your IDE.
-
Add a DTO record: In your
postpackage (e.g.,com.example.groupmanager.model.post), create a new Java record for a projection. This will hold a post's title and the count of its tags.package com.example.groupmanager.model; public record PostWithTagCount(String title, Long tagCount) { } -
Update your repository interfaces with the following methods:
- In
PostRepository.java, add these methods. We'll find posts containing a specific tag and also find posts with more than a certain number of tags.import org.springframework.data.jpa.repository.Query; import org.springframework.data.repository.query.Param; import java.util.List; // ... other imports public interface PostRepository extends JpaRepository<Post, Long> { // ... your existing derived query methods ... // JPQL query with a JOIN to find posts by a tag's name @Query("SELECT p FROM Post p JOIN p.tags t WHERE t.name = :tagName") List<Post> findByTagName(@Param("tagName") String tagName); // Native SQL query to find posts with more than 'minTags' number of tags. // This returns our custom DTO projection. @Query(value = "SELECT p.title as title, COUNT(pt.tags_id) as tagCount " + "FROM posts p JOIN posts_tags pt ON p.id = pt.posts_id " + "GROUP BY p.id, p.title " + "HAVING COUNT(pt.tags_id) > :minTags", nativeQuery = true) List<PostWithTagCount> findPostsWithTagCountGreaterThan(@Param("minTags") int minTags); }
Note: The native query
List<PostWithTagCount>works because Spring can map the result columns (title,tagCount) to the DTO's constructor parameters if the names match. This requires your project to be compiled with the-parametersflag, which is default in modern Spring Boot setups.- In
UserRepository.java, add a modifying query to deactivate users.import org.springframework.data.jpa.repository.Modifying; import org.springframework.data.jpa.repository.Query; import org.springframework.data.repository.query.Param; // ... other imports public interface UserRepository extends JpaRepository<User, Long> { // ... your existing derived query methods ... // Note: In a real app, a 'status' or 'active' field is better than deleting. // We'll simulate this by changing their name to indicate they are inactive. @Modifying @Query("UPDATE User u SET u.name = CONCAT(u.name, ' (Inactive)') WHERE u.id = :userId") int deactivateUser(@Param("userId") Long userId); }
- In
-
Update
DataLoader.javato test the new methods. Replace the entire content of yourDataLoader.javafile with the code below. It uses the same data setup as before but adds tests for our new custom queries.package com.example.groupmanager; import com.example.groupmanager.model.Post; import com.example.groupmanager.model.PostWithTagCount; import com.example.groupmanager.model.Tag; import com.example.groupmanager.model.User; import com.example.groupmanager.repository.PostRepository; import com.example.groupmanager.repository.TagRepository; import com.example.groupmanager.repository.UserRepository; import org.springframework.beans.factory.annotation.Autowired; import org.springframework.boot.CommandLineRunner; import org.springframework.stereotype.Component; import java.util.List; @Component public class DataLoader implements CommandLineRunner { @Autowired private PostRepository postRepository; @Autowired private TagRepository tagRepository; @Autowired private UserRepository userRepository; @Override public void run(String... args) throws Exception { // Clean up previous data postRepository.deleteAll(); tagRepository.deleteAll(); userRepository.deleteAll(); // --- Create Sample Data --- User user1 = userRepository.save(new User("Alice", "alice@example.com", "pass1")); User user2 = userRepository.save(new User("Bob", "bob@example.com", "pass2")); Tag tagJava = tagRepository.save(new Tag("Java")); Tag tagSpring = tagRepository.save(new Tag("Spring Boot")); Tag tagDatabase = tagRepository.save(new Tag("Database")); Post post1 = new Post("Intro to Spring Boot", "Content about Spring Boot basics."); post1.setUser(user1); post1.addTag(tagSpring); post1.addTag(tagJava); postRepository.save(post1); Post post2 = new Post("JPA Relationships", "Content about JPA."); post2.setUser(user1); post2.addTag(tagJava); post2.addTag(tagDatabase); postRepository.save(post2); Post post3 = new Post("Another Java Post", "More content about Java."); post3.setUser(user2); post3.addTag(tagJava); postRepository.save(post3); System.out.println("--- Sample Data Loaded ---"); // --- Testing @Query Methods --- System.out.println("\n1. Testing findByTagName('Spring Boot'):"); List<Post> springPosts = postRepository.findByTagName("Spring Boot"); System.out.println(" Found " + springPosts.size() + " post(s) with tag 'Spring Boot':"); springPosts.forEach(p -> System.out.println(" - " + p.getTitle())); System.out.println("\n2. Testing findPostsWithTagCountGreaterThan(1):"); List<PostWithTagCount> postsWithManyTags = postRepository.findPostsWithTagCountGreaterThan(1); System.out.println(" Found " + postsWithManyTags.size() + " post(s) with more than 1 tag:"); postsWithManyTags.forEach(p -> System.out.println(" - '" + p.title() + "' has " + p.tagCount() + " tags.")); System.out.println("\n3. Testing deactivateUser(" + user2.getId() + "):"); int updatedRows = userRepository.deactivateUser(user2.getId()); System.out.println(" Rows updated: " + updatedRows); userRepository.findById(user2.getId()).ifPresent( u -> System.out.println(" User 2 is now named: " + u.getName()) ); } } -
Run the application. Examine the console output. You should see the successful results of your custom JPQL, native SQL, and modifying queries, proving that you now have fine-grained control over your database interactions.
Conclusion
You have now added a critical tool to your Spring Data JPA toolkit. While derived queries offer convenience, the @Query annotation provides the power and precision necessary for building complex, real-world backend services. You are no longer limited by what can be expressed in a method name.
Key Takeaways:
- The
@Queryannotation allows you to define custom JPQL or native SQL queries in your repository. - JPQL operates on entities and is database-independent, making it the preferred choice for most custom queries.
- Native SQL (
nativeQuery = true) should be used for database-specific features or performance-critical queries that JPQL cannot express. - Always use bind parameters to pass data to your queries, preferring named parameters (
@Param) for readability and safety. - For
UPDATE,DELETE, orINSERToperations, you must add the@Modifyingannotation alongside@Query.
In this lesson and the previous one, you've learned how to read and write data. However, what happens when multiple operations need to succeed or fail together as a single unit? In our next lesson, we will explore database transactions and learn how to manage them declaratively using the @Transactional annotation to ensure your application's data remains consistent and reliable.