Welcome back! In our last lesson, we successfully mapped a many-to-many relationship using @ManyToMany, creating a join table to link our Post and Tag entities. We also created repository interfaces like TagRepository extends JpaRepository<Tag, Long>, but we didn't stop to explore what extending JpaRepository actually accomplishes.
This lesson dives into the heart of Spring Data JPA's power. We'll demystify the JpaRepository interface and see how, by simply extending it, we gain a full suite of database operations (Create, Read, Update, Delete) for our entities without writing a single line of implementation code. Understanding this concept is fundamental to building data-driven backend applications efficiently in the Spring ecosystem.
The Repository Abstraction
Before we look at the specific Spring interfaces, let's briefly touch on the underlying concept: the Repository Pattern. A repository acts as a mediator between your application's business logic and the data storage layer (our MySQL database). It provides a clean, object-oriented API that makes it feel like you're working with a simple collection of objects, hiding the complexities of database queries, connections, and transactions.
Your experience with the MERN stack and libraries like Mongoose for MongoDB follows a similar principle: providing a structured way to interact with your data source without writing low-level database commands for every operation. Spring Data JPA formalizes this pattern with a powerful set of interfaces.
The Spring Data Repository Hierarchy
Spring Data provides a hierarchy of repository interfaces, each adding more functionality. The JpaRepository is the most commonly used one in JPA-based projects, but it's built on several others.

Let's break down this hierarchy:
Repository<T, ID>: This is the base interface. It's primarily a "marker" interface that tells Spring to create a repository bean for the typeT(your entity) with an ID of typeID. It has no methods of its own.CrudRepository<T, ID>: This is where the magic begins. It extendsRepositoryand provides a standard set of methods for CRUD operations.PagingAndSortingRepository<T, ID>: This extendsCrudRepositoryand adds methods for retrieving data in paginated chunks and for sorting results.JpaRepository<T, ID>: This is the final layer for JPA. It extendsPagingAndSortingRepositoryand adds JPA-specific methods, such as flushing the persistence context (flush()) and batch deletion.
For a concise summary of this structure, the following article is a great reference.
Spring Boot JpaRepository Example
This article from HowToDoInJava gives a clear overview of the JpaRepository and its parent interfaces.
Please read the introductory section, specifically the table under 1. JpaRepository Interface. This table neatly outlines the purpose of each interface in the hierarchy.
Creating and Using a JpaRepository
As you've already done in previous lessons, creating a repository is incredibly simple. You define an interface and extend JpaRepository, specifying your entity class and the type of its primary key.
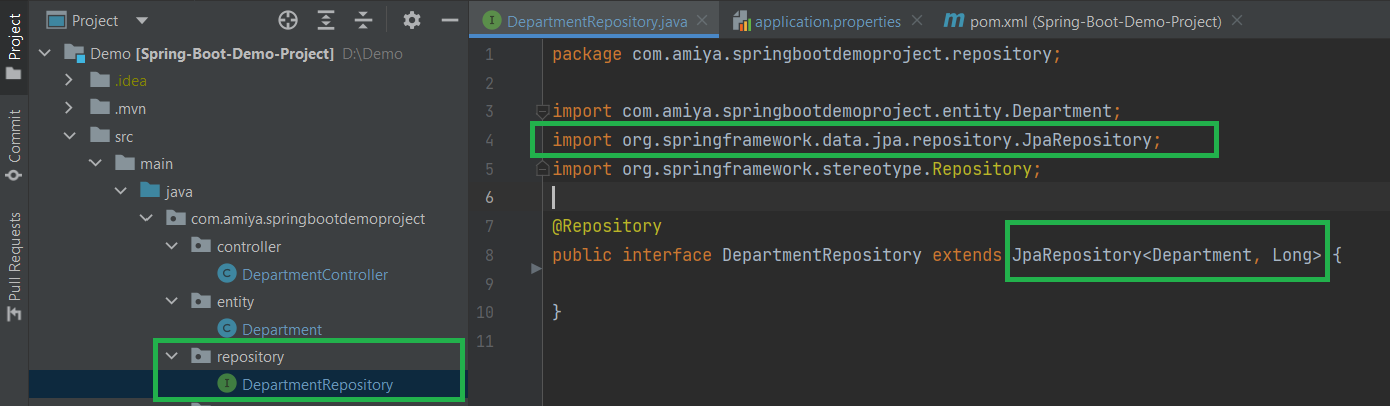
By doing this, Spring Data JPA will automatically generate an implementation class at runtime that provides the concrete logic for all the inherited methods. The following video from Telusko provides an excellent visual walkthrough of this process, showing how methods become available immediately after extending the interface.
#19 Spring Data JPA with JpaRepository
This video demonstrates the practical steps of creating a repository and then immediately using the methods it provides.
First, watch the instructor's explanation of the repository layer's role from creating the repository. Then, see the "magic" in action from extending JpaRepository. Notice how he extends the interface and can instantly call methods like findAll() and findById() on the repository instance in his service layer.
So, what are these powerful methods we get for free? Here are the most essential ones provided by CrudRepository, which JpaRepository inherits:
save(S entity): Saves a new entity or updates an existing one (if an ID is present).findById(ID id): Retrieves an entity by its ID. Returns anOptional<S>to handle cases where the entity might not exist.findAll(): Retrieves all instances of the entity.count(): Returns the total number of entities.delete(S entity): Deletes a given entity.deleteById(ID id): Deletes an entity by its ID.existsById(ID id): Checks if an entity with a given ID exists, returningtrueorfalse.
The bezkoder.com article provides another clear example of this.
Spring Boot, Spring Data JPA - Rest CRUD API example
This article provides a concise code example and explanation of the repository interface.
Please review the section Create Repository Interface. It shows the creation of TutorialRepository and lists the core methods that become available.
Hands-On: Putting JpaRepository to Work
Now, let's use these methods in our group-manager project. Instead of building a full REST controller right away, we'll create a CommandLineRunner. This is a special type of Spring bean that executes its code once, right after the application starts. It's a perfect tool for seeding a database or, in our case, for testing our repository methods directly.
-
Create a
DataLoaderclass.
In your main application package (e.g.,com.example.groupmanager), create a new class calledDataLoader.java. Annotate it with@Componentso Spring will manage it as a bean.package com.example.groupmanager; import com.example.groupmanager.model.Post; import com.example.groupmanager.model.Tag; import com.example.groupmanager.model.User; import com.example.groupmanager.repository.PostRepository; import com.example.groupmanager.repository.TagRepository; import com.example.groupmanager.repository.UserRepository; import org.springframework.beans.factory.annotation.Autowired; import org.springframework.boot.CommandLineRunner; import org.springframework.stereotype.Component; import java.util.List; import java.util.Optional; @Component public class DataLoader implements CommandLineRunner { @Autowired private PostRepository postRepository; @Autowired private TagRepository tagRepository; @Autowired private UserRepository userRepository; @Override public void run(String... args) throws Exception { System.out.println("--- Loading initial data using JpaRepository ---"); // Clean up previous runs postRepository.deleteAll(); tagRepository.deleteAll(); userRepository.deleteAll(); // 1. Using save() User user = new User("John Doe", "john.doe@example.com", "password123"); userRepository.save(user); Tag tagJava = new Tag("Java"); Tag tagSpring = new Tag("Spring Boot"); Post post = new Post("First Post", "This is the content of the first post."); post.setUser(user); // Set the user for the post // Use helper methods to maintain relationships post.addTag(tagJava); post.addTag(tagSpring); postRepository.save(post); System.out.println("Saved Post with ID: " + post.getId()); // 2. Using findById() Optional<Post> retrievedPostOptional = postRepository.findById(post.getId()); if (retrievedPostOptional.isPresent()) { Post retrievedPost = retrievedPostOptional.get(); System.out.println("Retrieved Post by ID: " + retrievedPost.getTitle()); System.out.println("Tags associated with post: " + retrievedPost.getTags().size()); } // 3. Using findAll() List<Tag> allTags = tagRepository.findAll(); System.out.println("Found " + allTags.size() + " tags in total."); allTags.forEach(t -> System.out.println(" - Tag: " + t.getName())); // 4. Using count() long postCount = postRepository.count(); System.out.println("Total number of posts: " + postCount); // 5. Using deleteById() postRepository.deleteById(post.getId()); System.out.println("Deleted post with ID: " + post.getId()); // 6. Using existsById() boolean postExists = postRepository.existsById(post.getId()); System.out.println("Does post with ID " + post.getId() + " exist? " + postExists); System.out.println("--- Data loading complete ---"); } }Note: For this code to work, you will need to add a
UserRepositorysimilar to thePostRepositoryandTagRepositoryyou've already created, and ensure yourPostentity has the@ManyToOnerelationship withUserfrom a previous lesson. -
Run the application.
Start your Spring Boot application as usual. Watch the console output. You should see theSystem.out.printlnmessages from theDataLoader'srunmethod, demonstrating each of the repository methods in action. You will see the post being saved, retrieved, counted, and finally deleted. This hands-on exercise confirms that your repositories are fully functional.
Conclusion
Today you've explored one of the most significant productivity features of the Spring ecosystem. By simply extending the JpaRepository interface, you delegate the tedious and error-prone task of writing basic data access code to the framework, allowing you to focus on your application's business logic.
Key Takeaways:
- A repository is an abstraction that provides a clean, collection-like interface to your data source.
- Spring Data provides a hierarchy of interfaces, with
JpaRepositorybeing the most common choice for JPA projects. - By creating an interface that extends
JpaRepository<EntityType, IdType>, you automatically inherit a full suite of CRUD methods likesave(),findById(),findAll(), anddeleteById(). - Spring Data JPA dynamically generates the implementation for these methods at runtime, requiring zero boilerplate code from you.
The built-in methods are incredibly useful, but what happens when you need a more specific query, like finding all posts written by a particular user or fetching all tags whose names start with "Java"? In our next lesson, we will explore derived query methods, another powerful feature where Spring Data JPA automatically writes queries for you based on nothing more than the name of a method you declare in your repository.