Welcome back! In our last lesson, you successfully modeled a one-to-many relationship between Post and Comment entities. This was a significant step in building complex data models where one entity "owns" many others.
Today, we will tackle a different but equally common scenario: the many-to-many relationship. We'll continue building out your group-manager project by adding a tagging system. A blog post can have many tags (e.g., "Java", "JPA", "Spring"), and a single tag can be applied to many different posts. This lesson will guide you through mapping this relationship using the @ManyToMany annotation and, crucially, understanding the underlying database structure involving a "join table".
The Need for a Join Table
In the one-to-many relationship, it was straightforward: we placed a foreign key (post_id) in the comments table. But with a many-to-many relationship, where do we put the foreign key?
- We can't add a
tag_idcolumn to thepoststable, because a post can have multiple tags. - We can't add a
post_idcolumn to thetagstable, because a tag can be on multiple posts.
The solution in a relational database is to create a third table, often called a join table (or junction table). This table's sole purpose is to store pairs of foreign keys, linking the two primary tables together. For our Post and Tag example, we'd have a post_tag table with two columns: post_id and tag_id. Each row in this table represents a single association between a specific post and a specific tag.

To understand the relational model first is key. The following article from Baeldung provides a clear explanation.
Many-To-Many Relationship in JPA
This article provides a great introduction to the topic. Focus on the conceptual part for now.
Please read the section titled Modeling the Relationship. Pay close attention to the diagrams that show how the conceptual model translates into a physical database model with a join table.
Implementing @ManyToMany in JPA
Now let's translate this database concept into JPA entities. A many-to-many mapping is always bidirectional in the database (via the join table), but in our code, we still must define an owning side and an inverse side to tell JPA which entity is responsible for managing the relationship.
- Owning Side: This is the entity where we'll configure the join table details. We'll use the
@JoinTableannotation here. We can arbitrarily choose either entity to be the owner; let's pickPost. - Inverse Side: This is the other entity (
Tag). Here, we'll use themappedByattribute on the@ManyToManyannotation to tell JPA that the relationship is already configured on the owning side.
The following video by Java Techie provides an excellent, practical walkthrough of this entire process. We will refer to specific parts of it as we go.
Spring Boot | Spring Data JPA Many To Many Bidirectional Relationship Example | JavaTechie
This video provides a complete end-to-end example of a many-to-many relationship.
First, watch the introduction from the beginning to understand the Student and Course example, which is analogous to our Post and Tag scenario.
1. The Owning Side (Post)
On the Post entity, we declare a collection of Tags and use @ManyToMany to define the relationship. We then use @JoinTable to specify the name of our join table and the names of the foreign key columns.
// In the Post class...

@ManyToMany(fetch = FetchType.LAZY, cascade = { CascadeType.PERSIST, CascadeType.MERGE })
@JoinTable(name = "post_tags",
           joinColumns = { @JoinColumn(name = "post_id") },
           inverseJoinColumns = { @JoinColumn(name = "tag_id") })
private Set<Tag> tags = new HashSet<>();
Let's break this down:
@ManyToMany: Defines the relationship type.fetch = FetchType.LAZY: As with other relationships, lazy fetching is the default and is crucial for performance. It prevents Hibernate from loading all associated tags every time you load a post.cascade: We usePERSISTandMERGE. This means if we save a new post that has new tags, the tags will be saved too. Notice we do not useCascadeType.REMOVE. Deleting a post should not delete a tag that might be used by other posts.
@JoinTable(name = "post_tags"): Specifies that our join table is namedpost_tags.joinColumns = @JoinColumn(name = "post_id"): Defines the foreign key column in the join table that refers to the owning entity (Post).inverseJoinColumns = @JoinColumn(name = "tag_id"): Defines the foreign key column that refers to the inverse entity (Tag).
Watch how this is implemented in the Java Techie video.
Spring Boot | Spring Data JPA Many To Many Bidirectional Relationship Example | JavaTechie
The instructor demonstrates how to set up the owning side of the relationship on the Student entity. This is directly applicable to our Post entity.
Watch the segment from defining the relationship. Pay close attention to how @JoinTable, @JoinColumn, and inverseJoinColumns are used to configure the join table from the owning entity.
2. The Inverse Side (Tag)
The Tag entity is much simpler. We declare a collection of Posts and use the mappedBy attribute to point back to the tags field in the Post entity.
// In the Tag class...

@ManyToMany(mappedBy = "tags")
private Set<Post> posts = new HashSet<>();
This tells JPA, "This side of the relationship is just a mirror. The real configuration is on the Post entity, in the tags field."
The video demonstrates this clearly on the Course entity.
Spring Boot | Spring Data JPA Many To Many Bidirectional Relationship Example | JavaTechie
This part of the video explains how to configure the inverse, or non-owning, side of the relationship.
Watch from the inverse side to see the use of the mappedBy attribute, which is essential for a correct bidirectional mapping.
Best Practice: Use Set Instead of List
You might be tempted to use a List<Tag> instead of a Set<Tag>. While this works, it is highly inefficient. Because a List implies an order (maintained by an index column in the database) and allows duplicates, Hibernate cannot perform efficient single-row updates. When you remove a tag from a post's list, Hibernate's default behavior is to:
DELETEall records from the join table for that post.INSERTall the remaining records back into the table.
This is extremely wasteful. A Set, on the other hand, is an unordered collection of unique elements, which maps perfectly to the nature of a join table. When using a Set, removing an association results in a single, efficient DELETE statement.
Vlad Mihalcea, a leading expert on Hibernate, explains this performance pitfall in detail.
Best way to map the JPA and Hibernate ManyToMany ...
This article is a must-read for understanding the performance implications of your collection choice in @ManyToMany mappings.
First, read the section Implementing with a List. Pay attention to the SQL logs showing the inefficient DELETE and REINSERT operations. Next, read Implementing with a Set to see how this simple change results in a much more efficient, single DELETE statement. Finally, read the short Conclusion, which summarizes the key takeaway.
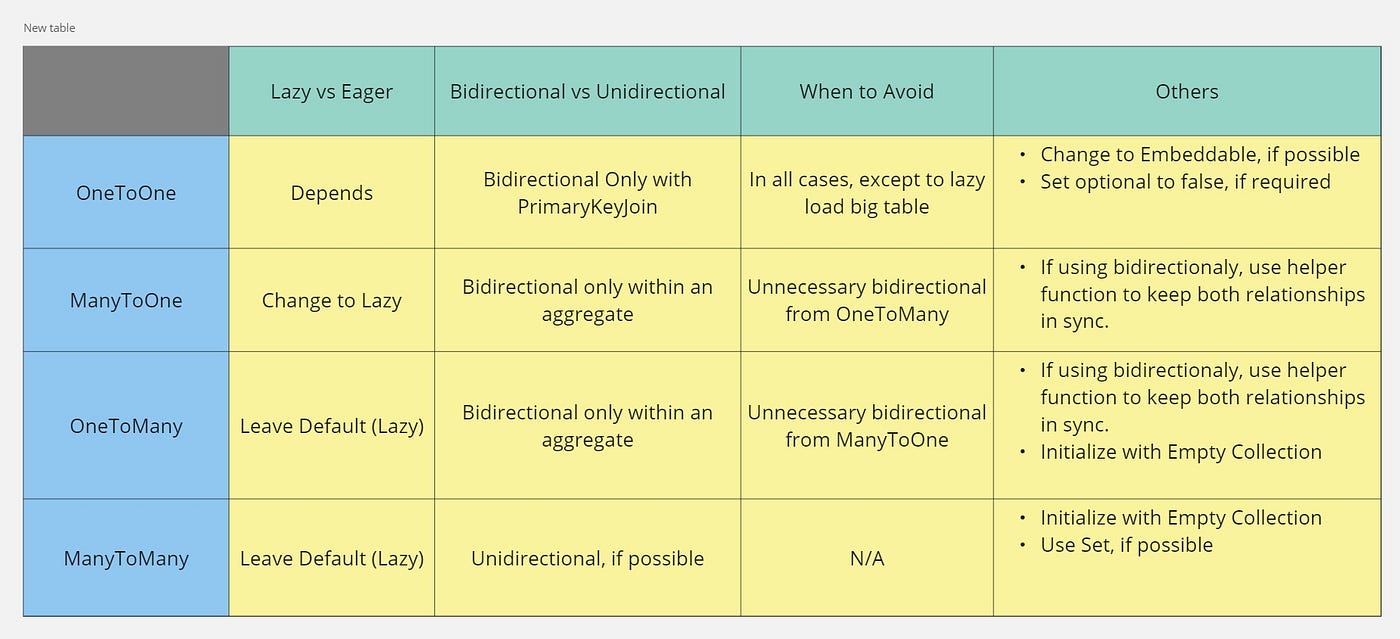
Hands-On: Add Tags to Your Project
It's time to apply this to your group-manager project. We'll create a Tag entity and modify the existing Post entity.
-
Create the
Tagentity: In yourcom.example.groupmanager.modelpackage, create a new class namedTag.java.package com.example.groupmanager.model; import jakarta.persistence.*; import java.util.HashSet; import java.util.Set; import java.util.Objects; @Entity @Table(name = "tags") public class Tag { @Id @GeneratedValue(strategy = GenerationType.IDENTITY) private Long id; @Column(unique = true, nullable = false) private String name; // Inverse side of the relationship @ManyToMany(mappedBy = "tags") private Set<Post> posts = new HashSet<>(); public Tag() {} public Tag(String name) { this.name = name; } // Getters and Setters public Long getId() { return id; } public void setId(Long id) { this.id = id; } public String getName() { return name; } public void setName(String name) { this.name = name; } public Set<Post> getPosts() { return posts; } public void setPosts(Set<Post> posts) { this.posts = posts; } // equals and hashCode based on the business key 'name' @Override public boolean equals(Object o) { if (this == o) return true; if (o == null || getClass() != o.getClass()) return false; Tag tag = (Tag) o; return Objects.equals(name, tag.name); } @Override public int hashCode() { return Objects.hash(name); } }Notice the
equals()andhashCode()methods. When working with Sets and entities, it's a best practice to base equality on a unique, immutable business key (like the tagname) rather than the generatedid. -
Modify the
Postentity: OpenPost.javaand add the newtagscollection and the helper methods.// Add these imports to Post.java import java.util.Set; import java.util.HashSet; // Inside the Post class, add this field: @ManyToMany(fetch = FetchType.LAZY, cascade = { CascadeType.PERSIST, CascadeType.MERGE }) @JoinTable(name = "post_tags", joinColumns = @JoinColumn(name = "post_id"), inverseJoinColumns = @JoinColumn(name = "tag_id")) private Set<Tag> tags = new HashSet<>(); // And add these helper methods: public void addTag(Tag tag) { tags.add(tag); tag.getPosts().add(this); } public void removeTag(Tag tag) { tags.remove(tag); tag.getPosts().remove(this); } // And add a getter/setter for the tags collection public Set<Tag> getTags() { return tags; } public void setTags(Set<Tag> tags) { this.tags = tags; }Just like in the last lesson, the helper methods (
addTag,removeTag) are vital for keeping both sides of the bidirectional relationship in sync in your Java code. -
Create the
TagRepository: In therepositorypackage, create a new interface namedTagRepository.java.package com.example.groupmanager.repository; import com.example.groupmanager.model.Tag; import org.springframework.data.jpa.repository.JpaRepository; import java.util.Optional; public interface TagRepository extends JpaRepository<Tag, Long> { Optional<Tag> findByName(String name); } -
Restart and Verify: Restart your Spring Boot application. Check the console logs. You should see Hibernate's
CREATE TABLEstatements fortagsand thepost_tagsjoin table. You can also connect to your database to see the new tables. The Java Techie video shows this verification step well.
Spring Boot | Spring Data JPA Many To Many Bidirectional Relationship Example | JavaTechie
After creating your entities, it's important to verify that the database schema was generated correctly.
Watch the section from verifying table creation to see how the instructor checks for the main entity tables and, most importantly, the new join table.
A Final Pitfall: JSON Serialization Loops
When you expose these entities via a REST API, you'll encounter a StackOverflowError. This happens because the JSON serializer gets stuck in an infinite loop: it tries to serialize a Post, which includes its tags; then it serializes a Tag, which includes its posts; this leads back to the original Post, and the cycle repeats.
The standard solution is to use the @JsonManagedReference and @JsonBackReference annotations from the Jackson library.
@JsonManagedReference: Place this on the collection on the "main" or "parent" side you want to serialize (e.g., thetagscollection inPost).@JsonBackReference: Place this on the collection on the "back" side to break the loop (e.g., thepostscollection inTag).
The video you've been watching provides a perfect demonstration of this exact problem and its solution.
Spring Boot | Spring Data JPA Many To Many Bidirectional Relationship Example | JavaTechie
This is a very common problem in projects with bidirectional relationships. Understanding how to solve it is essential for building working APIs.
Watch from the StackOverflowError to see the error in action and how the instructor uses @JsonManagedReference and @JsonBackReference to fix it.
Conclusion
You have now added another powerful tool to your data modeling toolkit. The many-to-many relationship is fundamental to many real-world applications, and you now understand not just how to implement it, but also the key performance and serialization pitfalls to avoid.
Key Takeaways:
- Many-to-many relationships require a join table in the database to link two primary tables.
- In JPA, you map this using
@ManyToManyon both entities. - The owning side uses
@JoinTableto define the join table's name and foreign key columns. - The inverse side uses
mappedByto refer back to the owning side's configuration. - For optimal performance, always use
Setinstead ofListfor@ManyToManycollections. - To prevent infinite recursion during JSON serialization, use
@JsonManagedReferenceand@JsonBackReference.
In our next lesson, we'll dive deeper into Spring Data JPA repositories and learn how to define custom queries without writing any SQL, using a powerful feature called derived query methods.