Welcome to the first lesson of our module on data persistence. In our previous work, we built a functional REST API, but our data was stored in a simple HashMap. This meant that every time we restarted the application, all our created groups were lost. Today, we take a major step toward building a real-world, persistent application by connecting it to a proper database.
Your experience with MySQL will be a great asset here. Our goal is to configure our Spring Boot application to communicate with a MySQL database. You will learn how to add the necessary dependencies and, most importantly, how to set up the connection details in the application.properties file. This configuration is the foundation upon which all our future database interactions will be built.
From Volatile Memory to a Persistent Database
So far, our application's state has been volatile. A HashMap is fast and simple for prototyping, but it only exists in the application's memory (RAM). For any real service, we need data to persist even when the application is not running. This is the role of a database. We will be using MySQL, a powerful and widely-used relational database management system (RDBMS).
To bridge the gap between our object-oriented Java code and the relational tables in MySQL, Spring Boot uses a technology stack that includes:
- JPA (Java Persistence API): A standard specification that describes how to manage relational data in Java applications. It provides a set of interfaces and annotations.
- Hibernate: The most popular implementation of the JPA specification. It's the engine that does the actual work of converting your Java objects into SQL queries and vice versa. This is a type of tool known as an Object-Relational Mapper (ORM).
- Spring Data JPA: A Spring module that makes it even easier to work with JPA by reducing the amount of boilerplate code you have to write.
Our first task is simply to establish the connection.
Step 1: Preparing the Database and Project Dependencies
Before we can configure the connection in our code, we need two things: a database to connect to and the necessary libraries (drivers and frameworks) in our project.
First, ensure your local MySQL server is running. Then, using a tool like MySQL Workbench or the command-line client, create a new database for this project.
Spring Data JPA Tutorial - #6 - Connect Spring Boot Application with MySQL Database
The Java Guides channel provides a very clear, step-by-step walkthrough. This first short clip shows how to create a new database schema in MySQL Workbench.
Watch the segment from creating the database. For our project, let's name the database group_manager_db instead of e-commerce.
Next, we need to add the required dependencies to our pom.xml file. These tell Maven to download the necessary libraries for database interaction.
Database Integration (JPA, Hibernate, MySQL, H2)
This article from GeeksforGeeks clearly outlines the dependencies required for MySQL integration.
In the "Step 1: MySQL Integration" section, find the part labeled 1. Add the Dependencies. You will need to add these two dependencies to the <dependencies> section of your pom.xml: spring-boot-starter-data-jpa: This pulls in all the core libraries for Spring Data JPA and Hibernate. mysql-connector-j: This is the official JDBC driver that allows Java applications to communicate with a MySQL database.
After adding these dependencies, your IDE should prompt you to reload your Maven project. Once that's done, your project will have all the necessary tools to proceed.
Step 2: Configuring the Connection in application.properties
The central place for external configuration in a Spring Boot application is the application.properties file, located in the src/main/resources directory.
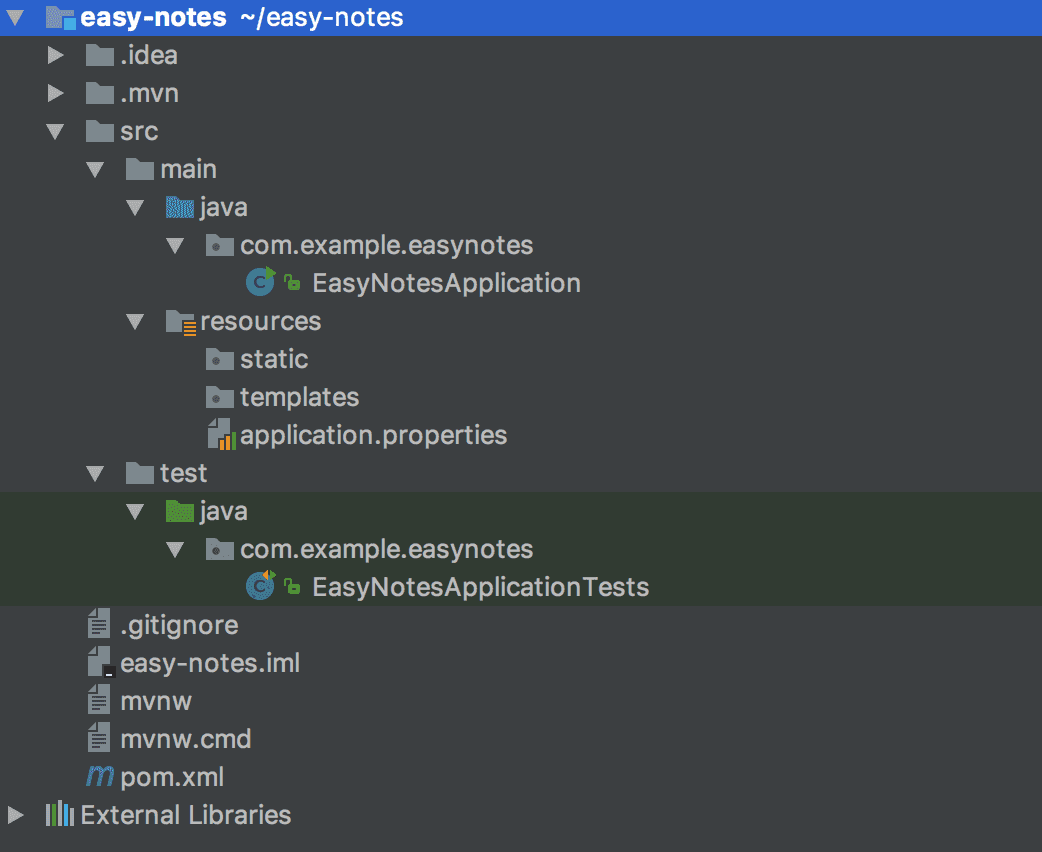
The application.properties file is the standard location for configuring your application's behavior, including database connections.
We will add a set of properties here to tell Spring Boot how to find and connect to our MySQL database.
Spring Data JPA Tutorial - #6 - Connect Spring Boot Application with MySQL Database
This video provides an excellent and detailed explanation of each property we need to add.
Watch the following segments carefully: Datasource Properties: This covers the three most fundamental properties: the URL, username, and password. Pay close attention to the structure of the JDBC URL. Driver Auto-configuration: This explains a key benefit of Spring Boot—you don't need to specify the driver class name manually. Hibernate Properties: This introduces two crucial Hibernate settings: the dialect, which tailors SQL for MySQL, and ddl-auto, which manages the database schema. The explanation of the update value is particularly important. SQL Logging: This shows how to configure properties that make Hibernate log the SQL it generates, which is extremely helpful for debugging.
Let's break down the key properties you just learned about:
spring.datasource.url: The JDBC connection string. It follows the formatjdbc:mysql://<host>:<port>/<database_name>. For a local setup, this will typically bejdbc:mysql://localhost:3306/group_manager_db. You can also add parameters like?useSSL=falseif needed.spring.datasource.username: The username for your MySQL database (commonlyrootfor local setups).spring.datasource.password: The password for the specified user.spring.jpa.hibernate.ddl-auto: This property controls Hibernate's behavior regarding the database schema. The valueupdatetells Hibernate to check the database schema against your Java entity classes (which we will define in the next lesson) and automatically add new tables, columns, or constraints as needed, without destroying existing data. This is very convenient for development.spring.jpa.properties.hibernate.dialect: This tells Hibernate which "flavor" of SQL to generate.org.hibernate.dialect.MySQLDialectensures the generated queries are compatible with MySQL.spring.jpa.show-sql=true: A useful debugging tool that prints every SQL statement generated by Hibernate to the console.
Here is what the properties file will look like when you're done:

An example of the completed configuration for a MySQL database connection in Spring Boot.
Hands-On Application: Connecting Your Project
Now, let's apply this to your group management project.
-
Ensure MySQL is Ready: Make sure your MySQL server is running and you have created the
group_manager_dbdatabase schema. -
Update
pom.xml: Open yourpom.xmlfile and add thespring-boot-starter-data-jpaandmysql-connector-jdependencies inside the<dependencies>block if they are not already there. -
Configure
application.properties: Opensrc/main/resources/application.properties. If the file is empty, add the following configuration. Remember to replaceyour_mysql_usernameandyour_mysql_passwordwith your actual MySQL credentials.# MySQL Datasource Configuration spring.datasource.url=jdbc:mysql://localhost:3306/group_manager_db?useSSL=false&serverTimezone=UTC spring.datasource.username=your_mysql_username spring.datasource.password=your_mysql_password # Hibernate Configuration spring.jpa.hibernate.ddl-auto=update spring.jpa.properties.hibernate.dialect=org.hibernate.dialect.MySQLDialect # Optional: For debugging spring.jpa.show-sql=true spring.jpa.properties.hibernate.format_sql=true
*Note: We've added `serverTimezone=UTC` to the URL, which is a common requirement to avoid connection issues related to time zones.*
4. Run and Verify: Start your Spring Boot application. Watch the console output carefully. If the configuration is correct, the application will start without errors. You should see log messages indicating that a connection pool has started (e.g., "HikariPool ... Start completed.") and that Hibernate is using the MySQL dialect. If you see connection errors, double-check your URL, database name, username, and password.
Spring Data JPA Tutorial - #6 - Connect Spring Boot Application with MySQL Database
This final clip shows what a successful startup looks like.
Watch the segment from verifying the connection. The absence of errors and the presence of logs from Hibernate and HikariCP are the key indicators of success.
Conclusion
Congratulations! You have successfully connected your Spring Boot application to a persistent MySQL database. While it may seem like a simple configuration task, this is the critical link that enables your application to store and retrieve data permanently.
Key Takeaways:
- Database persistence is achieved in Spring Boot using the stack of Spring Data JPA, Hibernate, and a JDBC driver.
- Configuration is centralized in the
application.propertiesfile. - The essential properties define the database URL, username, and password.
- Hibernate-specific properties like
ddl-autoanddialectcontrol how the ORM interacts with the database schema and SQL generation. spring.jpa.show-sqlis an invaluable tool for seeing the SQL queries Hibernate runs on your behalf.
Now that the communication channel to the database is open, our next step is to define what data we want to store. In the next lesson, you will learn how to map your Group Java class to a database table using JPA annotations like @Entity and @Id.